For a special occasion, such as the birthday of a loved one, you always want to choose a greeting card that will make a good impression and will be remembered for a long time. But in stores decent specimens are rarely found. Therefore, you can try to impress your friends with a handmade postcard. There are many ways to do this at minimal cost and without much effort. The main thing is not to tell loved ones about how easy it was for you to make this gift.
Volumetric postcard "Happy Birthday" do it yourself
Let's try to create a voluminous card with a congratulation that will look not only beautiful, but also much more complicated than it actually is.
For her you will need:
- cardboard sheet;
- several sparkles or sequins;
- twine;
- PVA glue;
- paint in the spray can.
Thick colored paper or cardboard may also come in handy. It can be purchased at a needlework store or at departments where gifts are packaged.
For decorating postcards we will use images of balloons. You can make them in several ways. Balloons - a symbol of dreams, creativity, freedom of expression, flight of fantasy. The first option for making such voluminous do-it-yourself birthday cards is to use patterned paper. Optionally, a balloon should be depicted on it. Any ornament, for example, in a cage, will do.
In order to smoothly cut the balloon, you can use a stencil. Take an ordinary simple pencil and transfer the picture from any suitable picture through tracing paper to thick cardboard. If you can draw by hand, it becomes even easier - draw a balloon right on paper. It remains only to carefully cut it along the contour.
How to make a volumetric inscription on a postcard
We continue to issue the card. The main decoration element for the do-it-yourself volumetric greeting card “Happy Birthday” is ready. Now we will create a congratulatory inscription. By the way, you can use this idea not only for your birthday, but also to please your loved one on any other holiday. Just change the label and part of the decor. For example, instead of a balloon, make flowers out of paper. It is not difficult, but the card will turn out very beautiful and spectacular.
When your paper balloons are ready, set them aside. Take a regular newspaper to protect the work surface from paint. You will also need glue and twine to lay out a congratulatory inscription.
To do this, follow a few simple steps:
- Cut a thread long enough for each word.
- Moving along the lines, apply glue. Wait for it to dry.
- Paint the resulting words with spray paint. Choose a color to your taste. Done!
Another option is to make an inscription from thick paper and cut it out using a clerical knife. Importantly, do not forget to put a wooden board, otherwise spoil the table. Cut a few more pieces of twine and process them in the same way to make ponytails for balloons. Now it remains to collect your handmade DIY three-dimensional postcard “Happy Birthday” to make a single composition from disparate elements.
How to assemble a picture
Getting to the final stage. Cut a rectangle out of cardboard to make the base of the card. Then glue the ponytails to the colorful paper balloons. Use sequins and sparkles for additional decoration. Think over the composition and stick the balloons to the card, and place the inscription below. Volumetric card "Happy Birthday" with your own hands is ready! It remains to write a congratulation on the back and give it to the birthday man.
Volumetric card with pompons
Consider another option for creating a greeting card. Make it a little harder, but only if you decide to make all the elements yourself. Get ready to create something unusual with your own hands - voluminous postcards from paper with pompoms from yarn.
For work you will need:
- basis for a postcard or a sheet of thick cardboard and paint;
- special device or cardboard circles for creating pompons;
- craft paper with a pattern;
- double-sided tape or mounting tape;
- yarn of four colors;
- scissors.
You can make almost all the elements of this greeting card yourself. Do it yourself do-it-yourself volumetric postcards for children they will definitely like. But a child can create them together with their parents. It will be not only fun, but also useful. Creativity and paper cutting develops not only imagination, but also fine motor skills of the hands. Therefore, if you are a parent and want to have an interesting time with your child, and the card is not intended for him, you can safely call your baby to be creative together. And if you are a child and want to make a postcard for your friend, call your mom and dad.
Only brown kraft paper with a pattern will not be easy to find in every home - you will have to purchase it separately. Ready-made pompons, white or patterned cardboard are sold in many departments, where there are goods for needlework and stationery. But you may have to look for an option that is right for you.
Necessary materials
In this lesson, each element can be made with your own hands: volumetric postcard templates can be found on the Internet and printed, and pompons can be made from ordinary wool or acrylic yarn. Cards with a simple monochrome pattern, for example, in small peas, will look stylish and will not attract attention from the central composition.
How to choose yarn
On our handmade do-it-yourself birthday card, there will be mouth-watering balls of ice cream. We will make them from thin yarn of four colors. You can take any shades, but it is better if the shades are combined with each other and with the color of the card, if you chose a non-black and white template.
In order to assemble the composition, you need a double-sided tape or mounting tape. You can also use a glue gun, but sometimes stains and uneven drops remain from it. And this will ruin the look of the postcard. Therefore, if there is no mounting tape, it is better to use ordinary PVA glue. If you want to add a highlight to your greeting card, use curly scissors.
How to make ice cream balls from threads
We start by creating pompons. First make a blank - two identical cardboard rings with a hole in the center. There are special slingshots for the same purpose, if they are in your house - use them. More magnificent pompons are obtained if the difference in diameter of the circles is large. Then wind the yarn around the rings, pushing the thread through the center. The more yarn, the fluffier the product. When the ring is completely filled, thread sharp scissors between the circles and cut them, and then fasten the threads with knots. Cut the cartons themselves and remove. It remains to trim the threads - and the pompom is ready. We make 4 different pompons - these will be our ice cream balls.
How to make a do-it-yourself 3D postcard
Now you need to cut a cup out of craft paper. This is a regular elongated triangle with rounded edges. For convenience, you can use the ruler to make the edges of the cup smooth. If you did not find paper with a pattern, apply it yourself using a pencil. Simple and even rhombuses will be enough, but you can come up with a more complex ornament, if you want. Then a do-it-yourself volumetric postcard in the photo will look neat, and no one will guess that you created it yourself.
Take double-sided tape and proceed with assembly. Glue the cup first, and then place the pompons over it as close to each other as possible. Press them on top with your palm for better fixation. If the base of your card was without a congratulatory inscription, add it using a liner or brushpen.
Greeting card with volumetric flower inside
We examined options for how to make different convex elements from the outside. And now we will learn how to create volumetric cards with your own hands step by step with paper figures inside. The easiest option is the flowers. In order to make them, you will need a special template, an example of which you can find below. Despite the apparent complexity, even a child will cope with such crafts. Parents can help kids cut something, but this is not necessary.
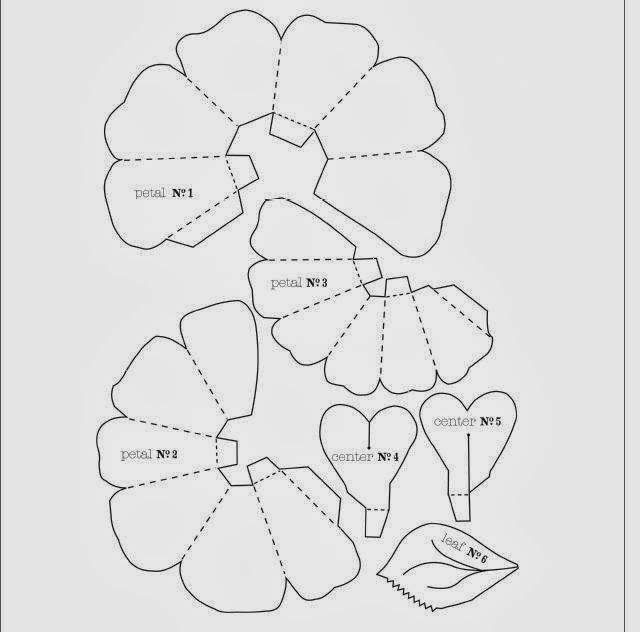
So, how to make a bulk postcard with your own hands with a flower inside? You will need colored paper for it, but if you wish, you can take a regular A4 sheet for the printer and colorize it. Then the flowers will be even more unusual. Then we print out the template, cut the blanks on it and fold them as shown in the picture. Do-it-yourself postcards, voluminous inside, are not as difficult to make as they seem. The main thing is to follow the instructions and fold the paper correctly so that it unfolds in the shape of a flower. And also - correctly fix the element on the basis for the postcard. This can be done using special beacons.
Panoramic greeting card with a vase or flower pot
The previous option was simple. If you are ready to spend a little more time, you can try to make it not just with one flower, but with a whole bouquet. To do this, you need a base for a postcard made of cardboard, in the center of which you need to draw a 3 x 7 cm rectangle. Make cuts along vertical lines using a clerical knife. And then bend it in half so that it is inside the card. We got a base for a pot or vase.
Now we begin to create a decor. Here you can not limit yourself and use flowers, insects and other elements of different sizes and shapes, focusing on your taste. The main thing is that together the composition should look harmonious.
Volumetric composition design
Make a pot of colored paper and stick it on the front of the curved rectangle. Its size should be larger than the base in order to conveniently place the decor. Think over the composition, cut out the details with scissors or using a clerical knife. Then connect the individual elements, place them behind the pot and glue. Flowers do not have to be placed on one layer. If you do a few, the card will look more interesting. Just make sure that neighboring elements do not overlap each other too much. You can additionally decorate the card with stickers, grass cut out of colored paper, or draw butterflies by hand.
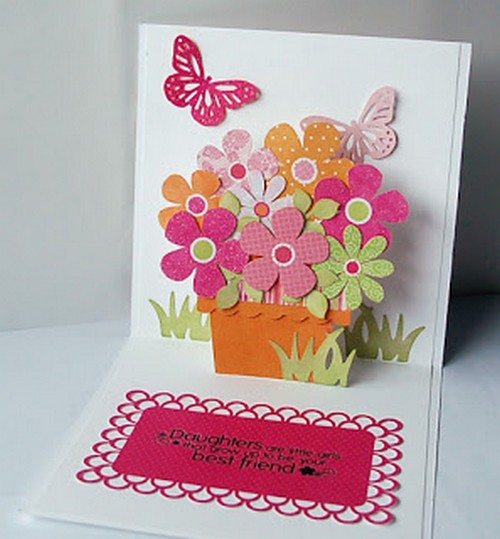
When everything is ready, check how the card will look closed. Think about how you can decorate it on the outside. Will a simple congratulatory inscription be sufficient or is it desirable to do something else. For a volumetric postcard with a bouquet, for example, on the front part a window is sometimes made through which a part of the composition is visible. It is simply cut out, sometimes adding a frame of brown paper or a curtain, decorating them with ribbons and beads. Do not be afraid to experiment and create original volumetric postcards. So you will delight not only your loved ones, but also yourself. Indeed, little can be compared in the pleasure of the process with creativity and needlework.