Origami art is multifaceted and allows you to do a lot of interesting things. We suggest you learn how to collect lotus origami in three ways.
Single leaf flower
Master class on how to make lotus paper in origami technique:
- Fold a square sheet of paper in half two times (Figure 1).
- Flatten the leaf and wrap the four vertices toward the center (Figure 2).
- Wrap the vertices to the center again (Figure 3).
- Flip the part to the other side (Figure 4).
- Wrap the four vertices in the middle (Figure 5).
- Bend the tips slightly (Figure 6).
- Turn the figure over to the other side again (Figure 7).
- Unscrew the petals and twist them (Figure 8).
- Unscrew the petals again and straighten the figure (Figure 9).
Wonderful origami lotus is ready!
Flower with several details foliage
To make such a lotus origami, as in the picture below, you need to take a few green and pink sheets of paper.
Operating procedure:
- Fold one green piece of paper in half in length (picture 1).
- Spread out the sheet.
- Wrap the edges to the middle to form triangles on both sides (picture 2).
- Fold the top and bottom sides to the fold line (picture 3).
- Fold in half the part (picture 4).
- Fold the two pink sheet pieces in the same way (Figure 5).
- Fold the white parts in half in the opposite direction (picture 6).
- You got one green detail and two white ones (picture 7).
- Fold the details together. Green should be at the bottom (picture 8).
- Make eight such blanks and fold them all together (Figure 9).
- Tie the pieces in the middle with a thread.
- Spread the parts in different directions and carefully unfold the petals (pictures 10, 11 and 12).
Origami lotus with leaves is ready!
Modular Origami Lotus
First you need to build the modules:
- Slice the same rectangles.
- Fold the rectangle in half in length (Figure 1).
- Fold it in half again (Figure 2).
- Wrap the right and left sides to the convex fold line (Figure 3).
- Wrap on the back of the edge of the “wings” (Figure 4).
- Flip the part to the other side and bend the corners on the left and right sides (Figure 5).
- Fold the part in half (Figure 6).
- You got the first module (Figures 7 and 8).
To create a lotus, you need 318 green modules, 240 light pink, 126 dark pink and 50 yellow.
Flower assembly process
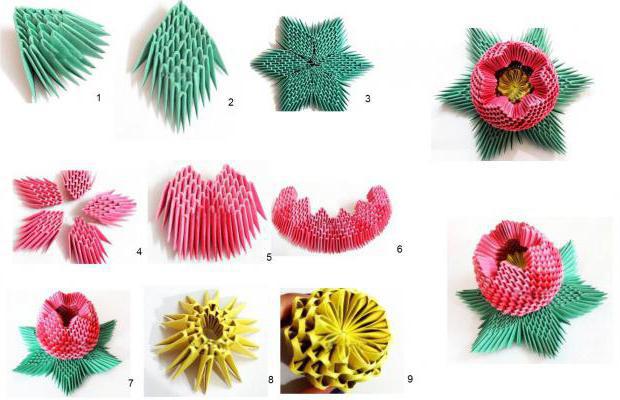
- Put one green module and put two on top of it.
- Continue to line up in this way until you have seven green modules in one (picture 1).
- Now you need to add the green modules in descending order, that is, in each subsequent row there will be one less detail (picture 2).
- Make only six of these sheets and fasten them together with additional modules (picture 3).
- Now we collect the flower itself.
- Take the light pink modules and fold them in the same way as the green leaf. Only the maximum number of parts in a row should not be seven, but five.
- Fold five more of these light pink petals (Figure 4).
- We begin to connect the petals to each other. To do this, put the two parts side by side and fill the space with dark pink modules (picture 5).
- Fold all the petals in such a way that they form one row (picture 6).
- Then roll up the row, connect its ends and place on a pillow of leaves (picture 7).
- Make the core of the lotus. To do this, fold the ring of yellow modules in three rows (Figure 8).
- Fist the last row and add two more (Figure 9).
- Insert the yellow part inside the petals.
The gorgeous origami lotus is ready!
You can use paper in completely different colors and textures.
Idea: if the core is not placed inside, then the craft can be used as a box or an original vase.