For many years, a pencil skirt has not left a leading position in the fashion world. This is a universal wardrobe item that every woman should have. Such a skirt fits any type of figure, creating an attractive feminine image. In addition, the same skirt can be part of the business image during the day, fully matching the dress code of the company, and in the evening can become the basis of a romantic or defiantly sexy image.
Everyone can sew such a skirt with their own hands, since the technique is quite simple. And, of course, this will be an ideal option for women with a non-standard figure. However, since it is impossible to sew a pencil skirt without a pattern, we will dwell on it in more detail. Before you begin to work, you should choose which skirt to sew. The number of measurements, calculations and constructions will depend on this.
Skirt Options
There are a lot of models of pencil skirts, but all of them invariably have a narrower silhouette. In the classic variation, its length may be slightly higher or lower than the knee, but also shorter options can be found. In the same year, narrowed skirts up to the middle of the calf came into fashion, and floor-length skirts remained popular.
You can wear such skirts not only with classic shirts.
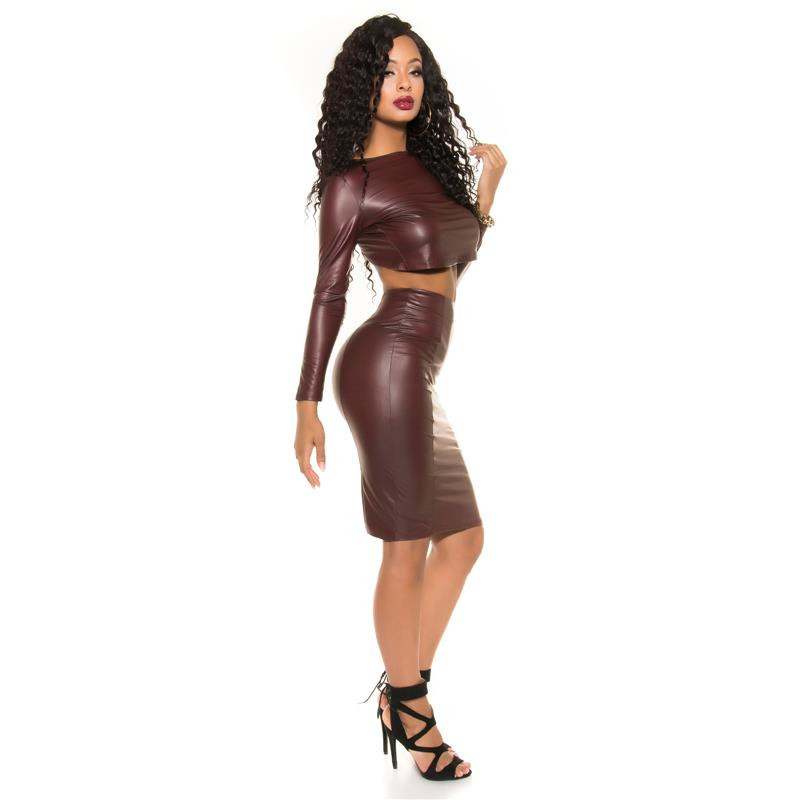
For example, a leather pencil skirt in combination with a bustier will help create the image of a fatal woman, dangerous and attractive.
A light lace skirt with an airy sleeveless blouse looks great in a romantic way. It is ideal for exploring the summer park and having breakfast in the outdoor cafe.
A long knitted pencil skirt can be worn with a sports jacket and sneakers or massive sandals. This will create a bit of a hooligan image, but at the same time emphasize the fragility of the girl.
The combination of a pencil skirt and a leather jacket will create a bright rebellious look, which is great for an evening walk around the city.
And, of course, do not forget about the classic combination of a pencil skirt that covers knees, a gas blouse and a straight double-breasted jacket. This is an immortal classic in the style of Coco Chanel. This combination is relevant for both office work, and for romantic dates and official meetings.
Measurements and calculations
To make it easier to build a pattern of a pencil skirt for beginners, it is better to make all measurements and calculations in advance. This will significantly simplify the task, save time and eliminate most of the possible errors. It is necessary to measure very carefully, without adding or decreasing the cherished centimeters. It is worth remembering that this skirt will need to be worn later.
So, to create a pattern of a pencil skirt, you will need the following parameters:
Title | Abbreviation | Calculations | Note |
Waist circumference | FROM |
Hip girth | ABOUT |
Thigh height | WB | Distance between OT and OB |
Length of the product | DI |
Waist height | VT | distance between classic and desired waist height |
High Waist Body Girth | Answer | for high waist models |
Front bar width | SHP | = 0.241 * AB | + = ½ RP + 1.5 cm |
Back bar width | SHZ | = 0.275 * AB |
Tucks are common | IN | BO = ½ (OB - FR) |
Side tucks | BV | BV = 1/3 VO |
Front tucks | PV | PV = 1/3 (VO - BV) |
Rear tucks | ST | ST = 2/3 (IN - BV) |
Tuck reduction | HC | (OT - OT) / 12 | For high waist models |
Slot height | VS | VS = DI * 0.6 |
After completing the calculations, they must be double-checked again to avoid errors, and you can proceed directly to creating the pattern itself.
Building a universal pattern
Any skirt can be sewn using a base pattern. On it, the main parameters and the location of the grooves are noted, therefore, after making several additional touches, it is easy to turn it into a pattern for any type of skirt.
In order to make a universal pattern of a pencil skirt, you will need:
- a sheet of paper (millimeter, A1 format or a cut of wallpaper);
- pencils (hard and soft);
- eraser;
- ruler.
Before you start drawing a pattern, it is better to compare the centimeters on a ruler and a measuring tape, which was used to measure the parameters. It is actually very easy to make a pattern, the whole process takes about 15-20 minutes.
Work grid
The construction of the pattern begins with the creation of a working grid. Here, the length of the skirt, its width, the line of the side seam and the height of the line of the hips are noted.
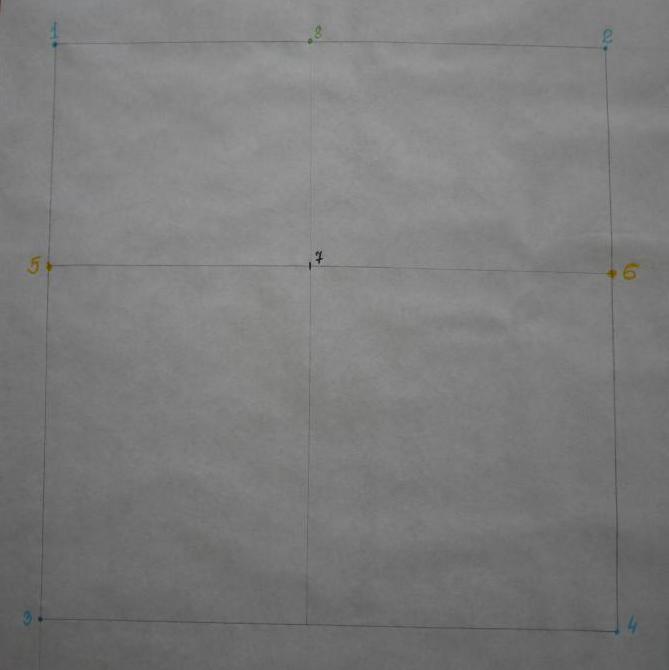
- Spread a sheet of paper on a flat surface. Its width should be at least half OB + 20 cm.
- To retreat from the left edge of about 5 cm. To build a pattern of a pencil skirt with a high waist from the upper edge of the sheet, you will need to retreat 15-20 cm. When building a pattern with a classic waist line, it is enough to retreat 1.5-2 cm. Set point 1.
- From point 1, lay to the left ½ OB + 1.5 cm (point 2) and down the CI (point 3). Connect to a rectangle with vertices 1234.
- From points 1 and 2, lay down the WB parameter (points 5 and 6) down and connect them with a straight line.
- On line 5-6 from point 5, measure to the left the distance equal to the NR parameter (point 7). Segment 7-6 should be equal to SHZ. Draw a straight line through point 7 parallel to line 1-3 until it intersects with lines 1-2 (point 8) and 3-4. 1/2 of the front rectangle will be located on the left side of the base rectangle, and 1/2 the back of the skirt on the right.
Undercut
In order for the skirt to fit well on the woman, it is necessary to make recesses. As a rule, there are only 4. There are 2 each in the front and back, as well as a decrease in the side seam. For a knitted pencil skirt, undercuts are not necessary, since the fabric stretches well and takes the desired shape, but even it is necessary to remove the excess volume in the side seams.
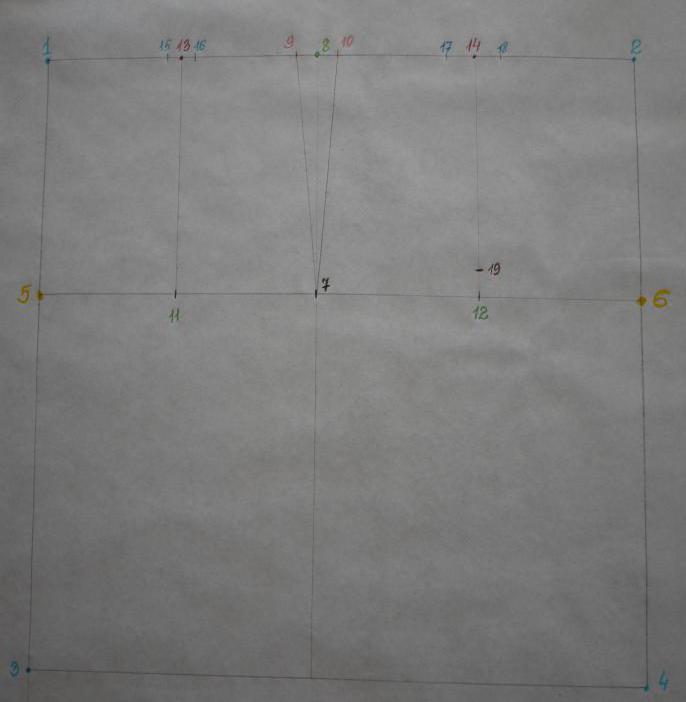
- Set aside 1/2 BV + 0.5 cm from point 8 on both sides. From the resulting points, step back 1 cm (points 9 and 10).
- From points 1 and 5, measure to the right the distance equal to half of the steampunk (points 13 and 11), connect them with a straight line.
- From points 2 and 6, measure to the left a distance equal to ½ (points 14 and 12) and also connect them with a straight line.
- From point 13 to the left and to the right, put off segments equal to ½ PV (points 15 and 16). Connect the dots in the following order: 15, 11, 16 and 9.
- From point 14 to the left and right, measure half the parameter of the pollutant (points 17 and 18). From point 12 on the segment 12-14 put 2 cm upwards (point 19). Connect points 10, 17, 19 and 18.
At this stage, the construction of the basic skirt of a straight cut is completed. Based on this pattern, a pencil skirt pattern is further constructed.
Bottom of the product
A pencil skirt differs from a straight-cut skirt with a silhouette narrowed to the bottom edge. It resembles a cone-shaped section, which is obtained by sharpening a pencil. To give such a silhouette to the product, it is necessary to make another decrease along the side seam, but from the bottom.
- From point 7 down, measure 8 cm (point 22).
- On line 3-4 from the point of intersection with the straight line 7-8 to the right and left, put aside 1/4 of the desired decrease in the width of the product. Typically, these values are between 1 and 3 cm (points 20 and 21).
- Connect points 20, 22 and 21.
Do not make the bottom of the product too narrow, since in this skirt it will be necessary not only to stand, but also to walk and sit. Even if a slot is provided, an excessively narrow bottom will stretch it, as a result of which it will not look neat.
Slot
This is an integral part of most pencil skirt models. Slot can be of 2 types: open and closed. Usually they are located in the center of the rear half of the product, but there are also slots in the center or slightly on the side of the front of the skirt. Its location depends on the model of the skirt. A skirt with a classic slots arrangement usually consists of 3 parts. The front part of the skirt is usually solid, and the back consists of 2 halves, and has a seam in the middle. This should be taken into account when cutting, and do not forget to make an additional allowance for seams.
For beginners, the pattern of a pencil skirt is best done with an open type of slots. It does not require additional patterns, but in order to do it, it is enough to flash the back seam, not reaching the lower edge of the upper seam + allowances for the lower seam. Next, iron the seam so that the edges of the fabric are spread in different directions, after which it remains only to flash the future slot along the contour, stepping back from the edge 2-3 mm.
But the construction of the pattern of a pencil skirt with a closed slot will be slightly different from the creation of the basic pattern.
- From point 4, postpone the upper axis (point 23), and from it another 1.5 cm (point 24).
- From point 4 and 23 to the right, set aside 2 widths of the smell of the undercut, the value of which is usually 2.5 to 4 cm (points 25 and 26). Connect the resulting points. This will be part of the slots of one half of the back of the skirt. In the second half, the slot should be 2 times narrower (points 27 and 28).
- Connect points 24 and 26, as well as 24 and 27, with a smooth line. This will facilitate the processing of the edges of the material, and will also prevent deformation of the fabric.
The location of the zipper closed by a valve, for example, as on jeans, is plotted on the same principle.
High waistline
To build a pattern of a pencil skirt with a high waist, additional parameters will be required, such as the desired waist height, body circumference at this height, as well as a decrease in the width of the undercut.
- From point 1 up, set aside the distance between the classic and the desired waistline (point 1a). Also transfer points 2, 9, 10, 15, 16, 17 and 18 (points 2a, 9a, 10a, 15a, 16a, 17a and 18a, respectively).
- From points 9a, 15a and 17a, put to the right, and from points 10a, 16a and 18a - to the left the value of HC. Connect the resulting points with the points of the base pattern.
If you need to make a pattern of a pencil skirt with a low waist, you only need to measure the distance from the top line of the base pattern to the desired waist line, and then draw lines parallel to the lines on the original pattern.
Long skirt
A pencil skirt can be of various lengths, but their patterns are not fundamentally different. For example, to create a pattern of a long pencil skirt based on the base, you need to make only a few corrections.
- From points 1 and 2, lay down the DI of the long skirt (points 3a and 4a) down. Connect them with a line.
- From the intersection of line 3a-4a with line 7-8, set aside 1/4 of the desired decrease in the width of the skirt (points 20a and 21a), connect them to point 22. If the line connecting them is straight, then the skirt will be narrowed, but at the same time fairly loose silhouette. To achieve a better fit, lines 20a22 and 21a22 must have a hyperbolic appearance.
The slots for such skirts are built in the same way as in the basic pattern, only its length will change.
You can also do the length below the knee. In this case, a pencil skirt will turn out in the style of Coco Chanel. As this great woman said:
You can show your hips - but not your knees!
Waistline processing
The waist line on the skirt can be processed in several ways. The most popular are:
- belt,
- tailoring,
- wide elastic.
It is necessary to choose one or another option, starting from the model of a pencil skirt. Let's consider them in more detail.
Belt
To sew a pencil skirt with a belt, it is necessary to carve out an additional part of a rectangular shape, the length of which should be equal (FROM + 3 cm) + increase in overlap (about 3 cm). The width of the part should be twice as large as the desired width of the belt. When cutting parts, you must remember to make allowances for the seams.
Sew the finished part to the upper edge of the skirt, placing the part face to face of the skirt, then bend it up and iron the seam. The edges of the parts should look up. Then fold the belt in half and, bending the edge inward, to sweep. To make it more convenient to sew it, the height of the belt from the wrong side should be 5 mm more than from the front. Bend its ends inward and flash the part along the perimeter from the front side.
Tailoring
This type of waistline processing requires some skills, as well as accurate patterning.
- To do it, you need to transfer the top of the skirt pattern to a piece of paper. You can choose any height for the trimmer, but do not make it too short, otherwise it will turn out.
- Cut the resulting details. There should be 2: from the front and back of the skirt. Connect the undercut lines on each part using glue, paper clips or pins.
- Trim protruding corners, transfer to paper with a skirt pattern, or cut using these blanks.
When cutting parts directly, it is worth remembering that this is only half, so you should indicate the fold line on the pattern and do not forget about the allowances for the seams.
Wide elastic
This is the easiest way to process the top edge. It is perfect for both knitted and leather pencil skirts, as it avoids adding extra centimeters to the waist, in contrast to decorating the product with a belt. In order to process the top of the skirt, it is enough to measure the length of the elastic, equal to OT + 4 cm per hem. The edges of the gum are slightly fused, stitched, departing from the edge of 2 cm. Then, spread the edges in different directions and sew them, departing from the edge by 3 mm. It is also possible to make an elastic band on a fastener, a lightning or buttons. Sew the resulting belt to the upper edge of the skirt. It can be placed behind or in front of the product web. But in any of the selected options, you need to stitch them by overlaying one part on another. In addition, it is worth choosing a knitted seam, zigzag or the widest step on the sewing machine so that when the elastic is stretched, the seam does not break.
Every woman has the opportunity to sew a skirt that will fit perfectly, have exactly the color and texture that is more like it, while it will not have copies. According to the presented pattern, both an experienced seamstress and a girl who is just beginning to learn the nuances of creating clothes with her own hands will be able to sew a pencil skirt. Only once having made a universal pattern can you sew many skirts of different colors and styles, spending no more than 5 minutes on their detailed patterns. Do not be afraid to experiment, because this is how real masterpieces are born in the fashion world.