Many music lovers know the situation: a loudspeaker installed in one of the speakers suddenly starts to “wheeze”. An external examination does not give anything, with a “tinkle” the tester shows the active resistance indicated on the label , but the sound is annoying, sometimes making it furious. Especially such a malfunction is characteristic of low-frequency speakers with a large stroke. What is the matter?
In an ordinary radio workshop, they will advise you to simply replace the speaker with a new one. This is a solution to the problem. It is simple but expensive. You can buy a good powerful head, and even a branded one, but it costs a lot. It will always be in time. In the meantime, you can try to repair the speaker with your own hands.
As a rule, wheezing arising from the reproduction of the bass spectrum of sound frequencies is caused by short-term disturbances in the contacts connecting the coil with the speaker cable. In a place where thin, literally hairy wires glued to the surface of the diffuser are connected to thicker elastic cables leading to the block, tin metal fatigue gradually accumulates during sound reproduction.
Repairing the dynamics of the subwoofer, and he most often suffers from this disease, is simple, but requires accuracy. Usually the connection point is flooded with a drop of compound, so it must be very carefully picked up, preheated with a soldering iron. After the connection is exposed, the contact should be very carefully and quickly soldered. After checking, if everything is in order, the repair site should again be filled with an insulating compound, nail polish or viscous glue.
Repair of the speaker may also be necessary in those cases when restoration of vintage or antique radio equipment is performed, over the age of more than half a century. For example, someone got an old post-war American tube receiver. The condition is quite operational, but the diffuser is badly damaged. You can, of course, just replace the speaker with a similar modern one. But you want to achieve “that” sound, feel the time. In general, there is a desire to preserve as many of the original elements of the circuit as possible.
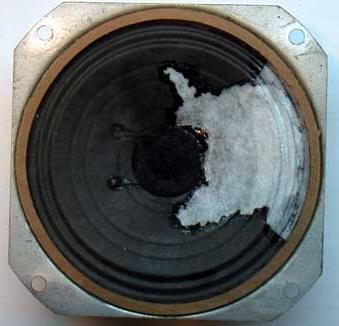
Repair of a speaker with a broken or torn cone is done by sizing. The best material for applying such a patch is a filter for a coffee maker. Scissors should cut the patch in such a way that it matches the shape of the missing fragment with an overlap of half a centimeter. Since stiffness is a good quality diffuser, the restoration part is best glued to it with acrylic nail polish. In the same place where its edge adjoins the ring holder, the rigidity, on the contrary, is inappropriate, the course should be as free as possible, therefore it is recommended to restore the semicircular edge with rubber glue, like "eighty-eighth". We can assume that the repair of the speaker is over, it remains only to let the varnish and glue harden and polymerize.
A frequent malfunction of the loudspeakers is the wear and failure of the corrugated annular suspension, which is usually made of porous rubber and holds the diffuser along the edge. Repair of the speaker in this case consists in removing the old one and gluing a new elastic ring. Kits for this procedure are sold, however, it should be borne in mind that only expensive speakers deserve such painstaking restoration work , you should not bother with cheap ones.