It happens that one wants to update the interior, but it is not known where to start. Sometimes you just need to change the lighting. But buying a new lamp is expensive, and in some cases it is not even required. We invite you to consider several workshops on how to update the lampshade of a table lamp with your own hands.
What you need to create lampshades
Do it yourself with any materials you can update lampshades for table lamps with your own hands:
- cloth;
- artificial flowers;
- skin;
- thread and rope;
- paper and so on.
It is also imperative to have tools such as scissors and a glue gun.
A simple and original way to decorate an old lamp
Such lamps are very well suited for a feminine interior in chic style. To give the lampshade such a look, take the following materials:
- shade;
- artificial flowers (flower stalks can be bought in stores for creativity, but you can buy bouquets and cut off caps from them, sometimes it turns out cheaper);
- glue gun;
- scissors.
A master class on how to update a lampshade for a table lamp with your own hands:
- Cut off the excess parts of the stem from the flowers, leaving only a cup that connects the petals.
- Heat up the glue gun.
- Put a little hot glue on a cup of one peduncle and glue it to the lampshade. Start at the top or bottom. Glue flowers either in a circle or in rows, tightly pressing them to each other.
- Hot glue dries quickly, so work carefully.
- When you glue the whole lampshade, fluff the flower petals.
Tip: interesting do-it-yourself lampshades for table lamps with your own hands are obtained by combining several shades of colors that flow smoothly.
Geographic lampshade
Such a lamp will look great both in the living room and in the child’s room.
You will need:
- shade;
- map;
- tape;
- PVA glue;
- some water;
- brush;
- glue gun.
Master class on how to make geographic lampshades for table lamps with your own hands:
- Prepare a map. You can buy it in a store, print it, or it can be special sheets for decoupage.
- Mark the required width on the map and cut a rectangle. If you don’t have enough to completely wrap around the lampshade, add one more piece.
- Dissolve PVA glue in a small amount of water.
- Coat the card on the back with glue and gently stick it to the lampshade. Smooth pimples with your fingers, if any.
- Wait for the card to dry completely.
- Cut off excess paper.
- Heat the glue gun and use it to glue the tape along the edge of the lampshade at the top and bottom.
Geographic lampshade is ready!
Book sheets as decor
Similarly, as in the previous mater class, you can decorate lampshades for table lamps with your own hands using book pages.
To do this, tear out a few sheets from the old book and trim their edges so that they are not shabby. Lubricate each sheet with PVA glue and stick it on the lampshade in a chaotic manner. The paper should protrude slightly around the edges. When all sheets are pasted, fold the protruding edges inward.
Warm lampshade with ombre effect
This lamp is ideal for the cold season, as it will bring a note of warmth and comfort to any interior.
List of what you need:
- shade;
- several types of yarn matching each other according to the color palette (for example, white, dark blue and turquoise);
- glue gun.
A master class on how to make a beautiful lampshade for a table lamp with your own hands:
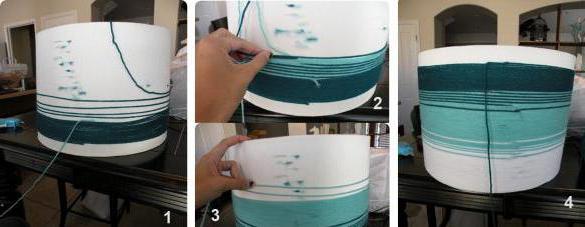
- Place a small drop of glue just above the base of the lampshade (approximately one centimeter from the edge).
- Glue one end of the yarn to the drop. Choose one that has a darker shade.
- Wrap the lampshade with yarn, trying to ensure that each new row fits snugly against the previous one.
- Wind a certain height with one color. The last turns should not fit snugly against each other, but should be at different distances, a bit randomly covering the lampshade (picture 1).
- Glue the yarn of a different color with a glue gun. The new color should be at the level of the old (picture 2).
- Winding yarn around the lampshade, this will prevent two colors in some rows. This is necessary so that the shades have a smooth transition and a striped pattern does not come out.
- When you wind the required level of yarn of the second color, make some free turns (picture 3).
- Wrap the third color of yarn, remembering to stick the tip.
- Finish wrapping the lampshade. To do this, the third yarn should go in tight rows to the edge of the lampshade, and glue the end (picture 4).
- Turn over the lampshade and wind the yarn to the end.
The warm lampshade is ready!
Lampshade with roses
You will need to take such tools and materials:
- shade;
- cardboard;
- pieces of fabric;
- green yarn;
- tape;
- glue gun;
- scissors;
- pencil.
A master class on how to decorate a lampshade for a table lamp with your own hands (a photo of the process is attached):
- Draw floral leaves on the cardboard, and then cut them out (picture 1).
- Glue the green yarn to the edge with a glue gun (picture 2).
- Wind the yarn tightly around the leaflet (picture 3).
- Glue the tip of the thread and make a few more leaflets in the same way (picture 4).
- Cut several strips about one or two centimeters thick from the fabric (picture 4).
- Fold one strip in half, dripping a little glue inward along the entire length (picture 5).
- Twist the strip tightly, sometimes dripping glue on the edge so that it does not come apart (pictures 6 and 7).
- Spread a bit of the edge of the figure, and you get a rose (picture 8).
- Make several roses of different sizes in the same way.
- Gently glue the roses onto the lampshade (picture 9).
- Do not forget to glue leaflets in some places under the roses.
Volumetric lampshade is ready!
New lampshade with ombre effect
To make a smooth and beautiful transition from one color to another, you need a suitable coating. To do this, it is recommended to make a lampshade with your own hands.
You will need:
- lampshade frame;
- cotton plain fabric (preferably white, beige or light gray);
- small bath or basin;
- paint (watercolor, for hair, for fabric, gouache and any other liquid);
- glue gun.
Master class on how to make a lampshade for a table lamp with your own hands with the ombre effect:
- Take the lampshade frame and fabric.
- Turn on the glue gun.
- Wrap the fabric around the lampshade and gently glue the edges. Cut off the excess fabric.
- Wrap the upper and lower edges inside the lampshade and glue them with a glue gun.
- Fill the basin or bath half with water and dilute the paint in it.
- Lower the lampshade not completely into the bath and pull it out.
- Repeat this procedure several times, gradually reducing the dipping height. Thus, the paint will be more absorbed at different levels, creating a smooth transition of shades of one color.
- Hang the lampshade in the bathroom and let it dry.
All is ready!
How to make a lampshade from scratch
The previous workshop taught how to update a tired or outdated lampshade. And what if there is nothing to work with and not even a frame? Then you can easily make a lampshade yourself.
To do this, you need to take:
- the cloth;
- masking tape;
- large ruler and centimeter;
- a piece of chalk;
- pencil;
- scissors;
- plastic sheet (can be found in hardware stores or among needlework products);
- wire rings;
- large paper clips;
- PVA glue or double-sided tape ;
- glue gun;
- special splitter for lamps (sold in lamp stores).
Operating procedure
Master class on how to make a new lampshade for a table lamp with your own hands:

- Take a centimeter and measure the diameter of your wire rings. This will be the diameter of the lampshade.
- Put a plastic sheet on the table and measure the length and width of the future lampshade on it
- Cut the marked rectangle.
- Unroll the fabric on the wrong side.
- Secure the edges of the fabric with masking tape so that it does not move.
- Cover the plastic rectangle with a layer of PVA glue or double-sided tape.
- Gently attach the rectangle with the sticky side to the fabric.
- Press the fabric against the sheet and flatten it.
- Cut off excess tissue.
- Twist the canvas.
- Glue the web with a glue gun.
- Connect the seam with clothespins and lay the part on the table.
- Put a load on top of the seam so that it does not stick out.
- Wait for the part to dry.
- Place the parts inside the top and bottom of the ring.
- Attach a special splitter to the upper ring.
- Glue the rings with a glue gun.
- Attach clothespins to the edges so that the rings stick better. Leave this item for a while.
- Glue the tape on top and bottom of the lampshade, half of which wrap inward.
- Cut a strip of fabric, tuck its edges and glue it to the seam.
- Cut two more strips of fabric, also rotate the edges and glue them on the top and bottom of the lampshade.
- Wait for all the elements to dry.
A brand new lampshade is ready!