Since ancient times, men hunted, and prey was used for various purposes. Some animals were eaten, some were skinned and laid like a carpet, and the deer’s head was hung on the wall for beauty. You feel sorry for the poor animal, but do you want decoration in this style? Learn how to make a deer out of paper!
Papier mache. Training
Using this technique, you can create almost any shape. Therefore, you should turn to her with a question about how to make a deer out of paper with your own hands. Materials:
- Newspapers.
- Duct tape.
- Scissors.
- Glue for papier-mâché (PVA).
- Paint.
- Thick cardboard (box).
- Wood base for wall mounting.
Glue for papier-mâché can be created independently. This must be done immediately before work. In a ratio of 1: 5, take the sifted flour and water, respectively. Mix until the lumps disappear. You can beat with a blender. Take three times as much water and boil it in a saucepan. Add the flour mixture. Reduce temperature, stir consistency for three minutes. Then add sugar. Allow the glue to cool, remove the emerging film.
Working process
When all the materials have been prepared, you can begin to study how to make a deer out of paper with your own hands.
- Crumple three newspaper balls of different sizes.
- Connect them together with a ribbon to form a head.
- Wrap the entire structure with a newspaper to get a smoother surface.
- Make the neck the same way. Attach it to your head with a newspaper and tape.
- From thick cardboard cut a circle with which the deer will be attached to the wall. Connect it to the neck.
- Tear the newspaper into small pieces.
- Dip each piece of paper in glue or glue mixture and put on your head.
- After creating the first layer, let the craft dry overnight, then apply a second layer.
- Cut the ears out of cardboard, glue them to your head and glue them using papier-mâché technique.
- Use a long newspaper scrap dipped in glue to shape your nose.
- Make protrusions in place for the eyes.
- To create horns, use thin branches as a shape (thick ones will not stick on your head). You can also roll thick paper to form horns.
- Paste over the selected shape with small pieces of paper.
- Paint the craft in the desired colors and attach to the wood base. This will give the product a complete look.
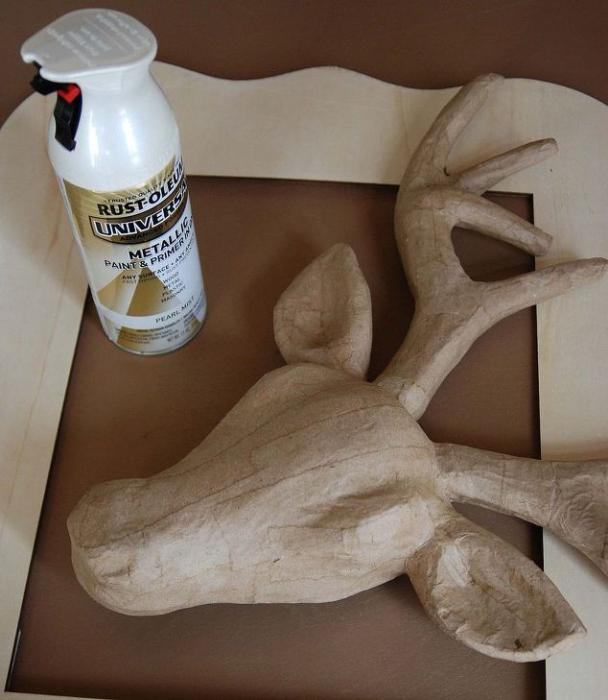
You learned how to make papier-mâché paper deer!
Prefabricated
There is a very simple way to get deer out of paper. Print the template below in the required size.
Cut out all the details and glue it on thick cardboard. The main thing is to choose the right thickness according to the dimensions of the product.
Decorate the blank in the desired color and assemble. Done!
New Year card
To complement the gift for friends on the long-awaited holiday of the year, a postcard will help. How to make a New Year's deer from paper? What do you need:
- Toy eyes.
- Red ribbon 1 cm wide.
- Red and brown cardboard.
- Pencil.
- Scissors.
- Glue.
Working process:
- Bend a sheet of brown cardboard in half and draw the body of a deer. The tail should be located on the bend. Cut out the pattern.
- Make a spout out of red cardboard.
- Glue toy eyes to the deer’s head . You can make them yourself by cutting out the appropriate circles from white and black paper.
- Create a ribbon bow and glue it on your neck.
- Write the congratulation inside, and you can attach a tag to the ribbon with the main congratulation, such as "Happy New Year", or with the name of the recipient.
Indulge loved ones with homemade postcards!
Origami
How to make a deer out of paper using the origami technique:
- Take a square sheet of paper and bend it so that you get a triangle.
- Bend again, straighten. This was necessary to create a fold line.
- Turn the top layer of the left side of the triangle into a rhombus. Turn the sheet over. Do the same with the other side.
- Bend the side corners and the remaining upper triangle to the center. Flatten.
- Pull the bottom corner and twist it into an elongated rhombus. Turn the sheet over.
- Fold the top to the bottom, return to the previous position.
- Slightly diagonally from the center, bend up the lower corners.
- Fold the triangle down, bend a small part below up and down again. Bend the triangle down at the top.
- Bend the corners sticking out from the side down, then a small part up.
- Cut the protruding triangle in half and do the same with it as in step 9.
Now you can easily create a deer in different techniques using paper!