Today there are a huge number of varieties of decorative pillows. What do the craftswomen do not do with their golden hands! And in this article we will consider the pattern of pillows "rose".
With your own hands, using our master class, you can create a very cute and stylish accessory to decorate your interior.
Which fabric to choose
Pillow "rose", the master class of which will be considered, requires the presence of a certain type of fabric and quality. Matter is better to choose a denser one. The so-called heavy tissue. If you use a light and thin canvas, it will be difficult to work, and the proper effect will not work. Since the flower itself is quite beautiful and interesting, it is better to choose a plain material so that attention is not distracted by the variegated fabric. Each detail of the flower has a back and front, which can be made from different materials. Of course, for the front part you need to use a more beautiful and expensive material, and for the wrong side you can take the fabric worse.
What else do you need for work
In addition to fabric, you will also need stuffing material. For example, batting or sintepuh. You will also need a sewing machine, iron and scissors. In some places it may be necessary to perform manual seams, so take care of the presence of needles and threads to match the color of the material. Even for the center of the flower you will need a plastic base. For this purpose, you can well use the coffee cover or cut a circle of the desired diameter from the file folder. Also need patterns. You may well be made a pattern of pillows "rose" with your own hands. Best if you take paper to freeze. But if this is not, then the usual one is quite suitable.
Pillow "rose" with your own hands. Patterns step by step
For a flower you need only four different patterns. Two petal sizes and two leaf sizes.
Now about how to make a pillow "rose" with your own hands. Patterns, photos of which are presented in this article, must correspond proportionally to each other. It is very convenient to use paper for freezing for them. Each pattern needs ten copies. What is good paper for freezing in this case? Well, first of all, you don’t have to circle the same thing ten times. The self-made rose pillow pattern is reproduced in the right amount on paper and cut out. You simply lay out the parts with the waxed side to the material and iron it. And then cut around the workpiece, retreating to allowances. And secondly, the use of such patterns allows you to most accurately lay them out on the material and thereby spend the canvas sparingly.
Cut fabric
Before cutting out all the details and applying them, the canvas needs to be ironed and folded in half or two parts together face to face. In order to prevent the fabric from moving in the process and you ultimately do not get a cut error, pin the material along the edge with pins.
In order to get a decorative rose pillow without errors and distortions, the pattern should be evenly laid and precisely cut. If you use some old clothes for sewing, then you need to undo it, remove all the threads, wash and iron well. And only then already lay out the details of the pattern on the fabric.
We sew leaves
Before us is a fully cut decorative pillow "rose". We do not need a pattern yet. And we begin sewing leaves. We should get five big leaves and five small ones. Parts must be folded face to face and stitched. After that, you should trim the excess allowance, cut the corner and make notches in convex and curved places. Leaves are not stuffed. Cutting the corner from the inside out is done so that the corner has a neat, clear shape on the front side. Turning leaves, help yourself with a wooden stick. Just do this carefully so as not to damage the fabric or seams. After all the leaves are turned out, they must be well ironed. To give them a more interesting look, lay a line, stepping back from the edge about 0.5 cm. If your sewing machine allows, then choose a decorative line for this purpose.
Create the petals
How next is the do-it-yourself pillow "rose", patterns of which were discussed above? She cannot do without petals. In our version there are only ten. Five large and five small. Each petal consists of three identical parts: the upper and lower parts are made of fabric, and the middle, which is located between them, is made of batting. Although the petals, of course, can be sewn from two parts and stuffed with filler. In the latter case, each petal will itself be voluminous, like a pillow.
Thinner petals, like leaves, are trimmed along the edge to give a volumetric effect. Now you need to collect two rings from the petals. One of the large petals, and the other of the smaller petals. To do this, lay two identical petals side by side and chop them with pins. If everything suits you in their form, then set the machine on the longest “zigzag” and sew in the place where they are most in contact with each other. Perform these actions until all five petals are closed in one circle.

Then do the same with the other five petals. If your petals are not flat, but voluminous, then they should be collected in a slightly different way. First, a base is created from two circles of matter with a synthetic winterizer or batting between them. And then the larger petals are pinned to this circle and attached using a machine. Then the second tier is overlaid with smaller petals, and the same thing is done with them. And in the original version, leaves are attached below the large flower and between the petal rings. And now it is necessary that the sewed pillow "rose" with its own hands takes on a completed look. The patterns that we learned to make in this article, we should only add one more and complete the middle of the flower.
Flower center
You probably noticed that the made pillow pattern “rose” has no details for the middle of the flower. Now we will consider how to fulfill this middle in two ways. For flat and for a volume flower. So, for a flat flower, it is proposed to make a wicker center. To do this, take a flap of square-shaped fabric and draw a net with small square cells on the inside of it. Now in a checkerboard pattern draw in the cells of the diagonal. In different rows of the diagonal, draw in different directions. Now it remains to use the needle and thread to connect the edges of each diagonal.
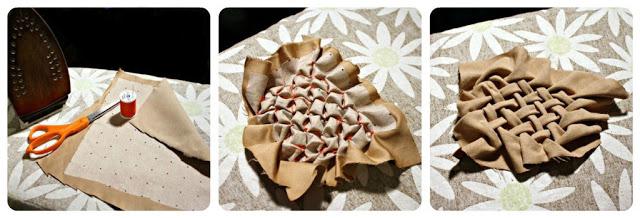
On the front side, the fabric will look like basket weaving. Now pull it all on a plastic blank and sew or just stick it in the middle of the flower. There is another variant of the middle part. This part is a long but narrow rectangle. You can even say - a strip. Two such strips of fabric should be cut. Stitch them together, twist and lightly fill with stuffing material. We need to fill so that this packing does not prevent us from folding this lane.
After the part is completed, it needs to be rolled up, giving it the shape of a rose and secured manually using a needle and thread. Now this center should be placed in the center of our pillow and sew by hand.
That's it. A wonderful pillow "rose", the master class of which we have reviewed, is ready to sit on your sofa and delight your view not only you, but also your guests. It will be a fairly attractive part of the interior. The reason for this is not the usual pillow pattern. Do-it-yourself rose from the fabric is not very difficult. Experiment with color and shape, and then your pillow will fit perfectly into absolutely any style of interior.