The Stirling engine is a heat engine in which the working fluid (gaseous or liquid) moves in a closed volume, in fact it is a type of external combustion engine. This mechanism is based on the principle of periodic heating and cooling of the working fluid. Energy extraction comes from the arising volume of the working fluid. The Stirling engine works not only from the energy of burning fuel, but also from almost any source of thermal energy. This mechanism was patented by the Scottish Robert Stirling in 1816.
The described mechanism, despite its low efficiency, has several advantages, first of all, it's simplicity and unpretentiousness. Thanks to this, many amateur designers make attempts to assemble the Stirling engine with their own hands. Some succeed, but some do not.
In this article we will look at how to make a self -made Stirling engine from improvised materials. We will need the following blanks and tools: a tin can (from a sprat), sheet metal, stationery clips, foam rubber, rubber, bag, wire cutters, copper wire, pliers, scissors, a soldering iron, sandpaper.
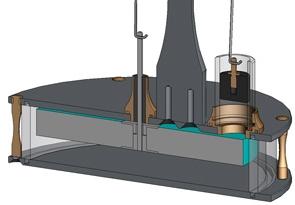
Now let's start the assembly. Here is a detailed instruction on how to make a self-made Stirling engine. First you need to wash the jar, clean the edges with sandpaper. We cut out a circle from sheet metal so that it lies on the inner edges of the jar. We determine the center (for this we use a caliper or a ruler), we make a hole with scissors. Next, take a copper wire and a paper clip, straighten the paper clip, make a ring at the end. We wind a wire onto a paper clip - four tight turns. Next, solder the resulting spiral with a small amount of solder using a soldering iron. Then it is necessary to carefully solder the spiral to the hole in the lid so that the stem is perpendicular to the lid. The paper clip should move freely.
After this, it is necessary to make a communicating hole in the lid. We make a displacer from foam rubber. Its diameter should be slightly smaller than the diameter of the can, but there should not be a large gap. The height of the displacer is a little more than half the can. We cut a hole for the sleeve in the center of the foam rubber, the latter can be made of rubber or cork. We insert the rod into the resulting sleeve and glue everything. The displacer must be placed parallel to the cover, this is an important condition. Then it remains to close the jar and seal the edges. The seam should be tight. Now we begin to manufacture a working cylinder. To do this, cut out a strip of 60 mm long and 25 mm wide from tin, bend the edge by 2 mm with pliers. We form the sleeve, then solder the edge, then you need to solder the sleeve to the cover (above the hole).
Now you can begin to manufacture the membrane. To do this, cut off a piece of film from the package, push it a bit with your finger inward, press the edges with an elastic band. Next, you need to check the correct assembly. We heat the bottom of the jar on fire, pull the rod. As a result, the membrane should bend outward, and if the rod is released, the displacer should lower under its own weight, respectively, the membrane will return to its place. In the event that the displacer is made incorrectly or the soldering of the can is not tight, the rod will not return to its place. After that, we make the crankshaft and struts (the spacing of the cranks should be 90 degrees). The height of the cranks should be 7 mm, and the displacer 5 mm. The length of the connecting rods is determined by the position of the crankshaft. The end of the crank is inserted into the plug. So we looked at how to assemble a Stirling engine with our own hands.
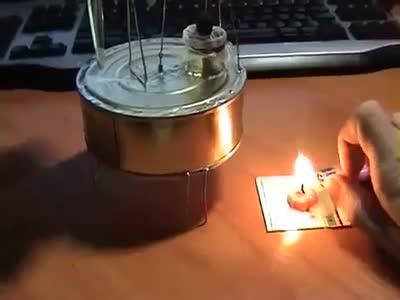
Such a mechanism will work from an ordinary candle. If you attach magnets to the flywheel and take the coil of the aquarium compressor, such a device can replace a simple electric motor. With your own hands, as you can see, making such a device is not at all difficult. It would be a desire.