Bead floristry has recently become one of the most popular areas of applied art. Bouquets of flowers made from glass beads are in great demand, as they look very bright and beautiful.
They can be a wonderful gift for any holiday, make the interior of the living room more interesting, as well as decorate clothes and hair. If you want to learn how to create beautiful flowers, this article is for you. In it we will tell you how you can most easily weave a magnificent lily from beads. Our master class is simple and designed for everyone, including beginner needlewomen. So, let's get to work.
Preparation of materials and tools. Workplace organization
At first glance, weaving from lily beads may seem rather laborious and complicated. In fact, with a little practice, any master can create this bright flower. We hope you take advantage of our tips and you will succeed.
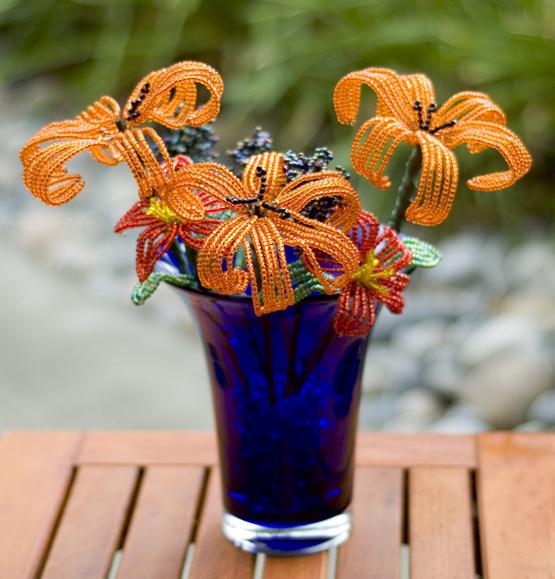
To create a lily, you need to prepare supplies, tools, as well as take care of your workplace. Of course, you need beads of several colors: green for leaves and any bright for buds and flowers. In general, lilies have the most diverse color. They can be one-color (orange, cream, lilac) and multi-colored (burgundy with a yellow border, raspberry with light stripes and even pale pink with red specks in the center). For beginner needlewomen, we recommend making solid lilies from beads. The photo shows gorgeous orange flowers with black stamens, take this example for yourself.
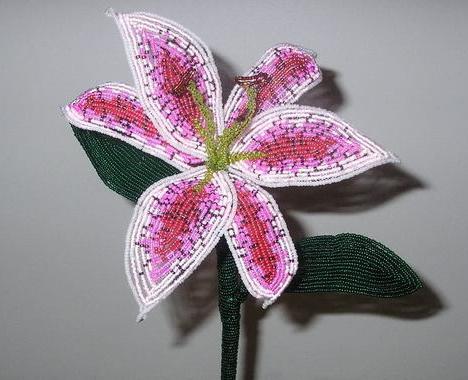
If you are already at least a little familiar with bead floristry, you can use a larger number of shades of beads, for example, buy white, light and dark pink glass beads for petals, and yellow for stamens. We used green, pink, red, lemon and dark yellow beads No. 10 in our work. Also, you definitely need a wire (0.3 mm, 0.45 mm, 3 mm), green threads, scissors, PVA glue, a ruler. After acquiring all the materials, organize a convenient
workplace. Remember, it should be well lit. We advise you to take a piece of plain fabric, fold it several times and place beads on it in colors in small heaps.
Getting started - create a lily from beads. Workshop for beginner needlewomen
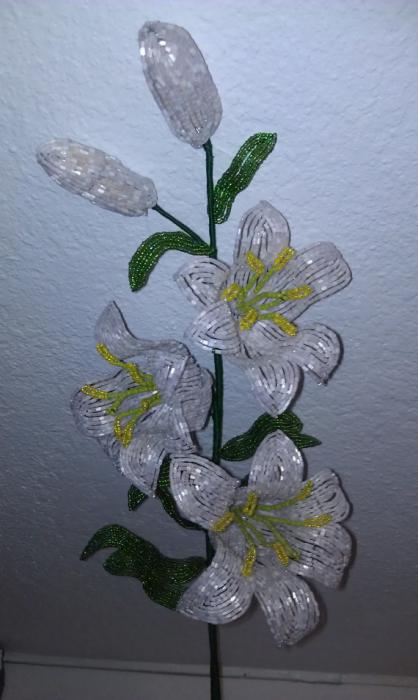
Let's decide on the design of our flower. The lily will consist of several elements: one large and one small green buds, three flowers and one blooming pink bud. Also, the flower will have six small and twenty large leaves. We start weaving lily from the beads with the creation of unopened large and small buds. In the work, we suggest you use the French axial (arc) technique. How to make a small bud of a flower like a lily from beads? The diagram illustrates this.
Take a small (about 15 cm) piece of wire with a diameter of 0.45 mm. Type 3 cm of green beads on it, and then do three arcs. To create a small bud, you need one more of the same petal. Make it by analogy with the first, based on the presented diagram. A large bud will consist of two large green petals. Take a piece of wire (15 cm long). Collect 4 cm of beads on it, make 5 arcs. Weave the second petal by analogy with the first. All the details for the unbroken buds are ready.
Weaving small and large leaves for our beautiful lily
Now we begin to make hardwood mass. We take a piece of wire 10 cm long and pick green beads on it 2 cm. We perform two arcs. It turns out the first small leaf. It is still necessary to make 5 of the same elements. We continue to make our lily from beads. A master class, we hope, while you are extremely clear.
Now we take a piece of wire equal to 15 cm. We string beads (3 cm) on it. We perform the first arc equal to the length of the bugle on the axis. When creating the next two arcs, add one bead to the axis. So you make the leaf peaked. By analogy with the first, create another 18-19 sheets. Such a number of elements will make our bead lily more beautiful and magnificent.
Master class for beginners: weaving open buds and inflorescences
After making the leaves, we proceed to create the flower. It will consist of three wide and three narrow petals, as well as six stamens and one pistil. How to weave a lily from beads? The scheme is as follows: to create narrow petals, take a thin wire 15 cm long. On the axis we will pick 5.5 cm of pink beads. Perform two arcs, then add a bead to the axis 1. Let's make the third arc. After that, add two more beads and finish the part with the fourth arc. By analogy, we perform two more narrow petals. If you want to make your lily speckled, string not only pink, but also red beads during weaving.
We will make wide petals with an axis of 4 cm. Perform four arcs without increments. For the fifth and sixth, we will increase one and two beads, respectively. And finally, we twist two incomplete arcs equal to about a third of the length of the axis. Fix them in the sixth arc. As a result, you get the first petal, wider at the base. Two such details still need to be done. Now we begin to make stamens and pestle. We take a thin wire 20 cm long. We collect 3 yellow beads and twist the two working ends of the wire. Next, on each of them we string 5 cm of yellow beads. For the manufacture of stamens, you need to take dark yellow and light yellow beads. First, we draw a dark (3 cm) on a piece of thin wire, connect the ends of the wire, and then string on each 5 cm of light yellow glass beads. Twist the ends of the wires. By analogy, we perform another 5 stamens. Everything, the details for making one lily flower are ready. In the same way, follow all the other petals, pistils and stamens needed to create two more of the same inflorescences.
We carry out a blossoming bud. Start assembly
How to weave a blooming pink bud for our flower? The scheme is as follows. We take a thin wire 20 cm long. On the axis we string pink beads (4 cm). We produce 5 arcs. One petal is ready. We perform the second by analogy. That's it, now you can twist them together. We cut off a piece of thick wire 15 cm long. With pliers we bend one end of it at a slight angle. Wrap it with green thread floss and coat for reliability with PVA glue. Around it we fix two pink petals, twist them and give them the shape of a bud.
Remember that all ends of the wires should be well fastened to the support rod. Next, wrap the threads with 3 cm of the stem and attach one small leaf. In the same way we connect the details of small and large unopened green buds around thick wires 11-14 cm long. We decorate the rods with green floss threads. We attach small green leaves. Connect the wires of two green unopened buds together. We wrap the stem with thread and attach three large sheets.
We complete the winding, glue, break the thread. Next to the first two we attach a pink blooming bud. Do not forget to decorate the wire with floss thread. We attach 3 more large leaves to the stem. We complete the winding and coat with glue.
Assembly of parts in a single design
Now we proceed to the formation of a lily flower. We take a thick wire 60 cm long. We bend the edge (about 5-7 cm) with pliers, we attach stamens and pestle on it. Next, we fix three wide petals, and then under them - three narrow, closing the gaps. We wrap the stem of the floss and attach a small leaf. Continue winding to the bend.
We collect the second and third flowers by analogy with the first. Next, we fix all three flowers on the main stem, one after another, evenly adding large sheets. That's all, our gorgeous bead lily is almost ready. MK (master class), we hope, did not seem too complicated for you. It remains to add small and large leaves to the flower stalk. So he will not look "naked". Then we wind the stem to the desired height and coat it well with glue. We cut off the excess pieces of wire. That's all, the lily is ready. It remains only to choose a beautiful vase for her.