For inexperienced users who want to independently create control systems for robotic devices or automation equipment, various hardware modules and their modifications are offered on the IT services market. As a rule, such devices have a simple architecture with the right to copy and the software included in the form of simple utilities. Such products can be used both independently and connected to other computer systems via wired or wireless interfaces.
Advantages of working with graphic displays
Earlier, graphic monochrome displays were used very widely in the production of cell phones.
Nokia has released a huge number of different models equipped with such a screen. The days of those phones have passed, but the displays have not disappeared from the market and continue to be actively used to the present. They turned out to be indispensable and, in addition, cheap devices for displaying text and
graphic information. Graphic displays work by creating dot matrixes on the screens that display the image. They save resources and time, while displaying a large amount of information and spending a small amount of energy. There are a huge number of different areas where Nokia 5110 devices can be used: photo, video, television, medicine, and many other industries.
Before describing how to connect the Nokia display to the Arduino hardware module, you must provide a brief overview of these devices.
Benefits of Using Arduino Uno
Many platforms and microcontrollers have been created, which are analogues of the Arduino platform presented in this article. One of such analogues is Netmedia's BX-24, Parallax Basic Stamp and many others. However, let's dwell on the Arduino Uno, as this constructor has a number of advantages over other controllers. You should pay attention to them when choosing a platform for work. First of all, it is the low cost of these devices. Models with this software cost less than $ 45, and if desired, can be assembled manually, as they have a fairly simple design. The second point is that Arduino platforms can work with all operating systems: Windows, Linux, as well as Macintosh OSX, while all others are limited to working exclusively with Windows.
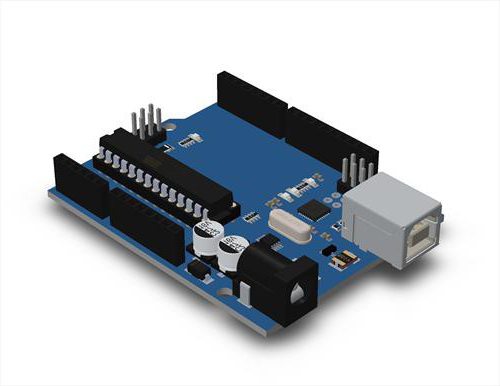
Description of Arduino Uno
Arduino Uno is a platform for developing and programming various devices, which has 14 digital inputs and outputs, 6 analog inputs, several connectors (USB, ICSP, power) and a button that has a device reboot function. This platform has a built-in fuse that prevents short circuits and ensures safe operation with a USB cable. It fires when more than 500 mA of current passes through the USB port. Compared to universal computers, Arduino Uno interacts much more closely with its physical environment. The platform is built on a printed circuit board and is designed to work with open source. It can be used by both students and amateurs, as well as professionals who can expand and supplement models as they wish and freely work with open source. The platform is designed so that you can easily add new components to it. The design involves the choice by the developer of the independent use of the device, so it is not placed in the case and does not have a rigid connection to the installation.
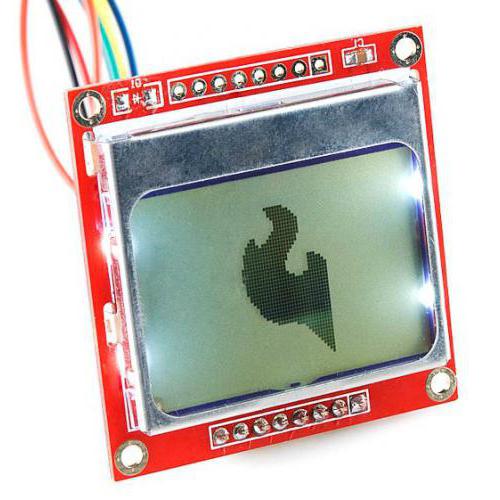
Description of the display Nokia 5110
The Nokia 5110 graphic display is a budget monochrome 1.6 ”diagonal display that allows you to display not only textual information, but also pictures. Its resolution is 48x84 px and the voltage at which it can work is 2.7-5 V. Information on the screen displayed in vertical blocks, their height is eight pixels, the width of the screen is six lines, and there are symbols for each contact on the back panel, which will not allow users to make mistakes in their location.
For full operation, the graphic display must be connected to the board. This article describes in detail the connection of the Nokia 5110 to the Arduino Uno electronic designer , which will allow you to start working with the display.
Materials required for connection
Nokia 5110 graphic display;
Arduino Uno;
a loop or seven wires;
USB cable (for connecting to a computer), battery or AC / DC adapter (for supplying power to the board without using a computer).
How to connect the Nokia 5110 graphic display to Arduino
1. First, you need to connect the Nokia 5110 display to the Arduino. Included with the graphic device is a mount for breadboard models with eight connectors. If you plan to use a circuit board, then "straight legs" are fine. In other cases, it is worthwhile to purchase connectors at an angle of 90 degrees. First, they should be inserted into the display itself, and then attach the device to the Arduino.
2. Next, you need to connect the wires. It is best to use a loop, but a normal MGTF wire is also suitable . It is important to know that this display is powered not from 5 V, but from 3.3 V. Therefore, you can safely connect 3 V to plus, and ground to minus. The remaining wiring is connected in a certain sequence to the Arduino and Nokia 5110. The connection diagram is as follows:
Gnd pin (common wire) - to Arduino ground (to minus);
Bl (backlight power) - to the Arduino ground (to minus);
Vcc (module power) - to the 3.3 V port on the Arduino.
Further, all contacts from right to left are connected to the ports:
Pin 1 (SCLK - pulse for transmitting information) - digital port D3;
Pin 2 (SDIN / MOSI - data) - digital port D4;
Pin 3 (D / C - data type) - digital port D5;
Pin 4 (RST) - digital port D6;
Pin 5 (SCE - chip selection) - digital port D7.
Work with libraries
In order to display the necessary information on the screen of the device, you need to download the library. The best option for working with textual information is LCD5110_Graph. Already by name, you can determine that this library was created specifically for Nokia 5110. The utility can also be downloaded from the Internet. It is attached as an archive. The unzipped file must be moved to the Libraries folder. After that, you can run the program. In the opened window, select “File”, move the cursor to “Examples”, then select the desired one. Ready code will appear on the screen, which is very understandable to users and elementary in use. All the necessary information can be read and edited, but it is important not to disrupt the code structure. Various library functions will expand the possibilities of working with Nokia 5110.
In order to display graphic drawings on the display, they must first be drawn in graphic programs such as Adobe Photoshop or Paint. After the drawing is ready, it must be saved in BMP (Monochrome Bitmap) format. Next, using the library, you should convert the picture to open source. After these steps, an image will appear on the screen.
The considered connection of the Nokia 5110 display to Arduino will help to independently master the initial skills of working with graphic displays and learn how to program images using a variety of hardware modules.