Today, decoupage is distributed around the world, including in Russia. For 600 years, he became an independent and unique art. Both masters and amateurs are fond of this technique - after all, what could be simpler and more original than updating old furniture with do-it-yourself decoupage technique, restoration of a kitchen set, or making Christmas candles?
Basic tools and materials
In this technique, the basis for the manufacture of crafts can be anything: vases, glass, shoes and much more. Decoupage on furniture will look especially impressive. Three-layer napkins with a pattern or rice paper are the main decorative elements that are applied using PVA glue and a brush. The do-it-yourself decoupage technique is remarkable in that the tools and materials are very inexpensive and can be found in any store. In addition, they are safe for children and allergy sufferers. Finished furniture is varnished, which gives a presentation. If desired, beads, pearls, sparkles can be used for decor.
History of Origin: Decoupage Technique
For thousands of years, mankind has been making many interesting devices with its own hands. Initially, they were of a practical rather than aesthetic nature, but subsequently the pursuit of luxury completely dominated women and men, so they began to craft decor items. Decoupage as a technique appeared 600 years ago in Europe. Literally from French, the word découper translates to “cut”. The technique was named thanks to the main manufacturing method. Ornaments and pictures were cut out of paper using scissors and other sharp objects, which were then superimposed on furniture, watches, and glass. The heyday of technology falls on the reign of Louis the Sixteenth. The French covered beautiful furniture with beautiful applications, which instantly transformed and became much more valuable. Among celebrities, this art was loved by Marie Antoinette, Lord Byron, Madame de Pompadour.
DIY decoupage technique on wood: manufacturing features
In any form of art, there are certain areas and characteristics, without knowledge of which it is impossible to achieve the ideal result. So, in the decoupage technique, which seems quite simple, there are as many as 5 types: classical, reverse, artistic, voluminous, decopatch. The first two will be considered in the article - they are the simplest for beginners. Decoupage is remarkable for the fact that it does not require in-depth knowledge to make it, and materials for the manufacture can always be found at home. I wanted to update wooden chairs - decorate them with beautiful paper patterns; I want to reconstruct Grandma’s chest of drawers - put some original three-layer napkins; If you want to decorate a curbstone - stick any pattern on it and cover it with glitter varnish.
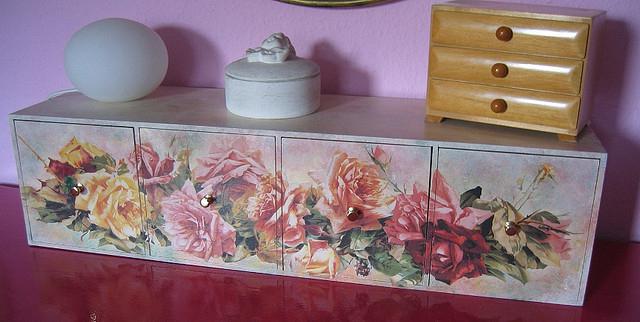
Do-it-yourself wooden paintings using decoupage technique that complement the updated furniture set are made using PVA glue, colorless acrylic varnish using three-layer napkins. To apply the first two materials, it is necessary to use a brush with artificial bristles so that it does not spill and does not spoil the appearance of the product. From German wipes, the top layer with a pattern is removed, which is cut along the contour and applied to the prepared surface with glue. You can dry using a cold hair dryer or fan. The surface is covered with colorless varnish from above and, if desired, is decorated with sparkles. In such a simple way, you can decorate any other objects with a wooden surface.
Updating the old closet
The decoupage technique is remarkable in that it can be used to decorate almost any surface. Large items - chairs, tables, wardrobes - will look especially impressive, and the most patient craftswomen will be able to update the entire bedroom or kitchen. The classic decoupage technique remains unchanged under all working conditions. If you want to reconstruct the old cabinet, first you should rub it with sandpaper and level the surface. Do-it-yourself decoupage technique on furniture will look especially impressive if you pre-paint the tree in the color of napkins with a pattern. Prepare wipes with a large pattern and do not forget to dilute it with smaller applications. Lay out individual elements on the surface of the cabinet and think over the ornament. When everything is ready for work, dip a brush in PVA glue and stick a napkin. It is necessary to carefully level it to avoid the appearance of bubbles. After drying, apply a second layer of glue and leave the cabinet for several hours to completely dry the tree. It is recommended to start work the next day. The last element is coating the surface with varnish. The upgrade of the old cabinet is excellent!
Glass table decoration
On a transparent surface, as a rule, the reverse decoupage technique is used , this ensures that the coating is kept intact. Glass cabinets, windows and a coffee table are excellent details for the manifestation of your creativity. The scheme for applying napkins is extremely simple: they are fixed on the back surface of the furniture with glue, dry and covered with white or colored acrylic paint. The do-it-yourself decoupage technique on glass provides some features: the glass should be perfectly clean without fingerprints, so it should be wiped with vinegar and soda before that. The ornament on napkins is selected depending on the color palette and style of the environment.
Metal chairs "Modern" using decoupage technique
These craftswomen probably guessed that for furniture decoration you can use not only three-layer napkins, but also other materials. Do not throw away the old battered newspapers of foreign editions, but give them a second life - do-it-yourself decoupage technique will help you with this. To make a real modernist masterpiece, you will need simple and inexpensive furniture - metal chairs painted in black or golden color. Prepare the necessary sections of the newspaper. Put them on the seats and backs of chairs, dip a thick brush in PVA glue diluted with water, and glue to the surface. Leave the work for a day until completely dry. Coat the surface of the backs and seats of chairs with varnish.
Delicate bedroom set
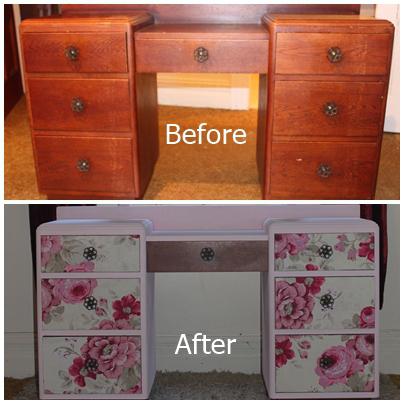
Do-it-yourself decoupage technique will allow you not only to update your old furniture, but also to create a whole floral arrangement in the lounge. As a rule, in the bedroom there are few objects: a cupboard, a mirror, a chair, a hanging shelf and a clock. Prepare a few three-layer napkins and think over the pattern. Keep in mind that cut pictures will not cover the entire surface of the furniture, but only part of it. After the procedure is done, it is necessary to cover the entire surface with varnish.
Original watches for home comfort
Shebby-chic is a common trend in decoupage, which is used mainly for the manufacture of household items. It is characterized by a pleasant pastel color gamut, blurry drawings, plots with flowers, angels, birds and animals. In order to make a watch with your own hands using decoupage technique, you need to prepare a round shape base - wood, chipboard or cardboard. The main element in this craft will be a clockwork with hands, which will have to be purchased in advance.
First you need to paint the base of the watch in the desired color or leave a natural wooden shade, which in the style of shabby chic will look beautiful and relaxed. After that, prepare drawings from three-layer napkins and fix them with PVA glue. Wait until the tree dries, and begin to lay out a pattern of pearls, which must be fixed with glue. Draw the numbers, cover the base with transparent varnish and make a hole for the clockwork, fix it on the back. A watch using decoupage technique is ready!