Modern needlewomen spending free time crocheting create elements of clothing and various soft toys. Looking for and using new schemes, craftswomen create not only products for the game, but also interior decorations. This article describes how to make a crocheted knitted sheep, and gives appropriate patterns.
Training
Before you start knitting, you need to determine which pattern you will knit, as they are presented both in a symbolic form and in a descriptive one. To read the diagram of the characters, you need to familiarize yourself with their notation. If you are poorly versed in the diagrams shown, use the conditional description. Crocheted sheep mainly consists of several parts: trunk, limbs and head. Small parts: ears, hairstyle, ponytail.
Then choose the size of the toy and, based on this, get the right amount of yarn. Also pick the appropriate size hook. Please note that the size of the sheep depends not only on the above scheme, but also on the thickness of the threads. Crocheted sheep can have eyes from buttons or embroidered with thread. They can also be crocheted in a small size.
Let's start knitting from the torso
Before starting knitting, it should be noted that the sheep crochet (the scheme will be described later) knits without breaking in a spiral, without lifting loops. During knitting, you need to capture the full loop without separating the front and back walls. The limbs of the toy do not stuff with the filler, but you can insert a flexible wire. Let's start creating the torso.
From the threads you have chosen we make a ring into which you need to knit a simple 6 columns without any crochets. The next row is increased exactly 2 times, knitting 2 stitches in each loop. It should be 12 loops. Further, in successive rows, it is also necessary to make increases, only between them with each circle will the number of single columns increase. Thus, the third row: 1 st - increase - 1 st - increase and so on. Second row: 2 st - increase - 2 st ... Next, we follow the algorithm and knit to the 8th row, taking into account the fact that in the previous row there were 42 loops. We knit the next 4 circles unchanged. After this, loops should be reduced. Loops are reduced in the same way as increases. With each lap, reducing the number of single bars between decreases. As a result, the 24th row should contain 6 loops. The future crochet sheep already has a trunk.
Knit head
The next step is to create a head with threads of a different color. Like all details, the element begins with an amigurumi ring, into which 6 simple columns are knitted. Further, the rows are created similarly to knitting the torso with the addition of loops in each circle at an equal distance from each other. As a result, the 8th row should contain 48 loops. From 9 to 15 rows, the part is knitted without changes. The following is a mirror reduction of the loops. 21 and 22 circles with 36 columns do not change. In the next row, you need to reduce 6 loops at an equal distance from each other. Next - two circles without changes. Crochet sheep, the scheme of which is described in the article, has a hat on the head that imitates wool. Therefore, take the same thread from which the body was created. With this yarn, knit the 26th and 27th rows with simple columns. Next, start the reduction, observing the proportion. The last 31th row should contain 6 loops.
Knit legs
A crocheted goat, a sheep and any other toy depicting an animal must have legs and ears. Let's start by tying the limbs. The difference between them is that the upper arms will be thinner than the legs. The first rows will be hooves, so take the appropriate thread color and start with the ring. Knit 7 columns from 1 to the 5th row. Then change the yarn and then also knit each circle of 7 columns. The length of the pens vary yourself. They can be short or longer than the body. Legs knit similarly, only from 8 initial columns. Do not forget to change the threads at the same distance from the beginning.
Knit ears
Crocheted sheep, described in the article, has cute ears. Let's start creating them. In a ring of yarn we knit 6 columns. In the next row, double the number of loops. In the third circle we make an increase through one column, in the next - through 2. Next, we knit two rows without changes. Close the row, fold the ear in half and sew the sheep to the head. It remains to assemble the toy by stitching all the parts together.
How to crochet a sheep, we examined. Optionally, you can simulate the product scheme, adding rows and thereby lengthening the details. Or reduce their number by making the elements shorter. Play with volume, increase the tummy, head or legs. Everything is possible and everything is in your hands!
Workshop: crochet sheep
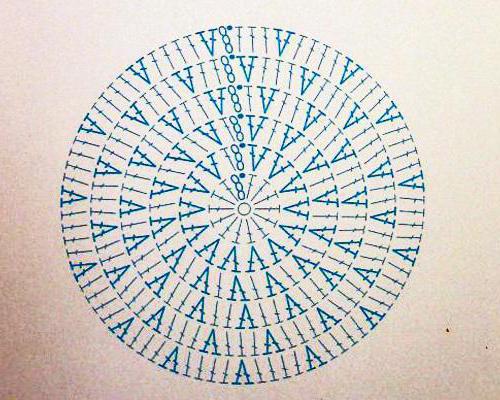
A tied sheep does not have to be a toy. Craftswomen make kitchen gloves in the form of this animal. Let's look at how to knit such a product. For a tack you need to take thick threads. To make the product dense, you need to take a smaller hook than the manufacturers of yarn advise. Since the tack has the shape of a circle, you need to knit a round part. Work begins with a closed chain of 6 loops. Next, you need to knit 17 rows with increments. In each circle add one single crochet 6 times (at equal distance from each other). The main thing is to observe symmetry. In the diagram below, it is clearly seen in which places to increase. In the last row should be 108 loops. In order for the lamb-grab to be more attractive, we will tie it with an original border. We make a loop, then we knit 1 simple column, skip 3 loops of the previous row and knit 9 crochets in the fourth loop. And we repeat such a shell 11 more times (every 3 loops of the last circle). Then you need to tie a pattern for reinforcement. You can take a thread of contrasting color. The border is tied with simple columns in each loop of the previous circle. The circle is the main part, which is the body of a lamb.
Small parts
Creating the image of a sheep, you need to tie a hat on his head. Make a chain of 7 loops and in the second loop from the hook, knit 2 simple columns, then one in each loop 3 times. There was the last one, in which we knit 3 columns. We unfold and knit in a circle, or rather we bind a chain on the opposite side. In each loop - on the column 4 times. We close the circle by connecting the last column with the first loop of the last row. We start the next row with an increase: 2 columns in the first two loops, then one three times. In the next three loops - 2 columns, then in each 1 tbsp. 3 times, and in the last 2 st. It should get 18 loops. After that, you need to tie the shells in every third loop of the last row. We tie the part with a thread of contrasting color.
Feet fit quickly and easily. Sew 12 stitches with the desired color of thread. Starting with the 5th, knit 4 tbsp. with 1 double crochet, then 2 half-stitches, 1 simple st., and 3 st. with 1 double crochet in 1 stitch. Expand the part and repeat in mirror image. Close the circle - the sheep’s legs are ready. Ears can consist of one chain. Dial 9 air. loops and connect extreme with each other. Embroider the muzzle on the main part with white thread. It remains to highlight the eyes and mouth. We examined how to crochet a sheep with your own hands.
Relying on the master classes given in this article, you will be able to connect many toys and useful things in the household. Based on the above works, experiment, add, change details, and you can decorate your interior with new products.