Making crafts from various materials is a great way to keep a child busy both at home and in an educational institution. This type of activity develops well the thinking, imagination and fine motor skills of children. Today we want to offer you to engage in the manufacture of another interesting crafts - birds. These representatives of the fauna are of great interest to the children, so they will certainly be delighted with the opportunity to make one or more of them with their own hands.
Owl made of geometric shapes. Preparatory stage
Owl is an excellent prototype for the manufacture of children's crafts. Birds in nature exist the most diverse, but not every child can make each of them. Fortunately, this does not concern the owl, and even a very young master can make her application, although with the help of adults.
So, for work you need to prepare the following tools and materials: scissors, cardboard, colored and white paper, a simple pencil, compasses, a ruler and glue. You will also need templates of a number of geometric shapes, since they will serve as the basis for the manufacture of this bird crafts. It will be much easier for a child to make this application with his own hands, if he has all the necessary figures at hand, but the older baby can be invited to do this business on his own. That is, draw all the shapes with a ruler, pencil and compass, and then cut them out.
Making an applique of an owl from geometric shapes
So, making an owl from geometric shapes should start with the eyes. In the upper part of the cardboard base, it is necessary to arrange and glue next to each other two blue circles of the same diameter, and in their center along the green circle, but already smaller. In the middle of both green circles you will need to draw pupils with a black felt-tip pen. Further above both “eyes” it is necessary to place rectangular triangles - these will be the “ears” of the bird.
For the manufacture of the body of an owl, isosceles triangles should be used. To do this, they need to be placed next to each other slightly below the circles. For the manufacture of the body you will need about 3 rows of five triangles, 1 out of four and 1 more out of three. The beak will be a yellow rectangular triangle located hypotenuse up and pasted in the middle and below the circles, a little overlapping on the "body" of the bird. At the final stage, you can draw a contour around the owl with a brown felt-tip pen and cut it out, thanks to this, the finished crafts of the bird look more realistic.
Volumetric birds: creating blanks
Based applications are not the only possible paper crafts . Birds from this material can also be bulky. To make them, you will need double-sided colored sheets, scissors, toothpicks, glue and a clothespin. These birds will consist of the same elements as many others - the body, head, tail, beak and eyes. However, the manufacture of parts has its own characteristics. First you need to prepare strips of certain sizes, depending on which part of the bird they are used to make. So, for the body you need 5 paper strips 2.5 cm wide and the following lengths - 7.5; 10; 12.5; fifteen; 17.5 cm. For the head, two strips of the same width, the length of which is 6.25 and 8.75 cm, and for the beak, the strip should be 5 cm in length. For the tail, it is necessary to prepare 5 strips, 3.75 cm wide, the length of which will be 5; 7.5; 10; 12.5; 15 cm. Two circles should also be cut, 1 cm in diameter - these will be the eyes of the bird.
Collection of volumetric birds from paper strips
Billets are at hand, and you probably are already eager to find out how to make a craft. Paper strip birds can be made as follows: body blanks should be twisted into a circle and the ends glued together. Then put all the circles into each other and glue at the base. To dry completely, the fastening place is best fixed with a clothespin. Similar actions should be done with blanks for the head. When both parts of the bird are ready, they must be joined and tailored.
The strips for the tail should be made using scissors to give a triangular shape and curl the wide ends a little. Then lay the parts on top of each other and glue on the narrow side, and then attach to the body. There was a beak and eyes. To make the first one, it is necessary to fold the strip in half, then bend the corners from the bend side and fold them inwards. Eyes are made by winding a small circle on the tip of a toothpick until a ball is obtained. Now you need to attach the last two details to the appropriate places - and the craft is ready.
Blue bird from an egg: an unusual DIY craft
It will be interesting for the child to learn that the egg can be used not only for eating, but also for the manufacture of bird crafts. With your own hands, you will need to thoroughly wash and dry the egg. Then make a hole with a thin needle on both sides and “blow” the contents into the bowl. Next, the egg must be given a blue color - this will be the body of the bird. This can be done using both special paint and watercolors.
When the workpiece dries, it should be placed horizontally and the wings should be glued to the “back”, and the tail should be attached to the back. To make these parts, you will need strips of blue chiffon or mesh fabric. The beak needs to be cut out of yellow paper and glued to the appropriate place, as well as two eyes to be painted with black paint. Pass the fishing line through the holes made earlier in the egg and tie its ends - this will allow you to place children's crafts in a prominent place. Birds made from eggs by your children will be able to decorate any room in the house or educational institution.
Cardboard tube eagle
The eagle is one of the most magnificent birds, so why not invite the children to make it? Moreover, this work will not require any special materials, the main thing is to print the following templates in advance. In addition to them, you will also need a cardboard tube from toilet paper or kitchen towels, scissors, glue, colored markers, pencils or paints. If the child will paint the eagle with pencils, it is better to do this before you start making the bird, painting the patterns on another sheet. If for this purpose markers or paints will be used, then it is better to do this after making paper crafts. The birds will then look neater.
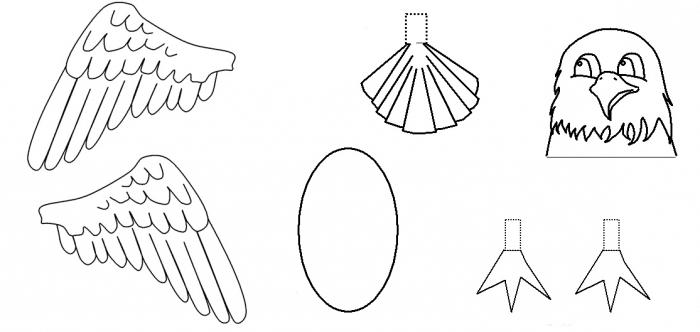
So, all materials and tools are at hand. First, the tube must be pasted over with white, and preferably brown paper, then you will not have to paint it. Then, turning the workpiece vertically, in its lower part attach an oval - the "abdomen" of the eagle. Paws should be glued to the lower front part of the tube, and the tail, turning the "body" of the future bird backwards. Above the abdomen, it is necessary to attach the head so that it only overlays the lower part of the tube. The wings should be glued to the back of the eagle and you can start painting the craft of the bird, if you did not do this at first.
Migratory birds: applique with drawing elements
Storks are the most famous migratory birds for children, therefore it is their silhouettes that will form the basis of this applique with drawing elements. It is worth noting that in this work, children will need not only basic skills in handling scissors and other tools, but also a fantasy, thanks to which they can imagine an autumn day and flying storks. Craft “Migratory birds” should be made on the basis of children's ideas, so do not limit the small masters in their aspirations. All that is required from the adult in this situation is to print the silhouette of the bird below and give it to the child as a template.
Possible variations in the manufacture of migratory birds
Storks can be cut out of white or black paper, depending on the weather conditions that the child will depict in his work. In addition, ready-made templates can be bent in the center by half, creating a new silhouette of a bird, or you can stick a bird to the sheet only with the center line, and leave the wings “flying”. In addition to storks, all other elements: trees, clouds, falling autumn leaves, rain, sun, a child can draw with paints, felt-tip pens or pencils. Therefore, make sure that in addition to scissors, cardboard, a simple pencil, glue, white and colored paper, he has tools for drawing.