Professional photographers are well aware that one of the key points in creating the perfect shot is a well-placed light. Even when shooting outdoors, photographers carry reflectors and umbrellas with them, which allow you to direct the maximum amount of sunlight to the model. But when it comes to the studio lighting scheme, everything becomes much more serious.
Small introduction
Studio light schemes are a science. Of course, there are some templates that beginners work on - inexperienced photographers often use them for family or portrait photo sessions, for example, for a passport. An experienced, talented and professional photographer will always improvise. He will take into account the features of the appearance and figure of the model, the style of the photo shoot, clothes, makeup; will take into account the wishes (if this is not an TFP survey) and, summing up all these factors, he will be able to configure the light most competently for a particular case. For those who are just starting to get acquainted with this type of art, we offer to analyze patterns.
Studio light schemes allow you to either make the photo as bright as possible, or muted, intimate. To achieve the desired result, adjust the lamps, as indicated in the instructions, take a couple of shots, and then adjust them based on the appearance of the model. Below we will present studio lighting diagrams with examples.
Portrait - how much in this word ...
If a modern person hears the phrase “studio portrait”, one immediately remembers the passport photo: a white background, a bright, outlined face, every detail is clearly visible - all this thanks to a large number of light sources and their high brightness. But the scheme of studio light for a portrait can be completely different - dim, intimate, soft. Well, let's take a look at each of the options:
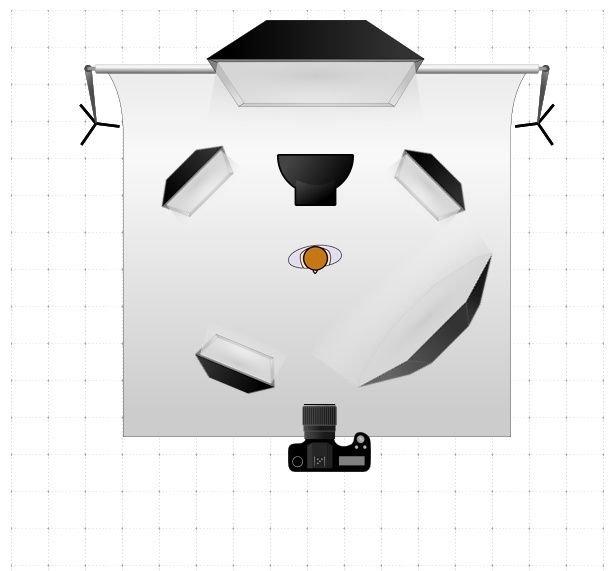
- In order to make the portrait as bright, expressive, clear, but at the same time artistic, interesting, not flat, but multifaceted, you need to resort to some light trick. Four softboxes are installed: the largest is clearly behind the model, two smaller ones are behind, directed diagonally into the back of the posing person, and the fourth diagonally, but in front. The main lamp is aimed directly at the largest softbox. As a result, we get a very bright scene, but the light does not directly and flatly illuminate the face of the model, but harmoniously fills the surrounding space.
- There is a studio light scheme for an artistic portrait, which is called "Rembrandt" and allows you to achieve the effect of twilight, from which the face is clearly visible. The principle is based on Rembrandt's drawings - he seated his models 3/4 turn from the window from which direct light fell. Therefore, we need to position the softbox (not the spotlight!) Exactly like that, and as an addition, we can lightly highlight the background.
Soft haze
Most often, this type of lighting is chosen for intimate filming of models in half-naked form or for a thematic photo shoot where very soft and diffused light is required. It is this effect that the photographer achieves with the help of two huge softboxes that are placed behind the model, each diagonally, the light is directed to the back. A light source muffled by a reflecting umbrella is also installed in front of the model. It is best to take a photo on a dark background with such a lighting scheme and use auxiliary effects in the form of smoke, diffuse splashes, soap bubbles, etc.
In the bright rays of spotlights
Some professionals call this scheme of studio lighting "gamin", as the main criterion for evaluation - excessive brightness. Moreover, the rays of light from all sources are maximally focused precisely on the model, while the background remains almost without attention. Two lamps with direct rays illuminate the back of a posing person, and a spotlight, slightly muffled by an umbrella, or a softbox, looks at him from the front. With this position of light, the photo, the face of the model, clothing elements become incredibly expressive. Therefore, it is worth preparing carefully for the photo shoot and making the image flawless.
The play of light and shadow
If you want to make expressive, clear, rich photos, but do not pursue maximum brightness, then this scheme of studio light with two sources is ideal. The first is set to the right of the photographer and diagonally illuminates the scene. It is important that it be raised to the height of human growth or a little higher. The second source is in the back opposite corner - this is a small softbox. Another important point is the reflector. It should play the role of a straight wall running along the stage to the right of the photographer. The result is live, original shots that have both the model and its shadow.
Silhouette shooting
If you focus exclusively on the figure of the model and you do not need to see her face or clothes in detail, then most likely you will need a silhouette scheme of studio light. It's simple: you install two spotlights behind the model so that they diagonally illuminate her back and obscure them with black umbrellas. If the face should not be visible at all, turn off all the other lights in the studio, even those not related to the scene. If you still need a soft beam that illuminates your face, install a small softbox that will diagonally highlight the model from the foreground.
Come from the darkness
Shooting on a black background is very difficult. In order for the pictures to turn out successful (especially when it comes to portrait), it is best to use loop lighting. Its essence is that it uses a single light source, which is located at the level of human growth, and "looks" at the face at an angle of about 35 about .
If you choose a bright spotlight, then the photo will turn out to be contrasting - the background will not be visible, it will become deep black, and the silhouette of the model will turn out to be very bright, clear and expressive. If you dim the light or use the softbox, the background will lighten slightly, the model will look more soft, the sharpness and contrast will disappear. It is extremely important to grasp the position of the shadow from the nose - it is the key to the proper installation of the spotlight. The shadow should not fill the entire cheek, it should be small, slightly directed downward. You can adjust the lamp light based on the features of the model, the main thing is to catch this feature.
Butterfly Lighting
Well, this is a favorite trick of all photographers who take pictures for fashion magazines and catalogs. The model in the photo is very expressive, but not too bright, the background is highlighted, but not dazzling.
So, the light source is located right behind the photographer, he frontally "looks" at the scene, but at the same time he is raised to a level slightly higher than human height. The main signs - "butterflies" - thin shadows from the nose and chin, which fall clearly down. The scheme is both simple and very beautiful.
Furnished Shooting
Setting up the light and selecting the right sources on a simple plain paper background is a very simple task. But if you need to do the same, only against the background of furniture, accessories, other decorative elements - everything becomes complicated.
What should be the scheme of studio lighting in an interior studio and how to correctly remove a model against a background of various objects? The basic rule is not to use bright spotlights. Light is dimmed by umbrellas or reflectors and softboxes. Further, the arrangement of light sources depends on the style and preferences. You can fill the whole space with light - then the pictures will turn out very bright, every detail will be visible - both on the model and in the interior. If the room serves as a secondary background, then use the lighting "butterfly" or a loop circuit.
Family photo shoot
Studio light schemes for shooting the whole family, as a rule, are chosen from the brightest and brightest. There is no place for halftones, the play of light and shadow, and, of course, silhouette lighting. In most cases, the studio light schemes of a family photo shoot are built under the "patronage" of softboxes. Larger ones are set diagonally at the back, those that are smaller - highlight faces in front and slightly above - something like a "butterfly effect", but brighter. Often elongated light sources are located on the sides and bottom - so that the floor and legs of the posing do not remain in the shade.
Conclusion
Setting up the light is a delicate matter. Not every photographer can cope with this task and adapt to a specific model. But if there is contact, then you can arrange spotlights and softboxes intuitively, focusing on the style of the photo shoot, on the preference of the model and on its features. Do not be afraid, experiment and come up with new variations.