The swan is a beautiful and proud bird, the image of which is often used in the manufacture of crafts, postcards, three-dimensional figures. The article will tell you in detail how to make swans out of paper in different ways. Let's start with the simplest applique of a bird on a sheet of cardboard cut out in layers. The work is original and looks voluminous. In addition, we will take a step-by-step look at how to make paper swans using the origami folding method, as well as modular manufacturing.
Figurines of volumetric swans can be used for crafts in a school or kindergarten, create compositions for a feast, and large swans assembled from small modules of paper can be placed at a wedding on a cake table or decorated table for the newlyweds.
Paper swan
With children in the preparatory group of the kindergarten, you can make an original piece of junk material. Only a white paper disposable plate is used. You will also need gouache paints, scissors, feather stencils, a simple pencil, glue stick, a brush and a jar of water. How to make a swan out of paper, read on.
On the bottom of the plate with a simple pencil draw a straight line in the center. A plate is cut with scissors before the rim begins. Then the upper semicircle is cut off and a beak is formed. On white paper, several feathers are outlined on a stencil, cut along the contours and cut along the sides with corners.
The feathers are glued to the lower semicircle of the plate. The beak of a swan is painted with red gouache, and black dot the eyes. The finished craft can be glued on a blue cardboard, then the picture will be a plot.
Application "Swan on the lake"
Let's look at how to make swans out of paper so that the picture seems voluminous. You will need a simple pencil, scissors, glue, gouache paints, a thin brush and a glass-spill for water. Not only schoolchildren in labor lessons will cope with such work. First of all, on a white sheet of paper, you need to draw a curved swan neck and an elongated torso. Wings are drawn separately and in different sizes. The lower ones have long feathers, and those closer to the head are much shorter.
Before assembling all the elements together, the swan's neck is bent in length in half. It turns out a fold that gives the product volume.
To make it appear in the picture that a swan is floating on the lake, three ovals of different sizes are cut out. First, the largest is glued, then - the medium in size, the smallest is glued last. Now you can already place the swan. First, the contours of the bird itself are attached, and then the feathers are glued alternately.
It remains to color the beak, the eye. You can cut willow twigs from green paper that hang over the surface of the lake. The picture is very effective.
Paper Napkin Bird
With the help of such a swan, you can originally serve any feast. How nice it will be for guests to see such a beautiful swan on a plate instead of simple even napkins. How to make a swan out of paper with your own hands will be described below in the article.
The napkin must be taken in white and paper must be thick. The first fold is made diagonally so that the central part of the napkin is on one side and the drop-down layers are on the other. After that, the napkin is opened again and placed on the table with a diagonal from bottom to top. Left and right corners are bent in the middle twice. The edge is smoothly smoothed by the fingers. The acute angle from below will be the beak and neck of the bird, and the reverse side, which is much wider, depicts the tail feathers of a swan.
Further, the lower acute angle is bent upwards so that the beak reaches the end of the tail. The fold again needs to be carefully smoothed. The blank is folded in half, and the bird's neck is slightly advanced.
The head and beak are formed by pressing the paper, and the lush tail feathers are gently lifted in layers. Here you need to act gently so as not to damage thin layers of paper.
Origami paper swan
How to make such a craft is clearly visible in the diagram below. For a swan figurine, you can take both white and black colored paper, preferably double-sided, so that white bends do not peek out. In the figure, the image was selected in color, so that it was easier for the reader to figure out where the front side and where the back.
The actions on the diagram resemble the previous crafts from the napkin. A sheet of paper is taken tight so that the bird holds its shape and can be positioned vertically on the surface of the table. The only difference from the previous version is the lack of a magnificent tail. In this case, the tail is simply flat.
Another option for crafts
The diagram below shows how to make a swan out of paper in steps. Work begins with folding a square sheet in half.
Then the process goes exactly according to the scheme. An important role in the beauty of paper origami is played by correctly executed and well-ironed folds.
Modular swan
You can make swan crafts out of paper from independently folded modules. This process is long and laborious. Preparation for the main assembly of the bird can be postponed the next day, and today we can start manufacturing tiny triangles. To make a large swan, they will need up to 400 pieces. You can make a small version of crafts, for example, for a school exhibition.
If you are thinking about how to make a swan of happiness out of paper for a wedding feast, then you will know that you will have to prepare almost 500 pieces. Make one of two-sided colored paper in orange or red. This will be the swan's beak.
How to make paper swan modules?
Before manufacturing the modules themselves, you need to cut sheet A-4 into small rectangles. To do this, you need to fold the sheet in half many times and cut along the folds. Some masters do not even use scissors, but simply tear pieces into folds under the ruler. The edges will be uneven, but they are not visible in the module, because as a result of the bends they hide in the middle of the figure. Below in the article is a photograph with a step-by-step explanation of the work on each module.
As you can see, a lot of folds will have to be done, so it’s better not to plan the production of blanks and the swan itself in one day.
How to make a swan’s neck?
The neck length of the bird is optional. It can be smooth, curved with a downward slope. It is made up of modules that add up to a long line. Insert them one into the other, holding the module at the right angle of the module, and insert it into the previous one with the expanding parts.
When the required neck length is reached, the last red module is put on. This will be the swan's beak made of paper. Put your neck aside and start creating the body.
Torso Making
In order to make a round base for a swan figure, you need to start work by connecting the two modules to the third. To do this, the triangles of the first two modules have a right angle in the middle and put on the third as follows: one corner of the first module and the corner of the other module mated with it are threaded into the slot on the back. So the clutch of parts is attached further. When a long strip of two rows is assembled, and some masters immediately reinforce the modules of the second row, forming another, third row, you can round off the workpiece. It is believed that this way the parts hold on tight and the workpiece does not fall apart. When 30 pieces were collected in the 1st row, 29 in the 2nd, and 28 in the third, the strip curled up and the edges joined together.
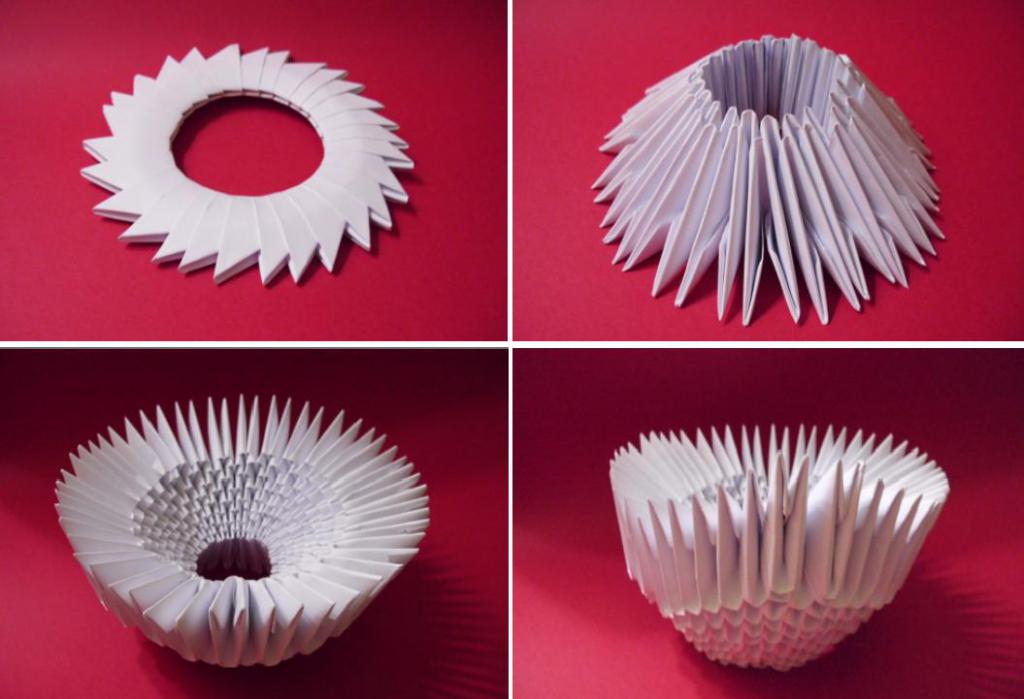
To make the swan out of paper confidently on the surface of the table, make an additional circle, which can be seen in the first frame in the photo above. It is easy to make, since it is assembled from modules according to the same principle as the neck. Only the edges after collecting a long strip join in a circle.
The rest of the body is made from a similar number of modules. Consider always 30 parts in each row. When 7 rows high are made, start making swan wings.
Module wings
How to make swans from paper (you can take different modular sizes), you already understood. Let's look at how to add wings to the body. Since the base is round, you can start building them anywhere. Insert 10 modules side by side. This will be enough for one wing. We raise the level of the modules, gradually reducing their number to one at the very edge. Some wizards use module inserts of a different color, emphasizing the lateral outer line, for example, in black.
Before manufacturing the second wing, you need to back off three modules and insert a row of 10 parts. Work is carried out similarly to the first option. The height of the two wings should be the same.
Tail section
Between the wings, on the one hand, the gap is equal to three modules, and on the opposite side there is more free space. This is where the tail of the swan will be. This area rises to a couple of rows at the request of the master. At the end, there is also one module. The tail should be significantly lower than the wings.
At the end of the work on the swan, you need to plant the workpiece on the circle of the base and attach the neck, bending it forward or down. In addition to the red module at the end, depicting the beak of a bird, you need to draw the eye with a black marker on the first white module. You can make it an application of a mug of black paper. The eyes are located on both sides, as the figure is voluminous and can be seen from all sides.
The article describes several options for making do-it-yourself swan figures from paper with your own hands. In the work, different types of paper work were used, the origami technique, according to which the figure is assembled by folding the sheet according to the scheme. The most time-consuming process is, of course, the modular origami of the swan. But after reading the article, you can easily collect such a difficult figure. Beautifully designed two swans can be presented to the newlyweds by placing them in love with a pair - beaks to each other. You can do the work on a solid basis, for example, on a tray.
Try to make a small figure first. You will surely succeed. Good luck!