The history of the creation of topiary dates back to the distant times of the Roman Empire, where gardeners beautifully designed patrician gardens, pruning bushes and trees. Many centuries have passed since then, but the art of creating such designs has survived to this day. Craftsmen have come up with their own smaller form of artificial trees, which serve as decor items in the room.
Do-it-yourself topiary make absolutely any material, but there are general rules for working on such crafts.
In the article, we will consider in detail the main methods of manufacturing small trees, with which it is better to start work, what materials to buy. We also describe several options for self-production of the crown of the tree of the desired shape. After reading, even novice masters can easily cope with the task.
Necessary materials
In order not to be distracted from the process of creating a topiary with your own hands, you need to prepare all the components of the craft in advance. First of all, the shape of the crown of the tree is chosen - a cone, spherical, heart-shaped. Sometimes for a man’s birthday, the top of the tree is shaped like a dollar. The traditional do-it-yourself topiary has the shape of a ball. In handicraft shops, you can buy ready-made figures from polystyrene. It is most convenient to use them in work, but if you did not find such a blank or simply do not sell it in your locality, do not be discouraged, then in the article we will also consider the independent production of blanks for crown at home.
Every tree should have a trunk. You can also dream up with this object. You can strengthen the crowns on one thick and short stalk using a wooden stick or a cardboard sleeve, attach a branching tree branch or twist it of any non-standard shape from thick wire.
Put the resulting tree in a flower pot, tin can or any decorative item, such as a cup or teapot.
Next, we consider the step-by-step instructions for the do-it-yourself topiary.
Base for crown
If you bought a ready-made ball or heart made of polystyrene foam, then greatly simplified your work. If not, then let's look at two options for self-fabrication of the base.
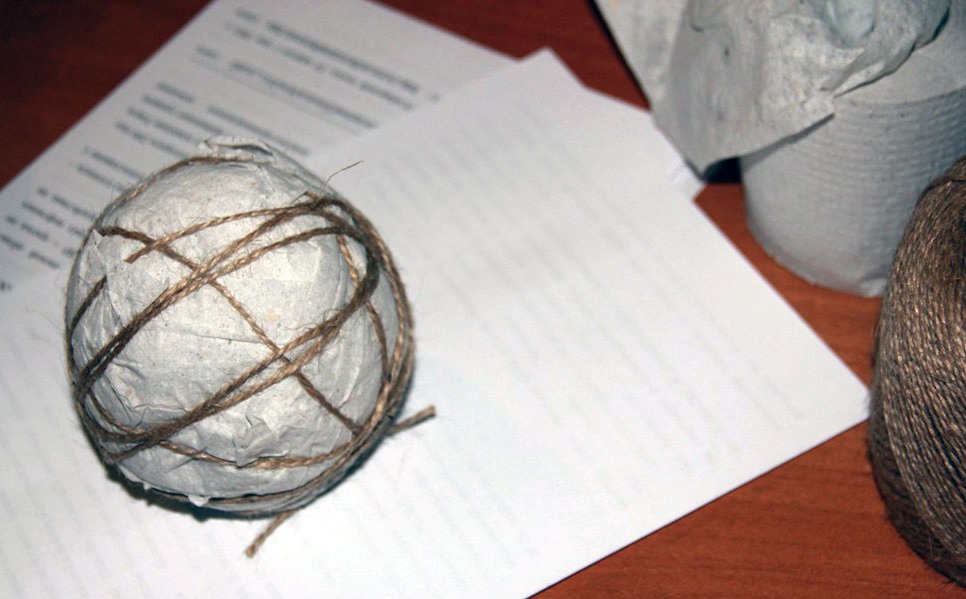
- You can perfectly make a ball out of several layers of the newspaper. The paper first wrinkles in the hands, then curls in the palms of a ball and turns into the next sheet. To prevent the newspaper from spinning, the last layer is made of napkins glued around the ball on PVA. You can further strengthen the design with threads - simple, knitting yarn or a thin hemp rope.
- If you recently had a repair and left a spray can with mounting foam, then from it you can make a wonderful base with your own hands for the topiary. You will need a balloon, the inside of which is washed with water. Then, with a hole, it is pulled onto the nose of the spray can, and the foam is blown into the inside of the rubber product. Do not overdo it so that the ball does not burst! Hands, while the foam has not yet hardened, you can give the base any shape - a ball, cone, heart, etc. When the whole mass is seized, the rubber coating is simply cut off and thrown away.
Top decoration
The article presents photos of the topiary, made with their own hands, of various shapes and using a variety of materials. On the prepared basis, it is easiest to stick the same paper flowers cut according to the pattern on PVA. If this is your first time doing a craft with a child, then this option will work just fine. Be sure to choose double-sided paper. Pebbles or beads can be inserted in the middle of the surround colors. Heavy and bulky parts are preferably secured with a glue gun.
Let us consider in more detail from which it is possible to create a crown of an artificial tree.
It can be:
- Flowers or satin ribbon bows.
- Coffee beans.
- Sisal fibers (small balls can be twisted from them).
- Artificial flowers or made yourself from corrugated paper or napkins.
- Pieces of organza or balls of fabric with synthetic winterizer inside.
This we examined the basic elements. To cover the entire ball of parts, you need to prepare a lot, so that the preparatory work is carried out in advance.
Additional craft items
If you glue the shape of the ball only with flowers or coffee, then the craft will look poor and simple. It is better to add bright accents to the topiary already made by your own hands (you have already read the manufacturing instructions). It can be shells and sticks of cinnamon, cones and star anise, dried mugs of lemon or orange, plastic ladybugs or butterflies. You can alternate elements, for example, stick one ball of sisal, and next to it stick a flower of paper.
Also, carefully choose the color scheme of the elements so that they look aesthetically pleasing together.
We make the stem
The rod should be combined in size with the shape of the upper part of the craft. If the ball is large, then the stem is better to make a short and even. Sometimes a tree is made using a natural branch branch, on each end of which a ball is worn. They can be from 2 to 5 pieces. It will turn out a small artificial bonsai.
Many masters experiment not only with the crown, but also with the shape of the stem. To create an exclusive version of the do-it-yourself topiary (step-by-step explanation below), you need to prepare a strong thick wire. With the help of pliers, you can give it any shape, for example, a twisted spiral or twist together several parts together, as in the photo in the article.
If you use a branch cleared of bark, then you can not decorate it with anything, but simply paint it in the desired color with acrylic paints. If the wire is in operation, but its diameter does not suit you, you can always increase it. To do this, use additional layers of paper or fabric, any napkins. So that the thickening is not visible, the entire core is wrapped with thread or a thin rope. Many craftsmen spiral wrap a stick or cardboard sleeve with satin ribbons of green or brown.
How to strengthen the rod
If you want to make a durable craft, then to strengthen the stem you need to use gypsum or alabaster. A mixture of powder and water is poured into a container prepared for the topiary. It is better to knead it with a spatula or an unnecessary spoon in a separate bowl. When the consistency of thick sour cream is reached, then everything is done correctly, it can be poured into a stand for wood. If you get a liquid mixture, then add gypsum, if thick - water.

The solution is not poured into a flower pot to the very top. It is necessary to leave a couple of centimeters to decorate the surface so that gypsum is not visible. Until it freezes, a stick or wire is inserted. Look carefully so that the location is perpendicular, otherwise the topiary will turn out to be crooked. You can cut a support out of cardboard so as not to hold the item in your hand for a long time. After solidification, the cardboard can be cut off. The ball on the stick can be worn either immediately or after the solution has solidified. It does not really matter. The main thing is, after making holes corresponding to the diameter of the core in the crown, drip a little into the glue. Then the branch will firmly hold the craft. You will not need to worry about the integrity of the product when carrying it. If you want to make a tree as a gift to a loved one, then use gift wrapping made of polyethylene to preserve the topiary on the road. To do this, put the pot in the center of a large square, all the edges are bent to the middle, above the tree, and the ends are tied to a lush bow made of satin ribbon. How to make a topiary with your own hands, you already know, let's look at a few holiday options for crafts.
Christmas tree
Recently, conservationists have recommended that all residents of the planet for the New Year not buy live trees, but do holiday handmade crafts. DIY do-it-yourself topiary is easy to do. Use the little Christmas balls remaining from last year, tinsel, colorful rain, plastic hearts or snowflakes.
You can decorate a flower pot with a bunch of thin serpentine, plant a little Santa Claus on it or insert sweets for children. On the festive table, you can make a temporary topiary of tangerines and chocolates. In this case, the core is not installed in gypsum, but in a piece of foam, which is cut to size and tightly inserted into the container. Give your child the imagination to paint and mark tangerines with markers by drawing funny faces - eyes, mouth and nose.
Present for the wedding
A pair of heart-shaped topiary can be made for a wedding feast. Such trees are placed on a table designed for gifts or for a cake. The contours of foam hearts are wrapped with jute or sisal rope. A beautiful curl hangs in the center of the recess. Then both the stem and the heart are entwined with white or contrasting thread, between the turns of which are attached half beads. The halves of the upper parts are decorated with artificial roses. The pot is selected light or white. The upper edging is glued with a satin ribbon with a bow. The gypsum base is covered with small bouquets of flowers.
Conclusion
The article presents several do-it-yourself topiaries in the photo, a step-by-step explanation will help novice craftsmen do this work with ease. Realize your creative ideas using our tips. Good luck in your work!