Do-it-yourself housekeepers - what could be better than a gift to yourself and friends? Moreover, this is not just a toy, but an ancient amulet.
Brownie as a talisman
For many centuries, brownies have been responsible for comfort and order in the house. They also protected him from all evil.
The brownie has several names: the owner, the homemaker, the housekeeper, the gravy and so on. He even has his own holiday - February 10th. On this day, it’s customary to appease your house. For example, pour sugar in a saucer and put it in a secluded corner.
We bring to your attention several workshops that teach how to make your own little house from dough, burlap, thread and nylon.
List of tools and materials for making a burlap domen
- Sackcloth.
- Rope.
- Material for stuffing (cotton wool, synthetic winterizer or any grains).
- Glue.
- Eraser.
- Pins
- Two beads for the eyes.
- Woolen threads of red color.
- Big beads.
Master class: burlap brownie
Burlap sackcloths are made as follows:
- Cut a large flap of burlap with the same sides (for example, 20x20 centimeters). The size of the finished house-block depends on its size.
- Spread the shred and place the selected packing (for example, cotton wool) in its center.
- Fold the corners of the burlap together, as if making a knot.
- Add more stuffing if necessary.
- Tie the corners tightly with an elastic band (picture 1). It turned out the trunk of the house.
- Sack the excess burlap that made up the tail and make it a “hairstyle” (picture 2).
- Cut another piece of burlap and disassemble it into threads.
- Weave four braids from several threads (picture 3). This will turn the arms and legs of the house.
- Attach pins to the torso and legs (picture 4).
- Take the thread and fold it in half several times, so that in the end you get a piece about five centimeters in size.
- Tie the resulting accordion from the threads in the middle.
- Cut the thread from both ends to get a few strings connected together.
- Fold what happened, again in half and bandage.
- Fluff. You have a nose and a beard (picture 5).
- Glue your nose with a beard to your body (picture 6).
- Cut two small pieces of burlap.
- Stuff them the same way your body does.
- Place the free end of the leg inside each piece and tie a knot.
- Embroider the nose with red thread and glue the bead eyes.
- Glue large beads on bast shoes.
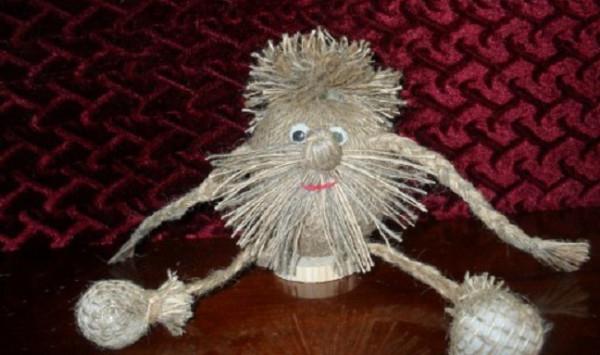
Burlap brownie is ready!
List of tools and materials for making a napkin
A napkin from kapron is made using such tools and materials:
1) kapron tights or socks;
2) stuffing material: synthetic winterizer, cotton wool and the like;
3) beads for eyes: two large white and two small black;
4) thick wire;
5) pin needles;
6) thread with a needle;
7) eye shadow for makeup;
8) fabric;
9) scissors;
10) gum-hairpiece.
Dominok from tights: a master class
If you have never made kapron dolls before , don't be discouraged. The proposed workshop will give you a detailed description of the process of working with photos.
Do-it-yourself housekeepers from kapron are made as follows:
- Cut a piece from the tights. Let's make a head out of it.
- Fluff stuffing material (synthetic winterizer or cotton wool), if necessary.
- Fill a cut off piece of tights (picture 1).
- Poke one side of the tights and attach it to the future nape of the house.
- Leave the other end unbound.
- Roll a small ball from the packing and place it under the capron where the nose should be.
- Poke your nose with two pin-needles from top to bottom (picture 2).
- Connect the resulting holes with a needle and thread in two - the top and the bottom (picture 3).
- Repeat step 8, letting the thread to the side of the spout and tighten it (picture 4).
- In each of the lower holes, make a small stitch, which is led up (picture 5). The result was nostrils.
- Pick up and stab the bottom of the tights.
- Mark the eyes with a marker.
- Mark the corners of the mouth with a marker.
- Make the eyes. Insert a needle with a thread into one of the points outlined for the eyes, then string a white bead and a black one on top. Pull the thread through the white bead back (picture 6).
- Bring the needle to the point indicating the corner of the mouth.
- Tighten the thread and form a cheek (Figure 7).
- Make another eye and cheek.
- Make a mouth. To do this, draw a stitch from one corner to another and tighten it (picture 8).
- Withdraw the needle in the middle of the stitch just below the spout.
- Insert the needle in the middle of the mouth and tighten the thread (picture 9).
- Make the lower lip. Step back a little from the corners of the top and sew a stitch, then tighten it (picture 10).
- Form and brow your eyebrows (picture 11).
- Chip off the end of the capron that was on the top of the head. Cut off excess and carefully sew.
- Break off the nylon, which was below, and cut off the excess. Sew it, leaving a small hole (picture 12).
- Apply makeup with ordinary eyeshadow. For example, paint the lips and make a blush (picture 13).
- Make the frame of the body. The ratio of head and body is 1: 3. Bend the wire as in picture 14.
- Wrap the trunk frame with a padding polyester (Picture 15).
- Sew a shirt. Fold a piece of fabric in half with the front side inward. Trim and sew it as shown in figure 16. Make a small neck so that the body frame passes.
- Sew pants. Take another piece of fabric or a piece of trousers. Sew it as in picture 17.
- Put on the frame of the torso and sew the head (picture 18).
- Take the chignon gum and cut it in half.
- Sew it in a circle to the top of the head (picture 19).
- Draw a palm on a piece of kapron, like a mittens. Cut it and sew the edges, leaving one for stuffing. Fill her. Make fingers with stitches (picture 20).
- Make one more hand and sew both to the frame under the shirt sleeve (picture 21).
- Make a hat and socks (pictures 22 and 23).
- Sew a hat and socks (picture 24).
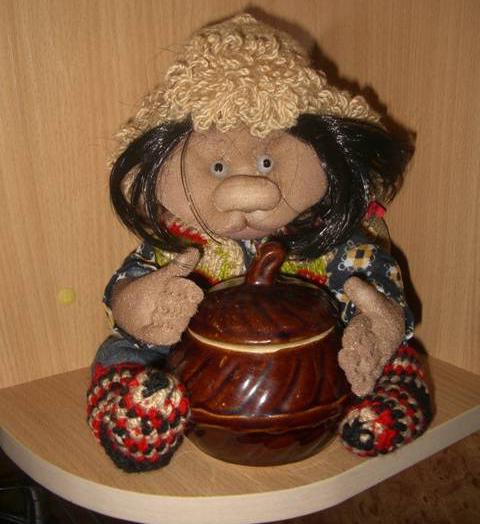
The tights little house is ready!
The list of tools and materials for making a domino from threads
- Two sheets of cardboard or two disks.
- Scissors.
- Woolen threads.
- Glue.
- Beads.
- Colored paper.
- The big needle.
Master class: brownie from threads
Do-it-yourself home-made threads are most often made using pompom technology. That is, to begin with, you make a pompom, then decorate it at your discretion so that you get a brownie.
Operating procedure:
- If there are no discs, cut two circles out of cardboard and make a hole in the middle of each.
- Put the discs or circles together.
- Thread the needle.
- Wrap the circles tightly together, pulling the needle into the hole in the middle, as in the diagram above.
- Wrap a few more rows of thread in the same way.
- Insert one scissor blade between the circles and cut the thread.
- Spread the circles a little.
- Tie a knot on the thread between the circles.
- Remove the circles. You got a pompom.
- Cut out eyes and mouth from colored paper.
- Glue them.
- Glue the pupil beads on top of the paper eyes.
- Roll up a small ball of thread.
- Glue it between the eyes and mouth. It will be a nose.
The little house from the threads is ready!
List of tools and materials for making a dough brownie
- Salty dough.
- Paints.
- Tassels.
Additionally, an oven is required.
Ingredients for the dough:
- two glasses of flour;
- a glass of finely ground salt;
- 180 grams of water.
Master class: brownie from the test
Make the salt dough. To do this, mix all the ingredients in a bowl and knead them thoroughly.
Now start sculpting from the dough. This is the same as sculpting from plasticine. Take a small board and place work on it. You can make a house figure both flat and three-dimensional.
Do each detail separately, gradually connecting them together, as the salty dough can have time to dry.
First fashion your head, make eyes, nose and mouth. Then form the torso. After that, make a couple of pens and legs. Attach the limbs and head to the torso. Give the whole figure a shape. For example, highlight the cheeks and eyebrows on the face, fingers on the hands. Also do not forget to make a silhouette of clothes and hair on the head. In general, feel like a sculptor.
After you have made a figure, it needs to dry. To do this, place it on a baking sheet and place it in the oven. Dry the figure for about an hour at a temperature of 80 degrees. Drying can be arranged on a battery, but this process will last much longer.
When the figurine has dried thoroughly, let it cool. After that, proceed to decorate the house. Then show your imagination.
The dummy is ready!
Tip: for needlework, choose bright colors of fabric, threads, dyes and decorations. So do-it-yourself housekeepers will be much more interesting.