The tradition of decorating eggs for Easter a long time ago, and nowadays, more and more interesting methods for this appear. But to make beautiful gizmos is not necessary only on holidays. Want to learn how to weave eggs from beads? A master class for beginners will help. As a result, you will get not only an original holiday attribute, but also just a beautiful souvenir.
What may come in handy
If you are determined to learn how to make eggs from beads with your own hands, please be patient. This art does not welcome haste. You will also need multi-colored beads, fishing line, thread or wire, the thinnest needle (or special for this purpose). In specialized stores you can purchase blanks in the form of eggs made of wood or plastic. They are needed in order to master the weaving technique. By the way, you can also make stands for Easter eggs from beads. The smaller the beads, the more tender the pattern. Transparent beads are suitable only for snow-white blanks.
Easter eggs are not only braided with beads, there are also techniques for pasting and decorating (decoration). In the latter case, stock up on special pockets. You will get a very beautiful, elegant option.
A few words for beginners
Those who weave eggs from beads need schemes. And even more so, they will be useful for beginners. When you perform this technique with ease, then you can do them yourself. And do not start with something complicated, choose the simpler option, where the patterns and pictures will not have too many details.
Of course, the beads should be multi-colored, but do not neglect the shades. Due to them, you can make smooth transitions between layers and weaving elements. Interesting options are obtained by adding beads or bugles.
If you want to make your wooden egg blank more realistic, cover it with white acrylic paint. The papier-mâché technique will also be appropriate. You can not use any blanks at all, but simply gently release the contents from the egg.
Experienced needlewomen recommend using wire instead of fishing line, since it does not have the ability to stretch or rub like a thread.
DIY eggs made from beads. Schemes and sizes
The novice master needs to really assess his strength and not take up immediately for complex weaving. Choose an option from two or three colors, no more. Take those where individual motifs are present, not whole pictures. So it will be easier for you to customize the belt patterns for your workpieces. There are many nuances - you need to know the height of the egg, the shape is more elongated or paunchy. You always have to count the crown of the head individually. For those who want to make Easter eggs from beads, patterns for embroidery and crochet, painted in squares and suitable in size to the workpiece, will also be useful.
So how to measure an egg? The first is a belt. To measure it, define a flat area where there is almost no narrowing either up or down. Measure its height. Look at the diagram, how many beads (i.e. cells) goes per centimeter. Multiplying one by the other, you get the required number of rows.
For those who weave Easter eggs from beads, it is important to be able to properly customize the patterns for the blanks. If the belt height is less than suggested, subtract the difference. This number of rows you will finish when you make a poppy. The height of the belt relative to the middle of the figure in the diagram will need to be shifted down. The detachable number of rows from above will be one and a half to two times more, since the egg always tapers more strongly in this direction.
Correctly determine the width will also help math. Count how many cells are in the motive, and correlate with the width of the girdle. You need to find out the required number of beads for the selected egg. Well, calculate it relative to the length of the girdle, and that’s it. If it is shorter than in the diagram, it means that the beads will also take less for you - the picture will simply change in scale.
In progress
Making Easter eggs with beads from your own hands is not difficult, you just need care and patience. Over time, everything will turn out much faster.
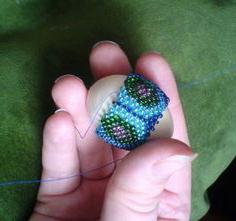
The braiding of the egg begins with the girdle. If he sat down like a glove, never puffs and has no gaps, then you did everything right, and now you can begin to build up the tops of your head. As a rule, you should start from the top. Only in the case when the extreme row slightly departs, further weaving should begin from the opposite edge in order to pull up the excess.
It was already mentioned above that when braiding eggs from beads, the patterns that were selected may have more blanks. So, those same decreasing rows are best done against a background where there is no pattern or the color is solid. You need to include them in the weaving one by one. Perhaps, in the course of work, you will understand that it will be necessary to reduce the beads more than was planned. It all depends on how pointed the egg is. In this case, alternate - turn off the beads through two or three rows, then through one and, finally, in each row. To make them as inconspicuous as possible, make them at the color transition.
Once the drawing is finished, proceed to the next crown. The fact is that your weaving will always shift in the direction in which you made it. Therefore, you need to pull it in the opposite direction and start from here. It is very important! To weave well, do not forget to regularly pull it slightly in the right direction. At the end of the figure, estimate again how it will be more correct to distribute the decreases. Never place them one above the other.
Finish
When you finish making eggs from beads, weaving patterns for the top of the head, which was specially left unfinished, are no longer needed. Even a novice master is able to come up with some kind of pattern for her on the go. And you can not close it completely. Let your pattern just surround the remaining space. Put in it a beautiful bead in tone or something else.
You can separately weave some jewelry from beads and add to the top as an additional decor. It will turn out very unusual and beautiful.
So, performing simple actions, you will learn how to make wicker Easter eggs from beads. The master class for beginners given in the article always let you serve as a good hint.
Bead Egg Stand
For the Easter version, it will be very appropriate. And for dyed or wrapped eggs will be a great decorating element. Thanks to beads or glass beads, the stand will look very elegant and festive.
Find a base that will fit the bottom of the egg. For example, a plastic lid from a medicine jar or cream may fit, a circle from a small tape.
If you wove a belt for an egg, then you will need a shirt for the stand. Make the measurements of the base in the same way as you measured the workpiece, according to the same principle. You already know how to make eggs from beads. The weaving patterns that were used for them can be used for the stand, and you can take others at your discretion. The main thing is that they are combined in color and overall style.
Weaving a shirt is best started from the bottom, and not from the middle of the base. And then go up the ranks. You can complement the resulting stand and openwork edges, just for beauty. Make the bottom the same pattern so that the souvenir as a whole looks more harmonious, but after you put the shirt on the base.
Openwork stand
Here, glass beads and small beads of a suitable color will come to your aid. If in the previous version you typed rows, then here you will weave patterns and connect them together. The number of beads and beads in the pattern is determined by the size of the bottom and the number of motifs on the egg.
The easiest option is round patterns. That is, around the beads - glass beads, alternating with beads. You get some sort of round stars. The very first is the lowest, it is also the bearing part of the stand. The next pattern is above it, a little narrower so that the result is a leg. And the next one or two rows will already be larger so that your testicle fits tightly into the stand. Do not make too many of them; in general, three or four rows of patterns are sufficient. You can just make an imitation of grass, as in the picture.
Weaving eggs from beads is most often associated with the subsequent manufacture of the stand. So your creation will look more complete.
Eggs made from beads with their own hands. Gluing technique
For those who do not want to bother with weaving, you can offer another way, more simple. This is pasting. Here, the price of the error is not so high, since all the flaws are easily fixed during the work.
This method is remarkable in that as a result you can get not only an Easter souvenir, but also just an unusual decorative accessory.
It is recommended to apply the technique of gluing on real eggs or blanks. But not very large. If you have chosen the first option, you need to release the contents from the egg. To do this, carefully make two holes - on the top and bottom. Lower let it be a little more. It is not scary if the shell slightly crack, the main thing is not to violate the integrity of the form. Do not forget to gently wash the shell and dry it.
Weaving eggs from beads provides for the option of placing it on a stand. A pasted egg can be suspended. To do this, break off a small piece from a toothpick and tie it to a thread or thin elastic for hair. And then - just gently push it into one of the holes.
We collect a pattern
So, your base is completely ready for decoration. Take a soft simple pencil and draw on the blank the pattern you want to lay out. You need to do this round the surface of the egg.
You can determine for yourself where you will start gluing beads. The main thing is that the first line lies flat. You can outline it with a simple pencil. However, small moves up or down will only add to the craft of personality.
What actually needs to be done? String a few beads on a thin needle, carefully dip in one glue in one glue and attach to the egg in the right place. Hold a little to get a better grip. Each row should be finished round. If the glue is transparent, it will be easier for you to correct errors.
As you can see, you can make beautiful eggs for Easter in many ways. They can be decorated with beads for a long time, but such a souvenir is always unique. It can be presented as a gift along with other Easter attributes to relatives and friends.
And the finishing touches
The eyelet that you attached to the blank at the very beginning can also be decorated. For example, use a bow, ribbon or braid it with beads for this purpose. If you make several of these eggs, then you can make a small garland or a bunch of them, which will be an excellent decoration of the kitchen for the holiday.
By the way, it is not necessary to paste over the egg completely - you can just make separate patterns or drawings. If there are sequins, use them too.
So you learned how to make eggs from beads. The master class for beginners on the technique of weaving and gluing, given in the article, let it become the initial stage on the path of your independent creativity.
And what if just to decorate?
Beading eggs involves just decorating. This method is great for eggs to be served.
For example, an apron can be made of beads. Of course, it is also important here to correctly measure the egg so that it lies in size. First you need to weave a round mesh with three or four rays (or belts). Next, you put an egg in it and make a row that will connect the tails. Or just completely wrap it with a net.
If you want to add something else, braid the crown at the top, as described above.
Those who wish to learn how to make eggs from beads, a master class for beginners, proposed in the article, will surely prove to be useful. Good luck!