Pine and spruce cones have long become a favorite material for crafts with children. Mostly large parts of the hero, for example, the body, are made from them. The remaining additional elements can be either from another natural material - chestnuts, nuts, leaves, or from waste material.
In the article we will consider options for making a penguin from cones. We will show what auxiliary elements are useful for such a craft, the better to fasten the parts.
Christmas decorations
Such funny penguins, as in the photo, can be made of fir cones for further decoration of the New Year tree. To create such an craft, you will need, in addition to the cone, to have pine flakes for the legs, shells from mussels for the hands, foam balls for making the bird’s head. A thin wire for a loop is also useful, for which subsequently you will need to hang a penguin from cones on a branch. The nose can be made from any stick, it will be enough only to press it firmly into the foam.
Start work by preparing bumps. It is well washed and brushed between the scales. It should be clean, without dirt. After the final drying, the body is covered with white gouache with a brush, carefully smearing each flake. Next, you need to use a bonding agent: glue or plasticine. For paws, you can also use pieces of bark or just plasticine. Around the top of the cone they tie a wire, carefully twisting it around the skeleton. The sharp edge is cut to form a flat surface for the head. The foam ball sticks well, but before this process begins, it must be painted with gouache. The white muzzle of the bird has a black sharp forelock. With a cotton swab put dots-eyes. That's it, the penguin from the cones is ready! After drying, the paint can be hung on a Christmas tree.
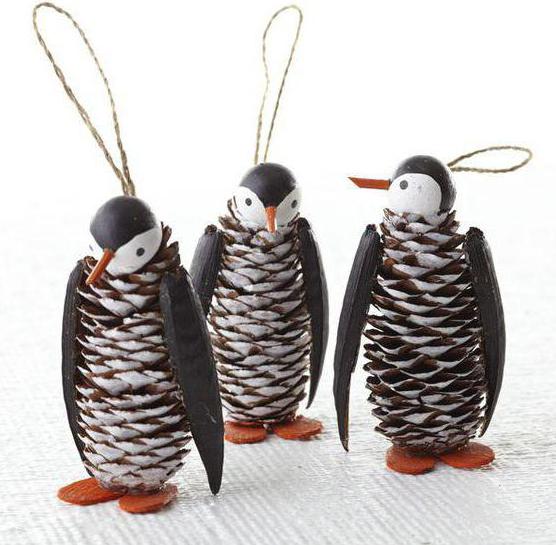
Pine cone bird
We present to your attention another version of Christmas-tree decoration. The hero of the craft is the same, only now a penguin is made from pine cones. Instead of hands, you can also use shells, any elongated shape will do. You can also attach parts to the glue "Moment" or plasticine.
The paws are most easily made of black plasticine. But on the head will have to work hard. It is made of threads of black and white, in the form of a pompom. It can be made much simpler, only from white yarn, and the necessary black contours can be made with gouache paint.
Recall how to make a pompom from threads for crafts from cones "Penguins". Such a small ball of yarn is best done on a fork. The eight is wound on sharp ends, forming a cross in the middle. Then a simple strong thread is taken separately, and a strong knot is tied in the center. The hinges on each side of the fork are cut and distributed in a circle. Sticking ends are trimmed with scissors.
Next, we begin to assemble all the parts together. The step-by-step instruction of the penguin from cones is described below:
1. Wash, clean and paint the bump with white gouache paint.
2. Glue shells-hands on plasticine.
3. Attach the lower legs with membranes made with a thin stick.
4. Glue the head, previously painted. Instead of a nose, you can attach a knot of thick black threads to the pompom.
5. On the back of the cone they tie a rope loop in order to conveniently hang a toy on the Christmas tree.
All is ready!
Frozen penguin
All children know that penguins are residents of the South Pole. It is very cold there, and penguins often freeze under icy gusts of wind. You can offer your child made penguins (crafts from cones) to warm with a scarf. Such work will look cute and at home. We make the bird a well-known method, and for a scarf you will need to buy a felt sheet. In the stores of sewing accessories or goods for needlework, you can find goods of any color.
A rectangular strip of felt is cut out, in this case, red. The edges on one side and on the other hand are cut with scissors, about 0.5 cm. The result is a fringe, as on a real knitted analog. Then the back of the felt is smeared with PVA glue and tightly attached to the "body" of the penguin. You can sew a button at the place of crossing the edges of the scarf or just grab it with thread, having made a couple of stitches from the back.
Penguin family
Such a fun little family is made of fir cones of different sizes. For dad, of course, we take the longest, for mom - the middle, and for the baby we will have to try to find such a small fir cone. The rest of the details are made of foam rubber painted in black gouache.
Consider a detailed workshop. Penguins from cones are easy to do. In this embodiment, both white and black gouache are used for coloring. Each flake is drawn completely and thoroughly. Such thin strips of foam rubber round shape can be purchased at a hardware store, in the department of insulation for windows. They are first painted with black gouache, and then adhere perfectly to the PVA. For the head will have to try, cutting it out of a whole piece. Eyes can be attached purchased, as in the photo, or you can glue paper, making the application and eyes and beak.
Finally
As you can see, making penguins from cones is not difficult at all, and special materials are not required. So - to the point! Good luck