LED strips simply cannot be plugged into a power outlet - they need to be powered by a lower and constant voltage. This is a difficulty for most people who dream of LED backlighting, but cannot afford it. Ready-made power supplies for LED strips of 12 volts cost about 500 rubles and more. Moreover, the higher the power consumption, the more expensive these devices are. It turns out to be much simpler to make the power supply yourself - for this you do not need to have rich knowledge in electronics, the circuitry is simple.
Tape supply voltage
The main parameter of LED strips is the supply voltage. Of course, it differs from what we have in sockets. By voltage, the tapes are divided into three groups:
- Power supply 12 V.
- Power supply 24 V.
- Power 36 V.
Moreover, the current must be constant! If you turn on the tape without a power supply, it will fail. The voltage of the unit must be appropriate - 12, 24, 36 Volts. With it, the mains voltage is reduced to the operating value. The most popular models of LED strips are those operating at a voltage of 12 V. Therefore, you need to select only those power supply circuits for LED strips that can generate such voltage.
Device features
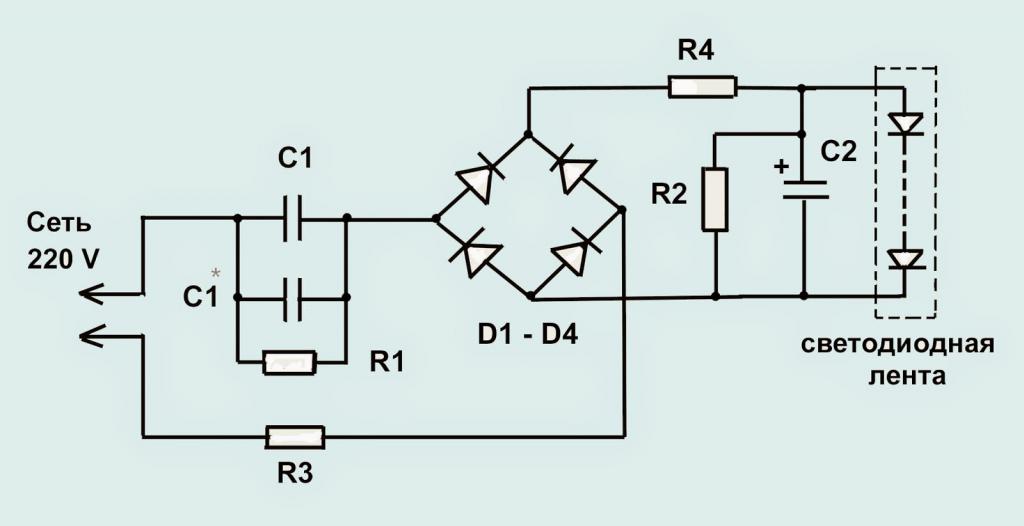
The design of such devices is quite simple, they do not have scarce elements. The standard power supply for 12-volt LED strips consists of the following elements:
- A step-down transformer - its power should be approximately 25% more than that of an LED strip. This is done so that there is a small margin.
- Bridge of semiconductor diodes. This is a simple design, which includes two pairs of semiconductor diodes, which allow to obtain a constant voltage from an alternating voltage. But more often, ready-made diode assemblies are used, which have 4 outputs - an AC source is connected to two, and the rectified one is removed from the rest.
- A capacitor installed between the positive and negative terminals provides reliable current filtering. More precisely, with its help, the entire variable component is cut off. Diodes perform current conversion, but after that a small fraction of the variable component remains. The electrolytic capacitor allows you to get rid of it.
All of these components are housed in a rugged enclosure. Moreover, if there is a need, a cooler (fan) is installed. You can even make it turn on all the time - this will ensure the normal operation of a homemade LED strip power supply. When making it yourself, it is recommended to pay attention to the safety of the device - it should not overheat.
Transformer power supply
The simplest in design are transformer power supplies. The main element in it is a coil transformer. With its help, the voltage decreases from 220 V to 12..15 V (or 24, 36 V). The voltage that is generated on the secondary winding is fed to the input of a bridge rectifier on semiconductor diodes. Then filtering occurs using a chain, usually consisting of an electrolytic capacitor, resistor, inductor. Sometimes zener diodes or microassemblies are installed in order to fix the output voltage at the same level.
The advantage of transformer power supplies is that they work even without connecting a load (the so-called idle mode). In addition, there is a galvanic isolation with a network of 220 V. But, despite the simplicity of the design, there are a number of disadvantages: very low efficiency, large dimensions, and high sensitivity to voltage drops. And the most important inconvenience is a large mass. It is because of these shortcomings that many use transformerless power supplies for LED strip.
Impulse PSU
It is not necessary to think that there is no transformer in pulse type constructions. It is, but its dimensions and weight are much smaller than those of the structures discussed above. The device operates at high frequencies (several tens of thousands of Hertz versus 50 in a domestic network). But the flaws remained the same - high sensitivity to voltage drops. Moreover, when operating in idle mode, the device may fail. Such power supplies for 12-volt LED strips can be used, but it is not recommended to turn them on without load.
How to calculate power
When making the power supply yourself, you must take into account the power consumption of the LED strip. The exact data can be found in the specification for a specific model. But the data of the most common types:
- SMD-3528 containing 60 LEDs on 1 meter, the total power of 4.8 watts.
- SMD-3528 with 120 LEDs per meter has a power of 7.2 watts, respectively.
- SMD-3528 with 240 LEDs per meter has a power of 16 watts.
- SMD-5050 with 30 elements - 7.2 watts.
- SMD-5050 with 60 elements - 14 watts.
- SMD-5050 with 120 elements - 25 watts.
If you are selecting a power supply unit (finished) for an LED strip or assembling elements for self-production, you need to consider all parameters. The main ones are:
- Power.
- Working voltage.
In order to calculate the total power of the tape, you need to know how much one linear meter consumes. Then this value is multiplied by the length (in meters). Next, you need to add another 25% of the obtained value and select a power supply (or transformer), whose power is closest to the calculated one.
Power calculation example
For example, you have a tape in stock:
- For each meter there are 40 LEDs.
- The total length is 5 meters.
- The standard supply voltage is 12 volts.
With a nominal power value of one meter of 4.8 watts, you can calculate the total value. It will be equal to 24 watts. It is recommended to add another 6 watts to this value (this is 25%). So, the power supply must have a power of 30 watts.
DIY making
So, you decided to independently assemble a power source for the LED strip. The size of the power supply depends on the power of the transformer (if a circuit with its use is selected). For a simple device, a transformer with a primary winding, designed for 220 V, is required. The output current should be about 1 Ampere, voltage - 12 Volts.
You will also need a few elements:
- Diode assembly. You can use 4 semiconductor diodes connected in a bridge circuit.
- An electrolytic capacitor with an operating voltage of at least 25 V. Cells with an operating voltage of 50 V can be used. The capacitance must be at least 470 μF.
- Zener diode or micro assembly KR142EN. This is a voltage stabilizer, but it needs to be installed on a radiator.
Power Supply Assembly Process
You have in stock an LED strip, the calculation of the power supply has been made and the elements have been selected, now you can start assembling. Use of both printed, and hinged installation is allowed.
Of course, on a printed circuit board, the whole design will look much more attractive. The manufacturing process looks like this:
- Diodes are connected to each other in a bridge circuit. Be sure to observe the polarity, on all diodes from the side of the strip on the case there is an anode (positive terminal).
- Connect the secondary winding of the transformer to the diode bridge.
- An electrolytic capacitor must be connected to the bridge output. When connecting, observe the polarity! Otherwise, the capacitor may explode!
- A choke is connected to the positive output gap.
- Further, between the plus and minus the zener diode is turned on. After it, it is also desirable to install another capacitor.
In conclusion, the entire device is assembled in one housing, the elements are securely fixed and two taps are made. The red wire should indicate the positive output, black or blue negative. This completes the manufacture of a power supply for LED strips 12 Volts, you can use the device.