If you want to refresh your interior, add the charm of the Scottish valleys to it, then heather from beads with delicate transitions from lilac to green will suit you perfectly. If you are a professional, then collecting branches of heather from beads will not be difficult for you. But even if the first time you decided to do beadwork, relying on the master class " Heather Beadwork ", you can create a real masterpiece.
Legends of heather
There is a legend in Scotland that long ago, when the gods created our world, they distributed distribution zones between animals and plants. Without life and vegetation there were only windy rocky hills. Not a single plant wanted to be in such difficult conditions, for a long time the gods looked for a daredevil, ready to become the keeper of the stone hills. And finally, the fearless heather agreed to occupy this area, holding on to the stones with strong roots.
As a reward for courage, the gods gave heather strong roots, endurance and ability to withstand any weather conditions, beautiful appearance and delicate honey aroma that attracts thousands of bees. Heather honey is considered one of the most delicious.
Heather is a symbol of endurance and beauty. Decorate your home with this miracle of beads, and no difficulty will scare you.
Tools and materials
If you are interested in beading heather, you will need a number of tools and materials. However, most of them can be found in every home, and those that you have to buy are quite inexpensive.
- Wire for beadwork with a diameter of 0.4 mm.
Of course, you can take ordinary copper of a suitable size, it is practically no different from a special wire for beadwork. If you want to give your work more naturalness, take a wire of dark green or dark brown color.
Any cutter that you find in the tool box will do. If you do not have wire cutters, you can also use scissors, although they are dull from this.
- Special containers for beads.
They are needed so that when working, the beads are not lost, and the colors do not mix. In the absence of special containers, lids from cans or pieces of cloth can be used. It is better if the fabric and lids are plain, contrasting with the colors of the beads (for light beads - dark fabric, for dark - light).
- Beads of green, lilac and light lilac colors or green, pink and light pink colors.
The listed combinations are most successful in order to make heather from beads, however, if you wish, you can make other color schemes.
Other necessary materials and tools:
- Ruler.
- Sponge or floristic oasis.
- Capacity where heather bush will be installed.
- Sand, pebbles or shells.
- Gypsum or putty.
- PVA.
Heather from beads: master class
So, you have prepared the tools and materials, decided in which colors to decorate your creation, and are ready to start work. Beadwork for beginners is not always an easy task. However, heather branches are not so difficult to reproduce. Moreover, weaving twigs with leaves and twigs with inflorescences is very similar. Let's figure out how to weave heather from beads.
Heather greens
The first step is to make twigs with foliage.
To do this, you will need:
- green beads;
- green or brown wire;
- wire cutters.
Working process:
- We spread green beads on the prepared place.
- Cut a piece of wire, about 30-35 cm.
- Fold the wire in half and collect 11 beads on it so that the 6th bead is in the middle (you marked the middle by folding the wire in half).
- We twist both sides of the wire under the extreme beads, the twisted part will be about a centimeter. You should get a loop of beads and two free wire ends. Give the loop an elongated shape.
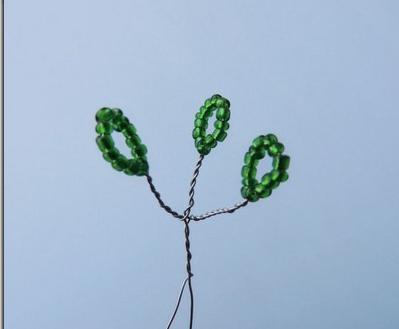
- On one of the ends, dial 11 beads, stepping back from the previously twisted part of the centimeter, twist the wire under the beads.
- Fold both ends of the wire and twist them one more centimeter.
- On the other end of the wire, also dial 11 beads and repeat the above steps.
- Make a total of 5 such loops, which then pull out into the leaves. This will be part of the green twig.
- For one whole branch, make three such parts.
- Take one of the twigs (it will be central) and fasten at the distance of 2 cm from its last leaf on the sides the other two parts.
- The number of such branches depends on the scale that heather from beads should have. For the average work, 10 branches are enough.
Heather flowers
Heather flowers have many ways to weave. Below is a master class "Weaving heather inflorescences in a row from beads." In order to weave flowers, you will need:
- brown or green wire;
- beads of pink and light pink, lilac and light lilac or blue and light blue;
- wire cutters;
- green beads.
This method is simpler, as is its circuit. Heather, the beads for which you have chosen, has delicate inflorescences, in their weaving similar to the weaving of leaves. By the way, flower branches can be made in the same way as leaves, but here is a more interesting option.
Working process
- Cut a piece of wire of the same length that you cut for a leaf branch.
- Pour two shades of beads onto two separate surfaces.
- Type 10 beads of darker color on the wire.
- Move the beads to the middle of the wire and twist the loop. Unlike leaves, this method does not imply large sections of twisted wire.
- After 2 cm, put on one side of the wire 10 beads of a lighter shade.
- Twist the wire under the beads, the length of the twisted part should be 0.5 cm.
- On the other end of the wire, dial 10 dark-colored beads and follow all the steps described previously.
- On the side of the wire with dark beads, make 2 loops of dark-colored beads and 2 of green.
- Make 3 loops of light shade and 1 - green on the side with light beads.
- Bend the sides and twist the wire under the bead loops together.
- Make 4 such inflorescences for one twig and twist them together.
- Make 20 such branches for the middle heather bush.
How to alternate colors and shades on the inflorescences, you decide, and it depends on your imagination.
Collect a bouquet
When the heather from beads, the master class for the manufacture of which we presented in this article, is almost ready, you only need to twist the free ends of the wire together and set the composition in a suitable container.
Let's say you have chosen a pot.
To fix the heather in the pot, you can use different materials. This article will tell you how to install heather in a pot using finishing putty, since when using it, the surface after drying remains flat.
You will need:
- pot;
- finished heather bush;
- floristic oasis (you can use a foam sponge);
- finishing putty;
- pebbles, pieces of moss, glass balls.
Working process:
- At the bottom of the pot, install an oasis so that its edges fit snugly against the walls of the tank and.
- From above we fill in the densely diluted putty, not reaching 2 cm to the edge.
- Carefully place a bunch of heather in the center of the pot.
- Leave the composition until the putty completely hardens.
- We decorate the frozen surface around the heather trunk with stones, moss and glass balls.
That's so easy and simple, having spent no more than two evenings on your work, you made a beautiful and unusual interior detail. Even if before that you never once held beads in your hands, such weaving from beads for beginners will no doubt be easy for you and kindle your interest in beadwork.