Many believe that making a rose from a ribbon is incredibly difficult and do not even try. Of course, the first time it may not be possible to twist a neat and lush flower, as the saying goes, the first pancake is lumpy. You don’t need to be upset, because after just a few attempts, experience will come and you will be able to do the work much easier and faster.
You can make a rose from a satin ribbon with your own hands in several ways. Each of them is fundamentally different from the previous method. There are combined options where different techniques for working with ribbons are connected. In the article, we will consider several methods of making a beautiful and beloved flower that are popular with masters.
Such an article can be sewn onto clothes, decorate a hoop or wreath for a girl, attach to a hairpin or elastic band for hair. Real artists create full-fledged paintings from satin ribbons. Of course, they probably already know how to make a rose from a ribbon. Consider this process in more detail and we are with you.
Rolling rose
Judging by the name, this rose is performed by winding the ribbon around the base. How to make a rose from a satin ribbon, we will explain step by step further. It is better to choose a material that is dense and not too wide. The tape is first folded in half in length and wound on the end of 3 or 4 layers of fabric.
Then, holding the skein with your fingers, the lower part is strengthened by sewing with a thread. You can no longer worry that the design will fall apart. The rest of the tape is twisted several times and winding continues around the stitched base. The lower edges are periodically stitched for better bonding. When the entire tape is twisted, it is necessary to burn its edge with a candle or a lighter so that the edges do not split and the threads from the tape in the finished product are not strewed. The edge is fixed again with stitches. You can add green leaves from below to make the rose look more natural. Craft is ready!
Combined manufacturing method
This option, thanks to which you can make a rose from a ribbon, includes two different methods. Firstly, the base of the rose is performed by wrapping the ribbon with flips. Secondly, large petals are attached from the bottom, which must first be sewn and then glued to the flower with a glue gun.
For work, you will need a tape of the selected color 4 cm wide. For the base you need to take a strip 40 cm long. Also, prepare threads, a needle.
Making the foundation
Before making a rose from satin ribbons (see the step-by-step photo below), you need to collapse the base of the flower. To do this, the edge of the tape is folded several times, turning up a roll. Having created several turns, the base with threads from the bottom is sutured. Then the wrapping continues, only the tape is periodically turned over and the edge of the strip of tape is bent diagonally. Every couple of turns, the flower is strengthened with threads. When the tape comes to an end, it is gently tucked down and sewn so that the edge is not visible. The thread is tied to a knot and cut off the excess edge with scissors.
The middle of the flower, made by winding, is laid aside, and the second stage of making the rose begins. Let's consider in more detail how to make a rose from a ribbon with your own hands in the next section.
Large petals
To make the lower part of the craft, you need to cut 10 pieces of tape 10 cm long. Each element is folded in half and the lower raw edges of the loop are sewn with stitches along the very edge. Then the thread is tightened so that folds form on the satin. Only then a knot is tied and the thread is cut. In this way all the blanks of the petals are made.
To fix them on a rose base twisted in advance, a glue gun is used. A few drops of glue are applied to each element on top of the seam and a tab is pressed to the bottom of the base around the sewn end of the fabric. So loops are placed in a circle in two rows. When everything is attached, the end of the ribbon in the middle of the rose from the back is trimmed with scissors. There remains a flat bottom surface that can be used to attach green leaves of the flower.
Leaf making
To do this, you need to cut a leaf on a wide green ribbon folded in half. Then it is burned at the edges with a candle or a lighter. The leaflet turns out with beautiful wavy edges. Using a glue gun, he sticks on the bottom of the finished rose. You can make a few leaves and attach a couple of turns of plastic garlands of small beads for beauty.
How to make a rose from a ribbon
A step-by-step manufacturing instruction is presented in the photo below. The craft consists of a central part and petals made separately. In order to create the basis for the future magnificent flower, you need to cut a strip 10 cm long from a 4 cm wide ribbon. How to fold the ribbon, carefully consider the first two frames of the photo. After the bottom edge is wrapped with a strong thread, the base can be put aside and start cooking a large number of petals. The more elements are used in the work, the more magnificent and beautiful the finished flower will become.
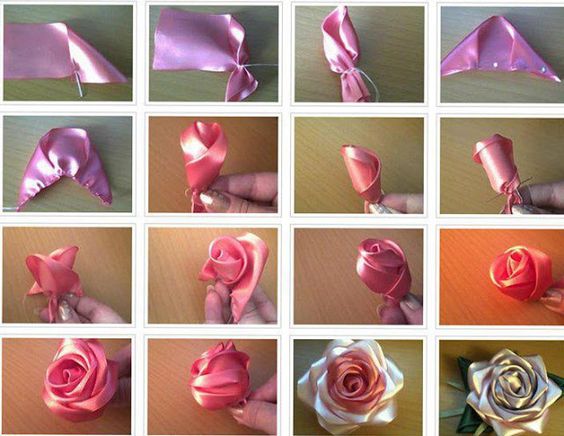
Cut lengths of 8 cm for the petals. From two sides, the workpiece is bent at right angles to the base and pinned with pins with a bead at the end. The long edge from the bottom is sewn with small stitches and the thread is slightly tightened. In this way, several petals are made, each subsequently wrapped around a previously made base and sewn from the bottom with threads. When the master visually sees that the shape of the rose satisfies him, the work ends. If desired, from the bottom you can attach several leaves collected in the same way.
Little rose on a fork
This is the fastest way to make roses. It will be needed only if the flower is needed small, for example, to create a floral arrangement on a girl’s blouse or for sewing on a hoop. To work, you need to take a large fork, a satin ribbon for a flower 1 cm wide, as well as a thin three-millimeter green - for a bow-shaped leaflet.
The winding of the tape begins by threading the edge in the middle between the teeth. Only then you need to wrap the fork several times with a cloth. Do this as follows:
- 4 turns are made around three cloves;
- 5 turns make around the entire width of the fork.
Then the edge of the tape is trimmed and all layers are sewn through with a needle and thread in one place. The opposite winding loop does not join the stitch. Further, the workpiece is removed from the fork. The seam place is wrapped with a thin green ribbon and a strong knot is tied. Then gently straighten the atlas loops in different directions. At the same time, the petals are given the corresponding shape with their hands. Advice from the master: it is better to take a dense ribbon, otherwise a thin flower will turn out to be a fairly flat flower.
Pleated Rose
How to make a rose from a ribbon so that it does not cut into pieces? It is simple, just carefully consider the following method for completing the task.
The tape can be taken in any width and length. The more fabric is collected, the more magnificent the flower will be. First you need to determine the middle of a piece of tape. To do this, just fold it in half. Next, you need to place one half at right angles to the other. Then, holding the kink of the tape with your hand, the end that is located on top goes down and wraps the workpiece from the back at a right angle.
The movement is constantly repeated until a thick "accordion" is formed. Do not forget that each time you need to rearrange the tape from the bottom up. Then with your fingers you need to hold the edges of the tape in your hands, and release the "accordion" itself. She’ll be free. The final touch of production will be the formation of a flower. To do this, one hand adheres to one edge of the tape, and the other you need to pull the remaining end. After the fabric is gathered, the outlines of the flower appear. To fix the position of the tape, its ends are tied into a knot, and the excess fabric is cut with scissors and the edges are treated with fire so that the threads do not crumble.
Rose on a stalk
To work on such a craft, you will need a wire, a green thin ribbon for decorating the stem. You also need to prepare threads, a needle, a wide ribbon to form a flower, a glue gun. In this way, you can make a whole bunch of roses and put crafts in a vase or arrange them in gift wrapping.
Equal sections of a satin wide ribbon are cut. The length is taken depending on the desire of the master. A needle with a thread matched to the color of the ribbon sews one edge with small stitches. Pulling the end of the thread, the fabric is carefully picked up by the waves.
Attaching the rose to the wire begins by spreading a droplet of glue gun on the edge of the fabric. Then, gently holding the bottom of the tape, the fabric wraps around the shaft. The very edge must be treated with fire and beautifully wrapped. The lower part is fixed with a glue gun at the base. So that the wire is well fixed inside the flower, its edge can be twisted with a pair of pliers loop.
The last step in making a volumetric rose will be wrapping the stem around a green ribbon. Its edge is attached to the glue below the flower. Then the fabric is wrapped tightly around first a wide ribbon, and then a wire. The lower end of the green ribbon is fixed to the last turn with glue.
Now you know how to make roses from ribbons. The photos presented in the review will help you better understand the procedure. Good luck in your work!