Colored paper applications are handled by children from early childhood. Already in the nursery group of the kindergarten, kids paste circles or squares. Children in the younger group use several details in their work, laying them out in the correct order. The teacher necessarily performs a sample of work and explains the sequence of actions.
Older children master different types of applications from colored paper, independently cut out the details with scissors, using techniques for folding the sheet several times.
Children of 6-7 years old come to school already with a base of skills. The first-class program is no different from the requirements in the preparatory group of a kindergarten, because many children who do not attend preschool must catch up with their peers.
In the article, we will consider several examples of colored paper applications for children of different ages; we will offer the reader a choice of various methods of making pictures.
Types of applications
Working with paper involves a large selection of tools, depending on the subject of the image. In the "Program of education and training in kindergarten" this visual activity is divided into three sections: subject, plot and decorative applications.
- Subject - the image of a single object, for example, a snowman, a bunny, a pyramid, etc.
- Narrative - some action takes place in the picture or many acting characters are depicted. For example, the plot of the tale "Gingerbread Man" consists of several elements. You can stick a house on the Kolobok window, nearby is a forest and a path.
- Decorative - decoration of household items, furniture or utensils with small elements of a floral or geometric ornament. For example, the teacher distributes cardboard eggs to the children and suggests that the Easter beautify the egg with circles, stripes, triangles, etc. A sample is given to younger children. Further, preschoolers can independently come up with a pattern by cutting out elements from colored paper.
Paper Techniques
They begin to master the application of colored paper with a simple planar gluing of finished forms. Over time, children master other ways, performing work from circles or hearts folded in half, collect pictures from stripes and using the weaving method. Interesting works are obtained from twisted balls of corrugated paper, from quilling strips.
Classes are often planned using torn paper, creating mosaic images from small pieces or whole details from torn-off shapes. Volumetric pictures or postcards can also be made from small pieces of paper wrapped around a pencil. There are a lot of ways to work with colored paper, as well as types of paper. It is textured and corrugated, corrugated and bilateral, glossy and ordinary. We will consider further simple applications from colored paper for children of preschool and primary school age with step-by-step instructions for completing work and photographs.
Hedgehog from eyelets
This work can be done with children 3-4 years old. It consists of many elements, but their educator prepares them. On the plates in front of the kids they spread the body of the animal, paws, eyes and nose. To create needles, many identical strips are cut. After the teacher’s explanation, the children around the drawn torso stick on strips folded with loops. They are arranged according to the type of petals in different directions, except for the lower part.
Then the head, paws and small details of the face are pasted. You can suggest drawing a mouth with a marker. Older children are additionally cut an apple with a leaf. It is glued under the needles so that they remain voluminous. Such an application of strips of colored paper is planned at the end of the year, when the children got acquainted with the basic methods of gluing parts on a sheet of cardboard.
ladybugs
All children like to study insects on a walk, look at butterflies, bugs and even worms. The most popular among all the guys is a ladybug. After the onset of spring, observations are made in nature, including insects. After such an excursion, you can consolidate knowledge about the bug on applications of colored paper. Children are given several circles of red or orange to glue them in semicircles to each other. When all the elements are connected by halves, the extreme sides are already attached to the cardboard.
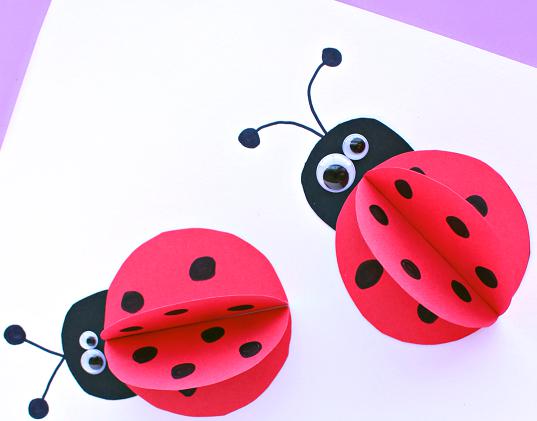
Then stick the head and antennae. If desired, you can give the children a task to cut short black legs. Children of the middle group will cope with this task easily. On each circle, before gluing the body of the insect, small black circles are attached. The work is voluminous, bright. Of particular difficulty for kids is bending circles in half and properly sticking them. All parts of the body must be beautifully spread so that they do not accidentally stick together. Eyes can be assembled from two circles of white and black or attached to the finished toy eyes.
Christmas tree
In winter, a Christmas tree decorated with toys is often chosen as the theme of applications from colored paper. In a group of kindergarten or school class, you can do large-scale teamwork and put it on the wall. Each twig is made of circled palms. Children are given green paper, a simple pencil and a hand-drawn stencil. You can pre-cut it after encircling your own.
Schoolchildren outline the stencil along the contours and cut a "twig". Stick the details on a large sheet of whatman paper, starting from the bottom of the tree. Pay attention to the compliance with the triangular shape of the Christmas tree. All “palms” are placed fingers down. The last detail depicts the top of the tree, so it is placed the other way around.
The application of colored paper for children is decorated with bright balls. They can be made from threads or pompons, dyed pieces of cotton wool or chopped finely tinsel. A stump from the bottom of the tree is made as desired. If space permits, you can supplement the work with a snowman with a broom and cut out snowflakes from several-fold white paper.
Crocodile Gena
After reading the famous work of E. Uspensky, you can make an application of her main character. Crocodile Gena is the kindest fairy tale hero who helps everyone and works in the zoo as a crocodile. Either preschoolers of the preparatory group or schoolchildren in the application lesson will be able to make an objective picture from many details. Mugs of different sizes are cut out of colored green paper.
The largest parts are for the body and head. Medium-sized circles depict the beast's paws. Small details adorn the crest of the tail, needed for the eyes and tongue. Children are given circle patterns, which must first be circled, and then independently cut from double-sided colored paper in green, orange and red. They are arranged alternately in a bent form in half, gluing is coordinated with the sample given by the teacher.
Application "Aquarium" from colored paper
For the plot application of the aquarium, fish, algae, pebbles are cut out at the bottom. Fishes can be made of different sizes and arrange them swimming in opposite directions. Children cut out the details either on their own, or they are prepared by the teacher, depending on the age group of the kids.
The application of fish from colored paper is done according to the method described above for drawing a figure from circles bent in half. The body of the fish is left flat, and the largest element is chosen. From the parts bent in half, the mouth, fins and tail of the fish are laid out. Algae can be made up of thin strips or collected similarly to the rest of the craft - from circles.
Fish in two ways
The following sample made of various non-traditional ways of applying fish from colored paper can be seen on the main photo of the article. The manufacturing process of this craft is quite lengthy and meticulous, so the lesson can be divided into two phases. The first day, you can invite the guys to make an applique out of strips of colored paper. To do this, a fish body template is cut out and, starting from the tail, gluing strips folded in the shape of a droplet is performed. Double-sided paper colors alternate. You can put them in stripes, as in the sample in the photo.
The second day is devoted to working with small elements. Small squares are cut from corrugated paper strips. Then each is put on the back of the pencil and all paper is pressed around the core. Holding it with your hand, glue is smeared on the base of the pencil and immediately attached to the place of gluing. The rod must be removed carefully and strictly vertically upwards. Crumpled cylinder-shaped paper remains in place. In order for children to understand where the borders of each color are located, you need to draw eyes, a mouth on the fish pattern, and divide the rest of the body into strips.
"Terry" mushrooms
If the children perfectly master the technique of making small elements from corrugated paper using the pencil described above, then we can offer to make a family of mushrooms, mushrooms. First, individual elements of the picture are cut out of color cardboard - mushrooms of different sizes. With a pencil, you can separate the hat from the legs and outline where the grass will be placed.
For further work, a large number of small squares (approximately 1-1.5 cm 2 ) are pre-harvested . The pencil is selected in a round shape, so that when pressed on it, appropriate bases for gluing are obtained. We will not describe the work step by step for the second time, since you are already familiar with this technique.
Intricate ornament
Geometric applications from colored paper can be both simple and affordable for kids, and complex, consisting of elements similar in shape. A decorative applique of figures can decorate a towel or beads for mom, a flower pot or a pot for soup.
A lot of the use of geometric shapes in this type of fine art. However, making a picture like the one in the photo above is quite difficult. The arrangement of parts starts from the central element. Children should carefully consider the sample, know the shapes and correctly determine the cardinal points.
Weaving bunnies
Another original way to make an application is to place contrast strips in a large part. A bunny is cut out of paper according to the template, then paper is folded in half along the center line of the body and horizontal cuts are made with scissors. Pre-harvested strips are inserted into the slots, stretching the strip from the bottom to the top of the cuts.
The next strip is done differently. First, on top of a strip carved on the belly of a hare, then below. On the finished craft, the visible parts of the inserts are staggered. Excess edges are trimmed, and the ends of the strips are glued to the sides of the craft.
Snowman at night
This winter application of colored paper is able to make only schoolchildren in labor lessons. First, the contours of the trees and the snowman are drawn, then white and black paper are folded together, only it is located with the back side up.
Then, along the contours, all elements of the plot picture are cut out. After everything is laid out on the front sides, it is clear that the image of the parts is not the same, but a mirror image. First white details are glued on the upper half of the sheet, then their “shadows” are located under them. The main condition for a quality craft is to clearly arrange the black elements so that the joints are not visible.
The article presents only a few options for performing application work. You can apply these techniques in different ways, coming up with new subject or plot pictures. Imagine with your children!