The dragon is not only a mythical character and a symbol of the East, but also a very interesting craft. It can serve as a gift for any holiday, a useful thing (for example, a keychain) or just pleasing to the eye as an interior item. We suggest you learn from the following workshops how to make a dragon bead.
What do you need for work?
The necessary tools and materials for weaving cute little dragons include:
- beads (the number of pieces depends on the size of the future craft, and the colors - on your imagination);
- two black beads (for the eye);
- fishing line or special wire (the length also depends on the size of the figure);
- scissors.
Little dragons
Such small dragons made of beads and wire can be used as a keychain, bookmarks, magnets, brooches, pendants and so on. It is enough to attach a chain, a ringlet, a pin, a magnet or any other fastening to the finished work.
You will need from 90 to 120 centimeters of fine wire, two hundred pieces of beads, at least two different colors, and scissors.
Scheme of work
Master class - dragon made of beads (weaving scheme is attached).
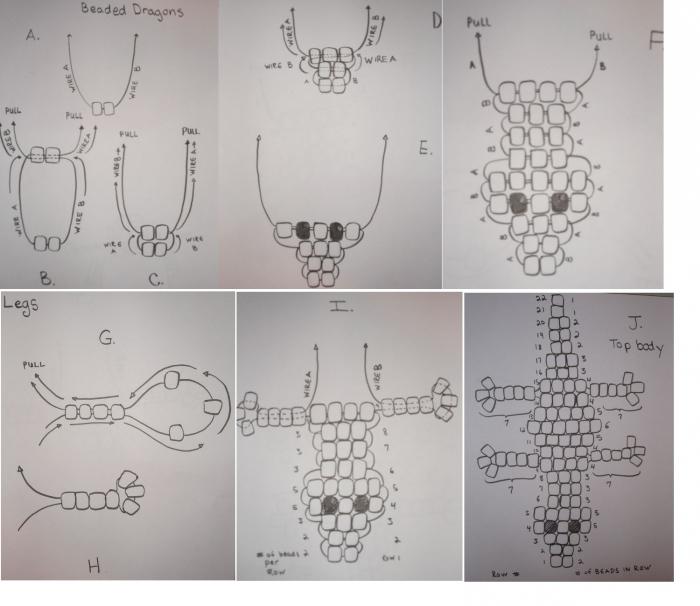
- String two beads on the wire and place them in the center (point A in the diagram).
- String two more beads on one side of the wire.
- Pass the other side of the wire through the last two beads (point B in the diagram).
- Tighten the wire. You have two rows ready (Figure C).
- String three beads in the same way as the previous two were strung (Figure D).
- Make the fourth row of five beads, as in illustration E. In this case, use the beads of the main color on the sides and in the middle, and between them - eye color.
- Continue stringing rows in the same way with the following number of beads: five, three, three, three, four (Figure F).
- String seven beads on one of the wires and draw it back through the first four (Figure G).
- Tighten the wire (Figure H).
- Repeat step eight on the other wire (Figure I).
- String a few more rows of beads in such quantity: four, five, six, five, four.
- Make paws, as in points from the eighth to the tenth.
- String eight more rows of beads in such quantity: four, three, three, two, two, one, one (Figure J).
Dragon Bead Ready!
Dragon with wings
In order to make a flying dragon, it is enough just to finish the wings on another wire and attach to the main body (for example, to the one described above).
The sequence of work on weaving dragon wings (one of the options):
- String one bead onto the wire (Figure 1).
- String four beads from one end of the wire and pass the other side through them (Figure 2).
- Repeat step two, only now string seven beads (you can alternate colors) (Figure 3).
- Make a row of ten beads in the same way as the previous two (Figure 4).
- String another row of fourteen beads, as in Figure 5.
- Now pass the right end of the wire through row number four (where you have ten beads) as follows: the wire is inserted into the first bead of the fourth row and displayed through the second into the fifth row, then returned to the third bead. Further, the fishing line is led through a row and again displayed in the fifth through the fifth bead and returns to the sixth. The trick is repeated with the eighth and ninth bead. Details are shown in Figure 6.
- In the same way, you need to draw the left end of the wire, only in the fifth row it will go through beads number five and nine (Figure 6).
- Now the left and right ends of the wire should go through the third row of beads, passing along several beads from the fourth. For the right side, these are beads numbered four and seven, and for the left - one, four, seven, ten (Figure 7).
- Similarly, as in the previous paragraphs, both ends of the wire are passed through the second row, “clinging” to every second bead from the third row (Figures 8 and 9).
- After that, one of the ends of the wire is drawn into the very first bead.
- Further zigzag steps are passed through all the beads from the upper row.
- Then another bead is strung, and the wire comes back (Figure 10).
- Next, paragraphs 11 and 15 are repeated, only the wire is drawn through the second bead from the second row (Figure 11).
- The other end of the wire is also drawn through the very first bead and makes zigzag “steps”, only through a row not used in the previous paragraphs (Figure 12). An additional bead is also strung.
- Add a small bead in the center (Figure 13).
- Pass both ends of the wire into it (Figure 14).
- Route both ends of the wire through all rows as shown in Figure 15.
- Add small beads to the tips of the wing (Figure 16).
One wing is ready! Do one more to make a couple.
Fasten wings to the body
If you did everything correctly, then as a result you will have both ends of the wire on one side. Remove them from the extreme beads, as in the first picture. Connect the wing with the body of the dragon, as in the detailed illustration below.
Tie knots at the ends of the wire.
So the flying dragon from beads is ready! For beginners, this work will also not be difficult. And all thanks to the detailed scheme.
Flat dragon
The weaving of a dragon from beads should not necessarily consist in giving it any volumes. It can be made flat, for example, as a picture. To do this, you will need to find schemes in special magazines or on the Internet. This does not have to be schematic illustrations for beadwork, they are also suitable for embroidery with threads.
Principle of operation:
- Put a sheet with a diagram in front of you.
- Start weaving from the even side or from the one with the most beads, if you are not making a picture, but a figure.
- Weave one row.
- Each new row is connected to the previous one of the ways:
- zigzag stitches if one end of the wire is used;
- if you are weaving with two ends, then dial a row on one side and draw the other through it (in the same way as described in the first master class).
Tip: if your flat dragon has a lot of uneven elements, then weave them on another wire and weave them in the right places.
Volumetric dragon made of beads (diagram attached)
This craft can serve not only as a keychain, but also as a very original pendant. In addition, you will need one large bead or a beautiful ball.
Master class - dragon made of beads (weaving scheme is attached).
- Insert a thick wire or thin wand into a large bead.
- Wrap one half of the ball next to the beads (Figure 1). Fasten the ends of the wire to the center rod.
- Add mosaic several rows of beads to the first row on one side and on the other. The ball does not need to be braided anymore. Trust your imagination and make the rows multicolored, for example, as in Figure 2.
- Connect the two parts from the previous paragraph together. To do this, pass one and the other wire in a zigzag through the extreme beads of each side. After one or two beads, additionally weave one bead of another shape, thus making a ridge. As a result, you will get the same thing as in Figure 3.
- On the side where the wire came out, your dragon will have a neck. You can continue to weave as one fishing line, or two. Add a few more rows of beads to make your neck look more authentic (Figure 4). Combine the new row with the previous zigzag “steps”.
The dragon’s body and neck are ready!
Volumetric Whelp Head
Master class on how to make dragon beads:
- The dragon’s head is knitted in a circle with the same wire that the whole body and neck.
- Take an additional two beads of a different shape and color from the rest. These will be the eyes.
- Start weaving according to the attached pattern. It clearly shows in which order and how to add beads. In the center of the figure, red dots indicate the last row of the dragon's neck.
- Tighten the wire with beads.
The dragon's head is ready.
We complete the weaving volumetric dragon
What is a real dragon without a comb on the head and tail?
Instructions on how to make a scallop:
- Finish several rows of beads.
- Figure 1 shows how the first row of the ridge is added. Make it so that the peak falls at the level of the neck, and closer to the nose the row becomes lower (Figure 2).
Instructions on how to make a tail:
- Add a row of beads, connecting it to the main body with zigzag stitches. Keep the color order of the beads.
- Make a few more rows of beads, gradually reducing their number. The number of rows depends on the length of the tail you want (Figure 1).
- The tail end will consist of one bead.
- Add two scallops to the end of the ponytail (Figure 2). The scheme of work is the same as when weaving a comb for the head.
Volumetric dragon is ready! Optionally, you can add a small ring to the fishing line that connects the scallop and head. For it, then you can attach the craft to keys or a chain.
Weaving a dragon from beads, regardless of whether it is voluminous or flat, is a rather fascinating activity, to which children can be attracted.