There are a great many ways to decorate interior items, including trays: painting, embroidery, burning, binding and much more. Of course, the choice of one or another decoration method directly depends on the material from which the product is made. It is unlikely that someone will decorate a sofa cushion by burning a picture, and on the wooden handles of a chair, he will actively embroider patterns. I would like to talk more about decorating wood products, and more specifically, to discuss the decoupage of a wooden tray. First, of course, you need to figure out what decoupage is all about. And only then it is possible to discuss the decoupage of the tray.
What is decoupage?
Translated from French, the word decouper (which is the progenitor of Russian "decoupage") means "cut". Decoupage is not only a variety of hobbies (hobbies), but also a way to originally decorate your home from the inside, to build a beautiful gift for a loved one.
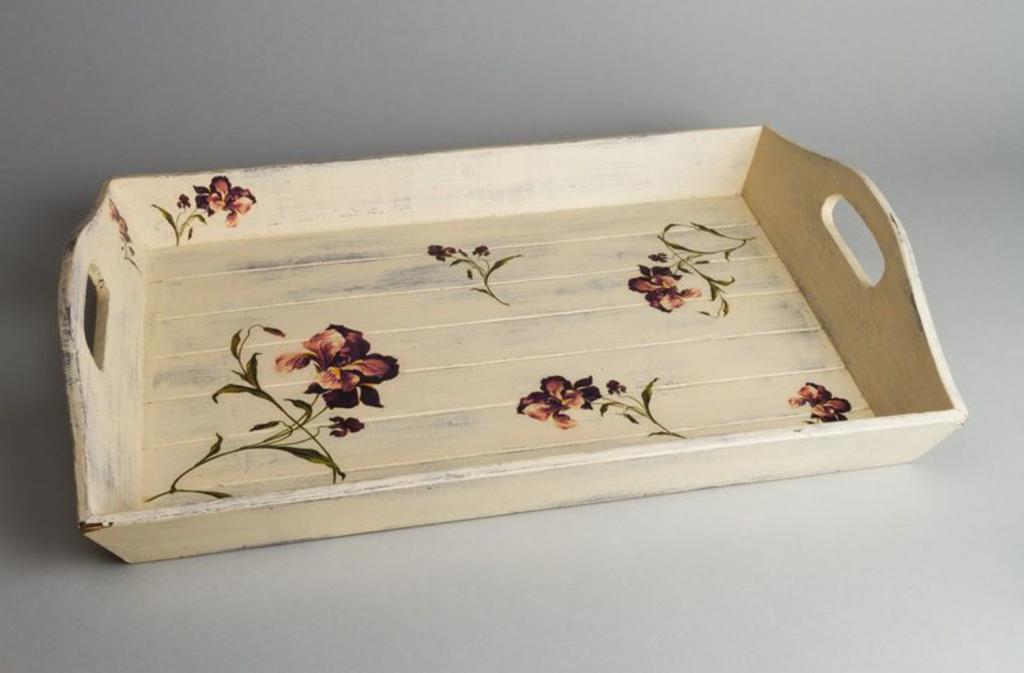
The essence of this method of decorating objects is to attach ornament elements from paper, cardboard, lace, photographs and similar material to the object to be ennobled by gluing and further varnishing to preserve the composition, increase the service life of the product and create a visual effect. For example, decoupage of a tray is a way not only to decorate a given product, but also to save time and effort in the process of refining it. Beautiful flowers, ornate patterns, autumn landscapes, celebrity portraits ... The choice of ideas for decoupage of a tray in particular, and decoupage as such, in principle, is very, very large.
Decoupage: the basic principles of the choice of ornament elements, their design and fasteners
It would seem that everything is so easy and simple - I cut out the picture, pasted it on the arm of the chair, varnished and finished. What is unusual and beauty? The thing is, firstly, in the image, the pattern that is chosen for decoration. That is, relevance, combination with the product itself, the color scheme are the fundamental factors in choosing the elements of the ornament. Secondly, it is necessary to carefully and accurately cut the necessary element. Untidiness and neglect of the contours of drawings will serve the master evil service. Thirdly, gluing pictures, photographs and other elements is one of the most painstaking stages. It is necessary to show not only patience and, again, accuracy, but also timely remove excess glue, without spoiling either the product or the pattern. And, finally, the stage of varnishing followed by drying is also an important procedure. The composition must be applied in an even homogeneous layer, not allowing unnecessary protrusions and depressions to appear. During the drying process, it is necessary to exclude the possibility of foreign objects, dust particles, crumbs getting on jewelry. So, choosing the decoupage of a tray made of wood as an example, consider all stages of the process.
Necessary materials
As with any kind of creative activity, some materials are needed to make a decoupage tray. A wooden tray acts as a decorated surface. Since the wooden surface to be treated is chosen, it is best to use a professional primer, and already paint it. Then you should decide on the drawings that are suitable for the tray. The selection of scissors is a rather significant part of the selection of the necessary materials. We need convenient scissors for cutting small parts, but it is important that there are no problems with processing large ones.
As an adhesive agent, you can take not only special glue for decoupage, but also ordinary PVA. For the convenience of applying paint, it is necessary to use sponges or sponges, and flat brushes will be convenient for smoothing the picture. As the final layer is used acrylic varnish. All these are necessary materials for beginning masters of decoupage. In the future, it is possible to use all kinds of sparkles, varnishes to create the necessary effects, gilding, etc.
Step-by-step instruction
Decoupage of the tray begins with its painting on all sides with primer paint. At least two layers are made. While the tray, or rather the paint on it, dries, it is necessary to prepare the elements for decoration, that is, carefully cut and distribute evenly on the tray (or in places where it is planned to attach). Then the gluing process begins. Accurately, clearly, patterns / patterns are glued to the intended location with glue. The glue should be allowed to dry well. Areas without elements of ornament can either be painted with a paint that is different in color from that applied at the beginning of the process, or leave the color unchanged. As a finishing touch, an acrylic varnish is applied with a brush to the entire surface of the tray. Decoupage wooden tray is ready!
Educational videos
For clarity and simplification of learning the techniques of this technique, an example with a video with a tray decoupage master class is shown.
This option is more complex, for those who are experienced either in the decoupage itself or, in principle, have worked with similar techniques.
The option is suitable for beginners who do not have rich experience in decorating using decoupage technique. Of course, these videos will help not only master the technique, but also draw ideas for future work.
The idea of a tray decoupage
Most often, not only in relation to a wooden tray, in this technique, romantic, delicate drawings, light patterns, and landscapes in pastel colors are used as decoration elements. Often, the ornament itself is cut out of napkins, ready-made pictures. Image search is carried out depending on the individual preferences of the wizard. It is best to use napkins as a "donor" of the elements of the ornament, as it is easier to fix, cut, pick up a picture. Trays with images of flowers, landscapes, still lifes turn out beautiful. You can also encrust the tray with twine, creating intricate patterns. The use of several colors during painting will compensate for the simple drawing. Using sandpaper, you can create an aging effect by passing off a new tray as a heirloom.