September and October are not only the “golden autumn”, but also the time when it is time to make crafts from dry leaves. For children, this activity turns into a real entertainment. After all, using various gifts of autumn, you can create applications on various topics. Most often, children prefer crafts in the form of a variety of animals - mice, squirrels, birds, deer, etc., as well as autumn pictures that depict yellowed trees, dry grass and the last sunny days. However, this is only a small part of what can be made from dry leaves.
Harvesting flowers and leaves for applications
Crafts from leaves of dried flowers and trees can be made not only in autumn, but also at any other time of the year. The main thing is to think about it in advance and “stock up” with the necessary natural materials. It is worth noting that you can start collecting leaves of trees and flowers for crafts and applications in the summer, when they are completely green. Then you will have more opportunities to create exactly the image that you wish. Leaves must be collected from a wide variety of trees and bushes - birch, mountain ash, oak, viburnum, willow, ash, cherry, apple, maple and much more. By the way, maple fruits, the so-called helicopters, can also be useful for autumn crafts.
In order to be able to make autumn crafts from dry leaves, the material must be prepared in a certain way. So, if there is enough time, it is best to use the old way of drying sheets - to put them between the pages of a thick book and leave for several days or weeks. If the craft is planned to be made on the same day when the materials are collected, then the easiest way to dry is to iron the leaves, inserted between two newspaper pages, with an iron. After that, they become dry, however, a little brittle, so you need to handle this material carefully.
Preparation of materials for work
Gifts of autumn - this is not the only thing you need in order to make interesting crafts from leaves (dry). For children, it is necessary to equip a convenient workplace, as well as purchase a number of other materials that may be needed during the work. For example, cardboard, colored paper, glue, a simple pencil, scissors, threads, brushes, teip tape, colored markers or markers. You may also need toothpicks or wire.
It is most convenient to glue the necessary elements with an electric hot gun. However, if it is assumed that the child will do everything without the help of an adult, then it is safer to buy him regular PVA glue.
Bouquet of roses from maple leaves
If there is a desire to make crafts from maple leaves, dry but plastic, then a bouquet of roses can be an excellent option. First you need to make a middle for the future flower. For this, it is necessary to fold a large beautiful leaf across the central vein by half and twist it into a tube. Then, the rest of the petals will be stacked around the middle.
In the center of the sheet, it is necessary to lay the core made earlier so that the front side of the future rose petal is inside. Then bend the leaf outward from the middle. It is important that this bend extends 1.5-2 cm above the core. Next, the side edges of the folded sheet should be wrapped around the middle. Subsequent rose petals are made similar to the first. Remember that each maple leaf should be opposite the previous one.
When the desired density of the rose flower is achieved so that the bud does not crumble, it is necessary to tighten all the leaves at the base with a thread. In the same way, you can make as many roses as you need for a beautiful bouquet. Ready-made flowers should be gathered together and decorated with bright maple leaves; you can also add a sprig of viburnum or mountain ash to the composition.
Leaf birds
Birds - this is another interesting version of crafts from leaves (dry). For children, the process of making such a creation will be a real holiday. Using the dry leaves of various trees, any variety of birds can be made. The most simple and at the same time interesting application is a bird sitting on a branch. To make it, you will need two ash leaves of different sizes, one birch, two mountain ash and a small twig.
First, glue the branch on the cardboard on which the future bird will sit. A little higher we attach the trunk - a large ash leaf, and we glue the birch leaf to it, turning the rounded end forward. A tail is made from two long leaves, and a wing is made from a small ash leaf. The eye and beak can be drawn with black paint, a marker or cut out of cardboard and glued to the appropriate places.
Leaf frames
What kind of child does not dream that his nursery is decorated with photographs or home-made pictures placed in the original frame? And if we are talking about a handmade frame, then it is doubly nice to place it on a work table or bedside table. It is worth noting that the manufacture of such a decor element does not require any special skills, only cardboard, leaves, glue and a little time are needed.
A cardboard template is the first thing you need to make such a craft from leaves (dry). It will not be difficult for children to independently design their own frame design. To make it, you will need to cut two squares, one of which must be left intact, and in the second, make a hole inside so that it corresponds to the area of the photo or image that you plan to place inside. Next, you need to glue these two blanks, pre-setting a photo between them.
It remains to draw a frame with dry leaves and other elements. To do this, they need to be dipped in hot water and, smeared with glue, attached to cardboard. The edges of the leaves are recommended to be wrapped on the opposite side of the frame. In the course of work, it is important to smooth all elements carefully, giving them the most even surface. When the work is completed, it is necessary to press it with a stack of books for better bonding. The finished frame can be installed in any corner of the room, it all depends on the desire of the child.
Helicopter - application from autumn leaves
All the boys really like to make various vehicles. It can be plasticine cars, trains from the designer, origami airplanes, colored paper ships and more. However, there is one more craft that children may not have guessed about. This is a helicopter made from dry leaves. To make it, you will need leaves of various sizes and shapes.
In the center of the cardboard sheet you need to glue a large sheet of pear-shaped, which will become the body of the helicopter. To make the front of the base, you need to use a pair of scissors to give the sheet a rounded shape. Next, from the long narrow leaves should be made the propeller and tail of the helicopter, gluing them to the appropriate places. On one application, you can depict several helicopters of different sizes. Such children's crafts from dry leaves will surely interest any boy, and soon he will make a new vehicle, showing his own imagination.
Animals from the leaves
All of the same materials, but different in shape and size, can produce various charming crafts. Application of dry leaves can be done in several ways - using whole sheets, cut out figures or by applying them on top of each other in several layers.
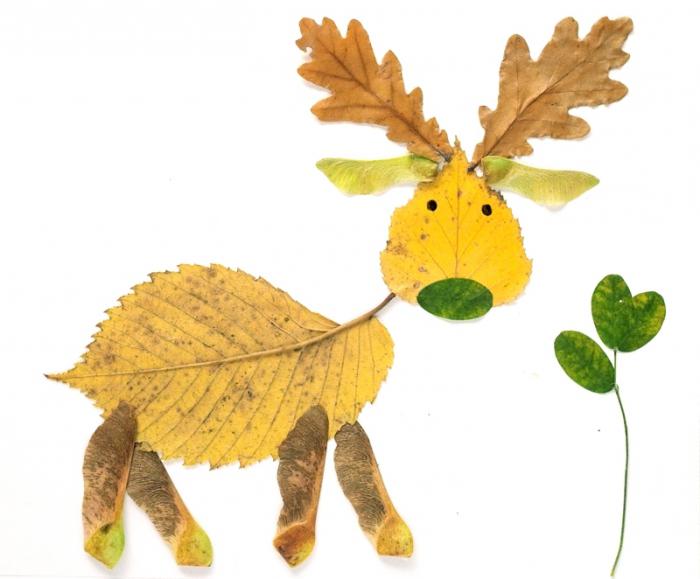
Having collected a large collection of leaves, you can try to make an unusual exotic animal. However, the simplest figures are: mice, squirrels, turtles, moose, cats and so on. So, to make a mouse, you need to stick an oblong leaf on the cardboard - this will be the body, for the head you need to use a sheet that is as close as possible to the shape of a circle, and the legs and ears should be made of very small maple fruits. In the same way, any animal can be shown on cardboard, picking up leaves of appropriate shapes for various parts of the body. For example, oak leaves are suitable for antlers of a moose and tail , for a tail of a cat and a donkey's ears are mountain ash or willow, for the head of a mouse - birch, etc. The main thing is not to be afraid to show imagination, and then everything will turn out!