Before the holidays at school or kindergarten, some parents think about how to make a paper crown for the role of queen or king. Many children, especially girls, want to be princesses on their birthday. You can buy the finished product, but it will not be original. Indeed, another child in the same crown can come to the festive matinee. The kid will be offended that he is not unique. However, this will not happen if the parents try and make a hat with their own hands.
There are a lot of ways to make a paper crown. You can draw a curly image on cardboard, creating the necessary template. Some craftsmen fold a paper crown using the origami or quilling technique. Use for such crafts cardboard, colored paper, and even a disposable paper plate.
In the article, we will consider several popular options for how to make a paper crown with your own hands with a detailed description and relevant photos.
Work with templates
The easiest way to make a royal headdress for a matinee is to draw a cardboard template. The lower part of it is a straight line, then a slight rise of 3-4 cm is performed, and then a symmetrical decorative element is drawn. Its shape can be absolutely any, from traditional royal lilies to geometric shapes. Triangles, rhombs, squares of different heights are perfect. Often the central part of the crown (above the frontal part of the head) is made higher.
Next, the circumference of the child’s head is measured, after which a rectangle is cut out of thick paper. Its length is equal to the measurements taken, and the width corresponds to the highest point of the crown. A template is applied to the strip and circled along the contours. You can fill the entire area of the crown with figured ornament, or you can make a carved picture only in the center, and leave the side and back parts with an even strip.
Then, with scissors, the resulting workpiece is carefully cut. It must be securely fastened to the back. You can use PVA glue. Another option is to fasten the ends with paper clips using a clerical stapler. How to make a crown of paper, you already understood. Now it remains to decorate it. Here you can use shiny pebbles, tinsel, rhinestones or half beads, to make a bright application on each protrusion of the crown. The choice of elements depends only on the jewelry and imagination at your disposal.
Spectacular crown
You already know how to make a paper crown using a pattern. After making it, you can decorate it with a beautiful fan in front. Such a decorative element looks very impressive, although the production does not take much time. The material for the crown can be taken different, depending on the role of the child in the holiday.
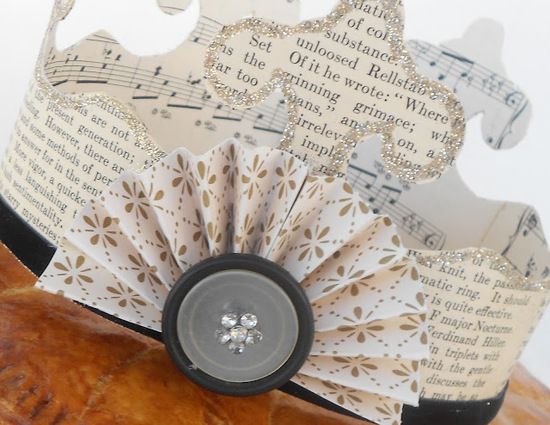
After making the main part according to the cut out template, you can take it for corrugated decoration. It is better to use printed paper. A rectangle is cut 12-14 cm long and 8 cm wide. You need to put it on a flat surface and carefully fold it with an "accordion", carefully smooth all the bends. Then this part in folded form is folded in half and the side surface of one half is spread with glue. After gluing, the decoration takes the form of a fan. The element is attached to the crown in the center of the front side. You can attach the part with a glue gun, and if it is not in the house, it is better to use the threads, sewing in the center a large bright button.
Crown for a boy
How to make a paper crown for the king, read on in the article. The craft is small in size. It is most convenient to create a crown for a boy from a sleeve from napkins or toilet paper. First draw the upper protrusions with a simple pencil, then cut the workpiece with scissors.
Cardboard can be glued with bright colored paper. The contours of the crown are induced with a marker around the entire perimeter. You can decorate the crafts with both applique and shiny elements (rhinestones, finely chopped "rain"). If the crown is made on a New Year's party, you can use tinsel or sparkles. On the child’s head, the craftsmanship is held with a thin elastic band that hangs in holes on the opposite sides of such a headgear.
Royal crown
Consider how to make a crown of colored paper for the king. First, measurements are taken. The circumference of the head is measured from one ear to the other through the forehead and the back of the head. Then the headgear height is determined. This is the distance from the forehead to the crown, plus 4 - 5 cm per allowance. According to these sizes, strips of thick paper 3 - 3.5 cm wide are cut. After fitting, the edges of the main horizontal part are fixed. Vertical segments located at equal intervals are glued to it. While the workpiece is laid aside and we will deal with the red filler of the crown.

It is made from corrugated paper. Since it is sold in rolls, you can simply wrap it around the boy’s head and cut off the excess piece in place. The edges are glued or stapled together. Then the excess height is cut off, only 15 cm is left. The upper part of the workpiece is cut into large triangles and connected in the center. It turns out a paper hat. The lower edge is glued to the yellow rim of the crown. It remains to collect the top. To do this, all strips are connected at one point and sewn together with threads, capturing the red filler.
At the end, a curly cross is cut out and with the help of thin strips of yellow paper attached to the front and back of the center. It remains to decorate the crafts with rhinestones or pebbles. Particular attention should be paid to the cross at the top and the rim around the head. Now you know how to make a paper crown. To ensure that all elements are well attached, it is better to use a glue gun. If you made the connections with paper clips, then they need to be sealed with colored paper or decorative details to make the craft look neat.
Origami crown
How to make a paper crown for a princess by folding and joining the same parts can be seen in the video below.
Such a craft is made of identical rectangles cut from colored paper. It remains only at its discretion to beautifully decorate it. What the finished crown looks like can be seen in the photo.
Lightweight Headgear
For children's birthday, you can make original crowns from disposable paper plates for all children. It will be interesting to invite children to decorate such an easy craft on their own. A hole is made in the center of the plate. From it to the rim, the plate is cut into triangular sectors.
Then, with your hands, the edges move apart (each corner must be pressed down). Colored plates look beautiful. Children in small bowls lay out small details for decoration and give adhesive pencils. For the most beautiful craft, you can give the child a prize or invite all the other guys to say nice words to him.
How to make a paper crown with a letter?
In the first grade, teachers conduct the Primer. Each child plays the role of a letter from the alphabet. Some put letters on ribbons around their necks, but they look more beautiful on their heads.
To do this, first a simple crown is made according to the template with an inflated middle. From contrasting colored paper, a printed letter is cut out along the contours and glued in the center.
Crown of triangles
Now we’ll tell you how to make a paper crown for a girl from triangles. Equal squares with a side of 8 cm are cut from glossy double-sided paper. The central square can be made larger, for example, 12 cm. Then the squares are folded diagonally and carefully bent by folds. The edges of the resulting triangles are smeared with PVA glue and attached inside the next element. When the necessary length of the craft is reached, it opens in the center and an additional row of triangles is inserted inside. They are staggered. When everything is assembled, the last triangle is fixed.
The article describes several options for how to make a crown of cardboard and paper with your own hands, gives step-by-step instructions with photos, which show the final result of the work. To make such a headgear you will need additional small details for decoration, a little time and your imagination.