Beautiful satin ribbon has long come into use as a decoration for women's hairstyles, items of clothing and gifts. But a new type of sewing appeared - embroidery with ribbons. The works of embroiderers are masterpieces. They are amazing. But in fact, this is a forgotten old art. Where were its sources, we learn from the article.
From the history of ribbon embroidery
In the Middle Ages in Byzantium came up with different types of embroidery ribbons. But the real impulse of this type of art was noted during the reign of the kings of France, in the 7th century. Only the royal family and the ladies of the court could afford such exquisite jewelry on their dresses. The technology of work, which used ribbons embroidery patterns, was also called rococo embroidery.
At that time, there were official embroidery houses that produced dresses for the royal court. Ribbon embroidery sometimes took months. Seeing the splendor of the courtyard of France, the British also mastered this technique. Until the beginning of the 20th century, she was only on the clothes of high society, and then sank into oblivion.
New birth of embroidery
Currently, embroidery with ribbons according to patterns (patterns on fabric) has found a rebirth. She is becoming fashionable thanks to Japanese, British and Australian embroiderers. This interesting textile creation is used to decorate all kinds of fabrics, clothes, blankets and sofa pillows.
According to the schemes presented in the photo, you can create vivid pictures. Novice embroiderers transfer the pattern to the fabric and embroider on it, and for more experienced ones, just look at it and do the work on the fabric.
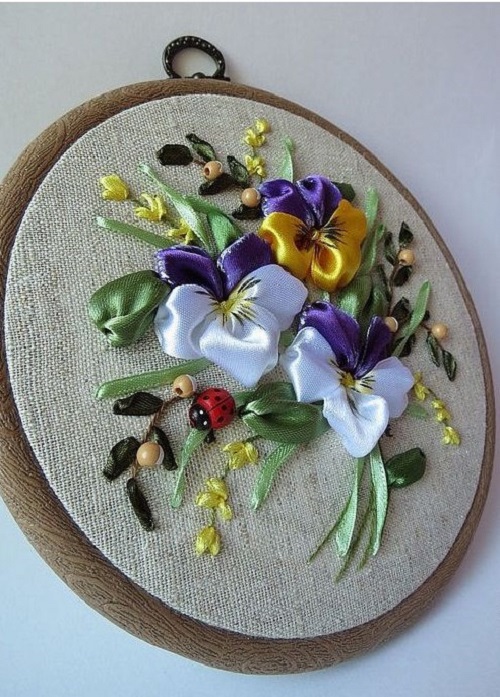
Wall paintings with unusually beautiful volumetric compositions perform embroidery. Working with ribbons allows the author to express his vision and original look at jewelry for fashionable dresses, elegant handbags or sofa pillows.
Learning to embroider
The technique is simple, even a child can do it, and the results will be excellent. To learn how to embroider ribbons, you will need certain materials and tools. The material for embroidery should be dense, but at the same time, a needle with a ribbon should easily pass through it. It can be linen, cotton, woolen or silk fabrics. Ribbons for embroidery are not wide, satin and silk.
The work begins with transferring the ribbon embroidery pattern onto the fabric. For beginners, it is important to master some basic methods and certain elements that are used in all works.
The seams used in the work
The simplest seam from all existing in the embroidery ribbon is a straight stitch. It is performed very easily. A needle from one point from the inside is inserted into another along the face of the product. After retracting the needle, the tape aligns. Such a seam is performed when creating petals or leaves.
It is important to remember the main types of stitches used in ribbons embroidery designs. The photo above also shows a Japanese ribbon stitch - a line. The tape with the needle is removed from the inside to the face and is evened out on the surface of the fabric. The needle pierce the tape and fabric, bringing it to the wrong side. Next, the stitch is repeated.
Having learned how to make the first two stitches, even beginners easily master the technique of embroidery with loops and half-loops with attachment, cobwebs and a French knot.
Getting started with tapes
To get started, you need to prepare the fabric, hoop, special needles for embroidery with an elongated eye, sewing threads for processing stems and small parts, scissors, ribbons of the corresponding color, width and length.
On the canvas, a drawing is made of what should be embroidered with ribbons - a diagram. For beginners, a master class by Tatyana Ulanova is presented step by step. In it, the designer tells and shows how to embroider poppies. Video is always easier to learn.
When embroidering, make sure that the poppies are not too close, otherwise they will look unnatural on the canvas. To make the work look attractive, first make an embroidery pattern with ribbons, where each element is painted.
The diagram draws all the additional decorative elements that will be embroidered with ribbons. It can be unopened buds of poppies on the stems, and the stems can be made of thin tape with ordinary stitches. These can be chamomiles, which are easy to sew with straight stitches.
Bell embroidery
Bells in the photo - embroidery with ribbons according to the pattern. For beginners, a step-by-step instruction is as follows.
- Prepare a green ribbon 6 mm long for the stalk.
- Fasten the ribbon knot. To do this, wrap the end of the tape 0.5 cm twice and make a puncture in the center of the square and stretch the entire tape.
- Pull the tape through the canvas and twist to get the stem. Put on the canvas and fix, that is, make a puncture in the stem and stretch the ribbon on the wrong side.
- From the inside, make a puncture in the stem and form one leaf with a Japanese ribbon stitch.
- If the tape runs out, fasten it on the wrong side.
To perform the bell, you need to take a ribbon 12 mm long in purple color and continue the step-by-step embroidery with flower pattern ribbons:
- Fasten the ribbon knot. To do this, turn the end of the tape once by 1 cm, make a puncture in the center of the square and stretch the entire tape.
- To retreat from the tip of the stem by 2-3 mm and stretch the tape.
- Twist the ribbon into a tube and make a loose French knot. To do this, take the twisted tape with your left hand, put the needle on top, and twist the needle around the needle from left to right 4-6 times without twisting.
- Make a puncture in the canvas with a needle with wound ribbon rings 0.5 cm below the elongated lilac ribbon. Pull the tape on the wrong side, a small bump will appear on the canvas.
- Spread the tape from the wrong side and pull the needle a little to the left of the nodule. Flatten the tape and hug the knot on the left side (the height of the knot is the volume of the bell), pierce with a needle under the very knot on the left with a straight stitch. Do not tighten the stitch to make a curved edge of the bell.
- Similarly, make the right and center petals.
Tips for embroidery masters
Experienced craftswomen have their secrets on how to make work truly beautiful.
- You need to start work on a carefully smoothed canvas, preferably through a damp cloth. It will be difficult to do this after embroidery.
- If the embroidery will be done on a thin fabric, such as silk or organza, you should wrap the hoop with a simple cloth, such as a bandage, so that the base does not slip.
- It is better to embroider with small pieces of ribbon that are enough for one flower or stem with several leaves located nearby. The ends need to be hemmed.
- No need to twist the tape during embroidery, if the pattern does not require it.
- Tape tension should be adjusted so as not to deform the web.
- The visual expressiveness of embroidery with ribbons according to patterns can be obtained by alternating ribbons of shiny and matte, transparent and plain silk or satin, narrow and wide.
- You can add charm to the work with a small amount of thin lace.
If embroidery with ribbons has become your hobby, transform inconspicuous items of clothing and interior into interesting textile masterpieces.