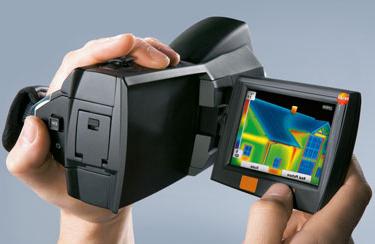
A thermal imager is a device designed to monitor changes in the temperature distribution on a given surface. All recorded changes are displayed on the display of the device in the form of a color field in which a certain color corresponds to a certain temperature value.
The device, specially designed to monitor the temperature distribution, has a large number of advantages that become apparent to all those who at least once in their life have encountered using a thermal imager. This device instantly captures temperature differences and therefore is able to clearly record all temperature differences.
Modern thermal imagers are divided into stationary and portable (or portable). The former are designed to control a variety of technological processes in industrial enterprises, the latter are necessary for everyday use in special assessment work, when mobility and ease of use play a very important role.
Using a thermal imager, you can easily monitor under absolutely any weather conditions, draw up thermograms, check how well the room is insulated, find the warmest or coldest place in the room, determine the source of a draft or “dew point”, that is, the place where it accumulates the most water due to temperature changes. The latter, for example, helps to effectively prevent the formation of mold and rotting processes.
Despite the fact that this device is useful and in demand in many areas, most people hesitate to buy a thermal imager, because its cost is quite high. And precisely for this reason, many consumers have the idea to make a thermal imager with their own hands, especially since to assemble it possible from inexpensive materials at hand. It takes a minimum of time and effort and does not require any special knowledge.
The only thing here is important to consider that such devices are quite complex and multifaceted, and therefore if the consumer decided to make a thermal imager with his own hands, he should understand that he is unlikely to take full advantage of the device’s functionality. However, a device that perfectly copes with solving everyday problems will be very simple to make.
So how to make a thermal imager? Where to begin? First of all, in order to assemble a thermal imager with your own hands, you need to take a conventional infrared thermometer - a device that measures the temperature at a specific point at a relatively short distance. Next, through a special board - Arduino, you should connect the thermometer to a set of RGB type LEDs (for example, LEDs from a flashlight). After that, the system is programmed in such a way that the color that the flashlight will shine depends on the readings displayed on the thermometer. As a rule, blue corresponds to a low temperature, and red to a high temperature. Now, directing the flashlight to one or another surface, depending on the temperature, it will be possible to observe the "backlight" with the corresponding color. The portable thermal imager is ready!
And now the main idea: any digital camera is put in slow motion mode in order to take pictures every two to three seconds and thus fix the lighting from the flashlight. The user only needs to go around the entire room with a flashlight, and a digital camera will take pictures that are in no way inferior to a factory-made device.
As you can see, making a thermal imager with your own hands is very easy and simple, and despite the fact that as a set of accessories you just needed a regular thermometer, an Arduino board, a LED flashlight and a camera.