The theme of this material, “Daisy,” is origami from the modules. How to create such a beauty, we will describe in detail below. Chamomiles are simple, but sweet flowers, pity, they just fade quickly. Therefore, paper daisies will be an excellent souvenir for friends and relatives on memorable dates or just for a good mood.
Instruction manual
In order for us to get the “Chamomile” origami, you will need: white paper, yellow (colored on both sides), green corrugated paper, glue for paper, cocktail roll, transparent tape and scissors. We will use all this in turn. So, we need an
origami paper daisy. To get it, you must first make triangular modules. To do this, take a paper rectangle of yellow paper with proportions of 6 to 4, its exact size depends on what size the flower will be. It must first be bent along, and then bent again, but across. Put the resulting figure like a house with the roof up. Raise the edges up and bend in this position in half. It looks like something like a tent. Flip and bend the free edges. There are small free triangles, bend them too. It turns out to be a triangle. Bend the large free ones back, but now they are already with the contours tucked up by triangles, bend them so back. Now fold in half. The modular blank is ready. The formed pocket is needed in order to insert another module into it.
Petals
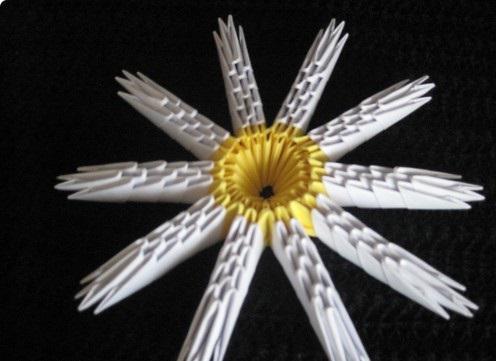
Now an origami daisy is created from the blanks. It is necessary to decide how many yellow modules you need. It depends on the desired number of petals in a row. For example, there will be 7 petals. Then, based on the calculation that 1 petal is equal to 2 modules, and there will be 3 rows, there must be 42 such yellow blanks in total. We take the number of modules we need per row based on this calculation (if there are 7 petals, then 14 modules in a row). Please note that the module has a long edge, and there is a short one. So, we put the first row to the surface necessarily on a short edge. We put the next row of 14 modules on the first, but already putting them on a long edge. We put the last, third row on the second, putting it again on the long edge. You need to be careful that everything does not fall apart at this stage, the modules have not yet been fastened. When the row is assembled, then the last module draws the row into a circle. When all three rows are assembled, it turns yellow, like the sun, the base of chamomile.
Stalk

At the next stage of making origami “Daisy” we start working with white modules. They are made just like yellow. How many of them do you need? Another row on top of the yellow ones is needed - these are 14 white modules. One petal is created from seven modules, that is, for daisies with seven petals, these are 49 modules. So, for the variant with seven petals, you need 3 white modules. The 4th row is being made, but it is already made of white modules. And now we string the petal according to the principle of 1 module, and from above 2, and so 5 times. That is, the petal begins with 1 module, 1 and ends. The remaining 6 petals are done exactly the same. We turn the design over, and that's it, the flower itself is ready, but it needs to make a leg. A strip of approximately 1 cm thick and 2 leaves are made of green corrugated paper. The beginning of the strip is glued to the cocktail tube and wound in a spiral to the end, the tip and leaves to the stem are fixed with tape. It remains to plant a flower on the stem - and the origami daisy is ready.