A talented person is able to create from various materials at hand. Many specially go to nature to collect cones, acorns, twigs. Others consume recycled materials: plastic bottles, faulty light bulbs, scraps of leather, fabrics, unnecessary CD-ROMs and a lot more. But each needlewoman always accumulates a huge number of buttons: they are cut off from old clothes, bought or donated. Approaching the matter with imagination, many make beautiful crafts and even paintings from buttons.
Great opportunities
Indeed, buttons are a material that has a wide range of colors, shapes, textures, and sizes. A huge range of crafts is made from them. These works of art are made together with children and independently. Often needlewomen give master classes. To make a button work, no special training is needed. It is enough to prepare the necessary tool and have patience.
Many craftswomen learned to make do-it-yourself paintings from buttons, photos of which clearly demonstrate the simplicity of manufacture and the beauty of products.
Button Crafts
Any button fantasy can be easily dealt with. All the nuances are known after several completed work. It turns out beautiful paintings from buttons, a master class which will help beginner needlewomen.
Soon Valentine's Day will come, and all the lovers will give each other presents. One of them can be a picture of buttons:
To make it, you will need:
- basis - a thick sheet of paper or canvas;
- acrylic paints in two colors;
- brush;
- glue;
- buttons of red color, different shapes and sizes. Some of them may be in the shape of a heart.
The basis should be applied with a pencil. Then shade with paints: the base is turquoise, and the heart is red.
When the workpiece dries, the design begins with buttons. First, the contours of hearts are glued, one large button is attached at the place of their connection. So, the drawing gradually fills - from the edge to the middle. For the work to dry quickly, it can be dried with a hairdryer. A picture intended for a gift is best placed in a frame.
Children's crafts from buttons
Children need the attention of adults: often parents who are busy with work cannot spend enough time on the child. But on weekends you should set aside an hour and do needlework with the kids. Together, you can create a picture of the buttons with your own hands. To do this, you will need:
- glue;
- paints;
- a large number of buttons;
- paper or canvas;
- cardboard, photo frame or chipboard.
The first thing to do is to process the base. Depending on what is used, whether it be a canvas or a photo frame, it should be painted. If it is a thick white paper, then a brown tree drawing is applied with brown paint on it, with spreading branches. On them, in the future, “leaves” are glued and beautiful pictures of buttons are obtained, photos of which are presented below.
When a person is not able to draw a tree on his own , he can easily use the template: with the help of it and a simple pencil, the image is transferred to canvas or paper, painted in brown. You can instruct the child further: apply glue to the buttons and stick them to the tree.
The crown is pasted over with green, and the trunk with brown buttons. The magic tree is ready - the child is very pleased with the joint creativity. The created product can be installed in a frame, and you will get a picture of buttons with your own hands.
Quite a bit of fantasy
You can use the stencil of birds: transfer them to paper, decorate and cut. Birds are glued to the finished "foliage" of the tree. It turns out beautiful paintings from buttons. They decorate the interior, hang in the children's room. Similar trees are used in scrapbooking: they make cards, depicting Christmas trees with toys.
If you turn to this type of needlework and look at the works of craftsmen, you can see a lot: these are Christmas tree decorations - snowflakes and beautiful balls, and even bowls.
The lamps are decorated with buttons, flowers, children's toys are made of them. Outwardly, these are very attractive and interesting button crafts. The master class, which is presented below, is simple and will be understandable to everyone.
Beautiful bowl
This will require:
- many buttons of different colors, shapes, sizes. Here, too, there is one caveat: large buttons do not stick well to the surface of the ball, so small and medium ones are the best option;
- you need to prepare a ball and a jar to support it;
- PVA glue;
- scissors;
- tassels.
The balloon is inflated to the size that the future bowl will be. It is put on a jar, tail down. Then, half of it should be covered with glue: for convenience, it is better to take the ball in the hand, by the tail and, shaking, correctly distribute the glue.
The glue-coated ball is placed in a jar and left to dry. Next, buttons are glued: on the second layer of glue. When the structure dries, you can cover the buttons with two more layers of glue. The bowl will dry for several hours. When ready, the tail of the ball is cut off, air escapes, the ball is removed from the product. Excess glue is removed with scissors. Of course, bowls are not button paintings. But they give style and complement the interior of the dining room or kitchen.
Another decoration
Very interesting jewelry, in the form of a necklace and headbands, can be obtained from buttons. This product is suitable for a little girl or her doll. To make it you will need: a beautiful ribbon, braid of red or pink color. Buttons are selected in different sizes: pink, red and white colors. The length of the tape should be sufficient so that it freely covers the neck or head of the girl, and long ends remain for tying. Pyramids are made of buttons: the lower is large, then the middle and upper are small.
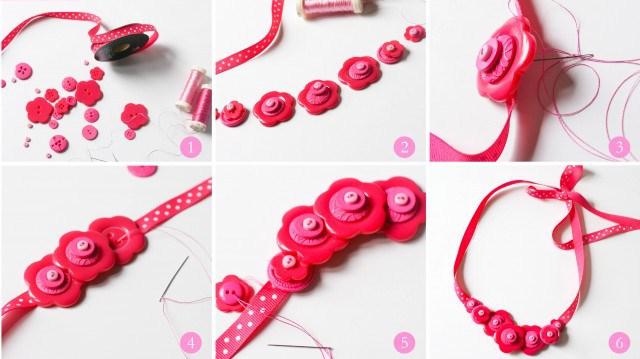
A large button may have a floral shape. You can alternate them in the pyramids at will. The first of them is sewn to the very center of the braid. The rest are located on both sides of the central pyramid. The buttons in this design are fixed with thread or glue. It is advisable to sew with a strong thread, matched to the tone. The pyramids are arranged according to the cascade principle: in the center there is a large structure, the others in reduction. They are sewn very close and even overlap each other. There are seven of them - and the necklace is ready.
Shoe decoration
The needlewomen produce not only crafts from buttons. The master class, which is shown below, will show how you can decorate summer shoes - flip flops.
This will require:
- a pair of shoes;
- dense braid, 2.5 cm wide;
- glue;
- buttons
- threads.
Two pieces of braid are cut, which are equal in size to the Vietnamese strap - this is approximately 30 cm. But for reliability, you should also measure the straps. The edges of the tape are cauterized with a match so that they do not open.
Step-by-step execution
Next, the middle of the braid is determined and folded in the form of the letter "V", fixed with several stitches.
Then buttons are sewn onto the ribbons of different colors - fun. The finished product is glued to flip flops, the recommended adhesive - Helmar 450 Quick Dry. It is a very strong, good fixing adhesive.
Out of ordinary flip-flops, bright, cheerful summer shoes turned out. Combinations can be very different: you can use any sets of buttons.
The article provides examples of crafts that can be done using such a simple subject as a button. These are unusual toys for children, jewelry, home decoration and even DIY paintings. The photos presented in the article do not reflect the whole range of applications of this applied art. Just try it and your hobby will become an interesting hobby. Especially in families with children: you can make wonderful cards for relatives and friends for each holiday.