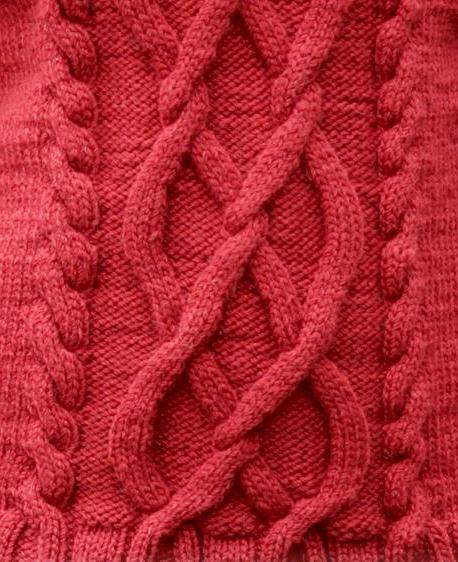
What could be better to decorate a sweater, if not everyone's favorite Arani (they are also plaits and braids)? This article proposes to the attention of knitters an extremely beautiful and fairly wide pattern of "braids" with knitting needles. The scheme is simple and will be understood by experienced craftsmen, they will be able to start work without any additional instructions. For all others, a description is attached. It includes recommendations for knitting as the pattern itself, and individual details of the sweater.
Why is the simplest ornament - a "braid" pattern with knitting needles? Scheme and other arguments
Looking at the intricate weave of knitted tows, many are amazed at how you can sit down and make such beauty! However, those knitters who have mastered the principle of creating arana easily weave braids, nets, knots and lattices from a very different number of strands.
To describe the algorithm for the formation of the ornament, we propose to consider the elementary pattern of the “braid” with knitting needles (scheme A.1 and A.3, sections marked with the letter b).
The harnesses from two strands are shown here, this is the minimum number. Each of them contains four loops. After all eight loops are knit with the front ones (front row), the work is rotated and knitted according to the drawing (back row), one more such row is done. Then the first strand (4 loops) is removed from the left knitting needle and left in front of the front side of the fabric (before work), and the second (4 loops) is knitted with the front ones. The removed loops can simply be pressed with your finger or left in free “hover”, some masters suggest transferring them to the auxiliary knitting needle. After the second strand is knitted, the loops of the first are returned to the left knitting needle and knit with the facial ones. The loops crossed to the left. This is the basic principle. All you need to know is the performance of the front and back loops!
Next, you need to knit another five front and five wrong rows and again perform the crossing. The result is a “braid” pattern with knitting needles (the diagram perfectly illustrates the algorithm).
Mirror Crossing
Considering the scheme A.3, it can be noted that the braids are directed to the right here. This is done in the same way as described in the previous paragraph, but the removed loops of the first lock are left not before, but at work.
Beginners should practice and learn to perform these two methods, because usually knitting harnesses and braids with needles is built on their combination.
We complicate the task
The figure below shows a sweater pattern. This product consists of four parts: two sleeves, a front and a back. All of them, except the back, are decorated with plaits.
Braids are often located in the center of the canvas, the bottom of the parts is performed with an elastic band. Based on the features of this pattern, it is rational to use an uneven elastic band to remove strands of braids from the formed columns.
These braids with knitting needles (with a description of the scheme will become more clear) are suitable for knitting women's, men's or children's sweaters. In addition, this universal pattern can easily be used to decorate bags, pillows, rugs and other items.
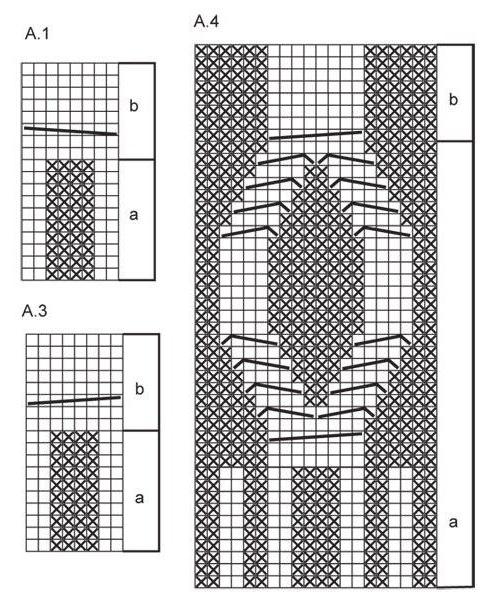
Legend: the cross is the wrong loop, the empty cell is the front. Inclined lines indicate the number of intersecting loops and their direction.
The peculiarity of the scheme of knitting braids from four strands
Figure A.2 depicts aranas from four strands. This ornament is placed in the center of the front part, the braid A.3 should be placed on the right side of it, and the braid A.1 on the left.
The remaining loops to the right and left of the ornament are knitted face.
Fragments marked with the letter a, depict knitting gum, and those that are signed with the letter b, relate directly to the bundles.
An important feature of this ornament is that a solid oblique line indicates the intersection of two strands (four loops each) with each other. At the same time, the inclined broken line shows that you need to cross one of the strands (of four loops) with one wrong loop of the background. In this way, pattern rhombuses are formed.
Knit sweater with braids: sleeves
Figure A.4 shows a diagram for knitting product sleeves. In the center, the main pattern should be placed, and the remaining loops should be seamy. The peculiarity of the ornament is that it contains only one rhombus. It is placed at the bottom, immediately after the elastic cuff. Further, the braids of the braid, which are brought together in one column, cross each other. The interval between crossings can be chosen at your discretion or you can focus on scheme A.1. Here, the interval is 14 rows (seven front and the same wrong side).
When all the details of the sweater are ready, they are steamed with an iron (or washed and dried), and then stitched.
Lastly, they knit a neck. To do this, you can perform the part separately and then sew to roll, or you can dial loops along the edge of the canvases on circular knitting needles and knit round. The usual neckline height is about 18 cm. Do not make it too tight, as this will cause discomfort in the sock. However, an excessively weak neck is also undesirable. Optimal will be the average density of knitting.