How to set up a TP-Link Wi-Fi router - such a question arises for users who have made a successful purchase and want to make it independently connect and configure for the work of local network subscribers. Works related to the connection of equipment do not differ much for different models of the manufacturer. The issue of setting up different models has its own nuances. Adhering to the tips and recommendations of the walkthrough, the user will be able to gradually approach the successful solution of problems that arose at the initial stage.
Work algorithm
He must determine the sequence of actions of the user deciding the question of how to properly configure the TP-Link router. With strict adherence to the algorithm, you will not need to return to steps that were skipped through inexperience. Without their implementation, it is impossible to achieve a successful solution of the task. The main steps that should be followed during operation include the following:
- preliminary review of the manufacturer’s models, their characteristics and functions performed;
- completeness check as described after unpacking the product;
- determining the location of the router in the room, given the proximity of electrical outlets, the lack of sources of electromagnetic radiation;
- inclusion of a product in an alternating current network through an adapter from a delivery set;
- connecting the Ethernet router with cables to the network of the selected Internet service provider, stationary computer (PC) or laptop;
- checking PC network card settings;
- setting factory default settings for the router, checking the latest firmware version;
- Entrance to the main interface through a browser open on a PC;
- Changing the factory password of the administrator of the router;
- setting connection parameters with an Internet service provider;
- WIFI network configuration of the router, wireless network protection;
- additional settings (if necessary).
After following these steps in sequence, you can get an answer to the question of how to connect and configure the TP-Link router. The process of setting up by rebooting the router and selecting its location in the room over the largest area of the WI-FI network coverage area is ending. When using a mobile modem, to obtain communication with the provider, it is necessary to place it on the window glass and fix it with a special suction cup.
TP-Link Wireless Router Design
The cases of TP-Link routers are most often made in white, black and dark blue colors. The front panel is occupied by a series of LED indicators or pictograms illuminated from the inside. They signal the power is turned on, the status of the functional modules, the presence of consumer connections to the LAN ports. The connection with the Internet provider and the serviceability of the WI-FI channel of the router are continuously monitored.
The rear panel is designed to accommodate connectors of different configurations. When you receive Internet via ADSL, a RJ-11 type WAN connector is used. When the provider uses FTTx technology, the RJ-45 connector will be used. The same configuration is used by the manufacturer for LAN ports to which consumers without WI-FI modules connect.
Often on the rear panel are USB ports. External hard drives, flash drives or modems of mobile Internet operators can be connected to them.
In addition, there is a plug-in connector for the power adapter, a button for turning on the WI-FI transmitter, a fast WPS synchronization mode, a button for returning to the settings set at the RESET factory.
The number of antennas installed on the router housing and connected to high-frequency connectors varies from one to five for different models. The number of WIFI ranges may vary.
Main technical characteristics of TP-Link routers
The quality of the local network, organized on the basis of the router manufacturer TP-Link, is largely determined by the tactical and technical parameters of the equipment used. These include the following:
- maximum data transfer rate in the local network via wired and wireless channels (Mbps);
- protocols supported by the router when receiving information from an Internet provider;
- IEEE 802.11 wireless standard (b / g / n / ac);
- port bandwidth (Mbps);
- WI-FI transmitter power (dBm) and theoretical radius of action (m);
- antenna gain (dBi) and their operating range (GHz);
- WI-FI information security class (data encryption);
In addition to these parameters, you need to pay attention to the presence of a firewall, your own DHCP server, support for the NAT network address translation function, dynamic DNS, the DMZ demilitarized zone, and the presence of static routing.
Configuring a computer to work on a local network
How to set up TP-Link router via PC? To do this, make the appropriate connections using cables. The network card connector of an RJ-45 type computer using the patch cord supplied must be connected to any of the router's LAN ports. In this case, the provider signal is sent to the WAN port connector.
After turning on the router with the Power (ON / OFF) button, it is necessary to control the lighting of the corresponding LED on the indicator panel.
On the PC network connections page, right-click on the symbol of the wired connection between the computer and the router. After selecting the "Properties" item in the context menu, it is necessary to check in the IPv4 protocol properties whether the computer receives the IP address and DNS server address automatically. If a discrepancy is found, it must be eliminated and confirmed by pressing the OK key.
Restore factory settings
How to set up Wi-Fi TP-Link router? On products purchased from the distribution network, factory values are saved. The procedure for their restoration is required for devices that have been in use by another user.
The RESET button located in the recess serves this purpose. It is required to press on the device with a pointed rod and hold it for (10-15) seconds. The recovery process starts. Its completion can be visually judged by the cessation of the flashing of the LEDs on the indicator panel.
Enter TP-Link Router Settings Interface
How to configure a Wi-Fi TP-Link router to work on a local network? All operations for setting connection parameters are performed in the web interface of the router. Login to its pages is carried out after entering into the address bar, opened on the computer browser, the IP address of the router on the local network.
For TP-Link, you need to enter the combination of numbers 192.168.0.1 or 192.168.1.1. This information is available on the product label affixed to the bottom of its case. The factory default values for the login and password (admin) are also indicated, which must be entered in the authorization fields. After confirming them, the next page receives a system offer to change the password. It will protect future pages of the interface from unauthorized access. Changing the administrator password and confirming it ends with a reboot of the router.
Connect to an Internet Service Provider
How to configure TP-Link TD router? First you need to carefully read the terms of service of the selected operator and the data specified in the contract. They will be required for the further setup procedure. Providers use different types of connection. The main ones are: PPPoE, PPTP, L2TP, dynamic IP, static IP. To proceed to setting their parameters, use the "Network" (WAN) section of the main menu.
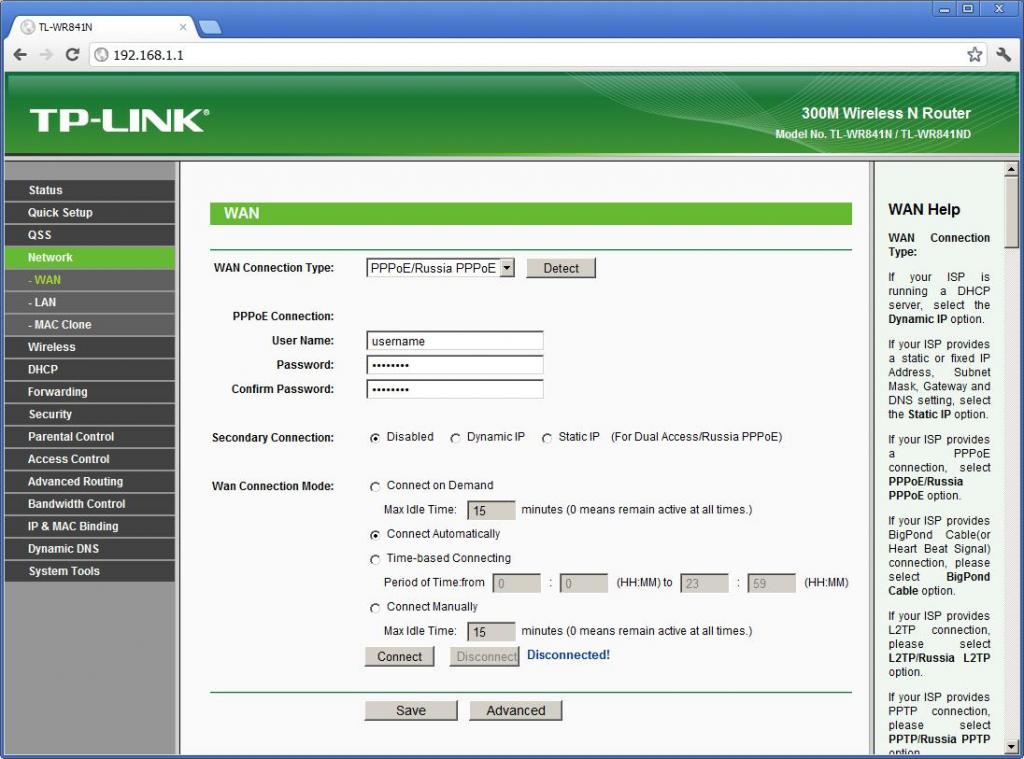
The first three types of connection require, when configuring, the input of the username and password assigned by the provider. PPTP and L2TP use the creation of a special tunnel for their protection. His network address is indicated in the corresponding field. When connecting to a static IP, the provider assigns a fixed value of the address to the subscriber, which should be indicated. Additional data is the gateway address and subnet mask. When connecting to a dynamic IP, the user is not required to enter additional information. But the address assigned by the provider may change with each new connection of the router to the network.
WIFI network setup
For example, you can consider specific models of the manufacturer. How to configure TP-Link n300 router? Access to the settings menu items of the wireless network is in the control panel of the router in the "Wireless" (Wareless) section. On the page that opens, they require filling in the field with the name of the network being created, which is selected arbitrarily, wireless standard (802.11 b / g / n mixed), channel number (Auto), which can then be changed.
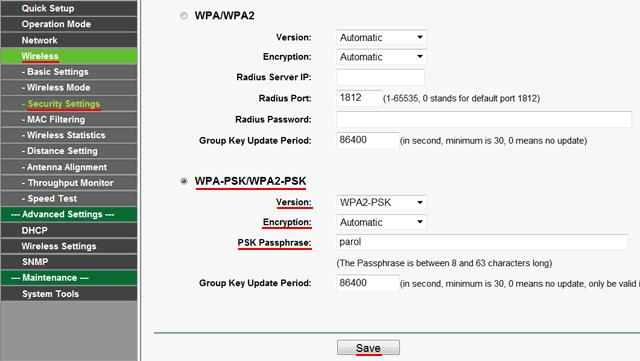
Wireless protection is set by choosing the type of encryption (WPA2-PSK) and writing the PSK key (network access password), which should not be confused with the administrator password to enter the router interface. Password is a combination of latin letters and numbers. Its length must be no less than 8 characters (up to 25 allowed). After executing the “Save” command and then rebooting the router, the basic configuration can be considered completed. In the same way, you can get an answer to the question of how to configure the TP-Link Archer router.
Additional settings
How to set up Wi-Fi TP-Link router? The main purpose of the router is to provide the Internet to subscribers of the local wired and wireless network, organized on its basis. Additional settings of TP-Link routers include the following:
- using the IPTV configuration wizard or manually setting the parameters of interactive television, taking into account the requirements of the provider;
- Manual configuration of the firewall with the creation of certain rules;
- Using the virtual server setup wizard
- opening (forwarding) of certain ports when using torrent trackers or the participation of a router user in online games with a large number of participants;
- filtering by MAC address in the "Security" section of WI-FI;
- setting up the Parental Control function with creating a schedule for using certain Internet resources (or a complete ban).
IPTV can only be configured after the provider has connected this paid service, provided that the router used supports this function.
Conclusion
Using the official documentation for the purchased router, the algorithm of actions, tips and recommendations set forth in the article, a user of any TP-Link model will be able to independently connect the router and configure on the network of any Russian provider. Reading the article will help you to be prepared for possible difficulties and successfully cope with the task.