What is the technology for crocheting socks? If you ask this question to several needlewomen, it turns out that there is no consensus. There are many ways to make socks with this tool. And the task of each needlewoman is to choose or come up with her own. In this article, we will consider the most popular methods, so that the reader has his own idea of how to make crocheted socks.
What measurements should be taken
Almost any thing that is planned to be knitted using a special machine, knitting needles or hook requires preliminary measurements. Otherwise, if knitted on the eye, the finished product may not fit in size. In order for the crochet procedure for socks to be successful, and the finished product made with your own hands exactly the same, you should acquire an elastic centimeter and make the following measurements:
- Foot length. To do this, without pulling a centimeter, determine the distance from the thumb to the heel.
- The start point of the rise. It is measured from the tip of the thumb to the middle of the foot.
- Girth of the foot. To find out this parameter, you need to measure the rise of the foot.
- The width of the fingers. We put a centimeter on the foot at the base of the fingers and look at the distance from the outside of the thumb to the outside of the little finger.
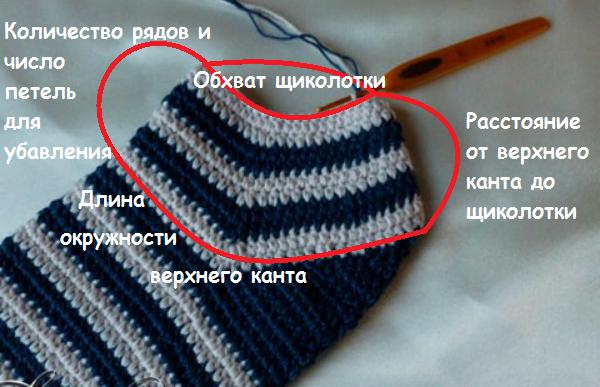
- Ankle girth. Another significant indicator. If you calculate it incorrectly, the sock simply does not wear. It must be measured at the base of the leg through the bone.
- Sock height. This parameter can be varied, focusing on your own wishes. Only, many experienced needlewomen note that it is better to make warm socks rather high. But spring or summer, made of fine yarn, and especially openwork, it is more reasonable to knit short ones.
How to make a toe
The initial step in crocheting socks is very important. In many ways, it determines the success of all work. So, in order to perform the toe correctly, it is necessary to carefully examine the scheme proposed below.
However, it should be started and carried out in a special way. In more detail we will tell further:
- First of all, you need to wind three times on two fingers - the index and middle, prepared knitting thread.
- Now gently hold the resulting ring and tie it, making seven single crochet.
- Then slowly tighten the ring so that the loops snug against each other.
- Further crochet socks occurs according to the above pattern. First, we knit fourteen new out of the stitches of the previous row. To do this, we draw two from each subsequent loop. We move in a spiral, no lifting loops need to be typed.
- In the third row, we will alternate and knit new loops not from all, but from every second. As a result, we will add seven loops, but in general we will have twenty-one loops in a row.
- In the fourth row, to get an even and beautiful toe, you should knit, skipping two loops. That is, pull two new from each third of the previous row. As a result of such actions, we will also add seven loops. In general, in the fourth row we get twenty-eight loops.
- In the fifth row, we need to add only four loops, so that in the end we get thirty-two. To do this, we will knit two loops every six.
When the above steps are completed, it is necessary to measure the diameter of the circle. The resulting value should be equal to the width of the fingers. If this is not so, proceed to the next step in crocheting socks should not be. It is necessary to finish a few more rows, for example, in this way:
- In the sixth row, add four new loops every seven.
- In the seventh, four every eight.
- In the eighth, four every nine, etc.
How to knit the front of the sock
Let's start with the explanation that the above term should be understood as the part of the toe from the toe to the beginning of the climb - approximately to the middle of the foot. It is very simple to execute it:
- First, measure the diameter of the resulting circle. Recall that it should correspond to the width of the fingers.
- After that, we simply knit in a spiral, gradually reaching the desired lifting point.
How to knit a heel
In the next step, we need to perform another very important detail of the sock. The description of crocheting will help the reader not make a mistake and do everything correctly:
- First you need to fold the product in half to outline the part on which we will knit the heel.
- Then proceed to knitting. Raise the bottom of the heel one row.
- From the next row we reduce one loop on each side, knitting the first two together, then the last two together.
- We continue to perform the steps indicated in the previous step until only one loop remains.
- As a result, we have outlined the bottom of the heel. And now we need to tie the edging of the product around the circle. That is, capturing the lifting part and sidewalls.
- When this task is successfully completed, the sole length should be measured. If everything is done correctly, the instructions are followed exactly, we should get a number equal to the length of the foot.
How to calculate the number of rows from the rise to the ankle
The instructions presented in this article are very detailed. Therefore, the described technology for crocheting socks for beginners is the same as for experienced knitters. At the current point, we will examine in detail the feature of lifting. Which is actually quite simple to do:
- First, we need to try on a sock and measure the distance from the upper edge to the ankles.
- Then fold the product in half and measure the circumference of the upper edging.
- Then determine the density of the knit. To do this, measure two or three already connected rows, select an arbitrary place.
- All parameters are fixed. They will be useful to us.
- Now it is necessary to carry out such calculations: subtract the ankle girth from the circumference of the edge; divide the resulting value by the density of knitting; multiply the final number by the number of measured series - two or three, depending on previous calculations.
- As a result, we find out how many rows we need to knit until we reach the ankle. And, accordingly, the implementation of the penultimate stage of simple crochet sock.
How to determine the number of loops to reduce
However, our calculations do not end there. After all, it is still important for us to determine the number of loops for the deduction:
- This is also easy to do, you just need to follow the following steps: divide the number of loops in the last row of the sock by the length of the edge; multiply the resulting value by the ankle girth; subtract the previous figure from the total number of loops in the last row of the product; divide this number into two, and then by the number of rows that we determined in the last paragraph.
- The final number tells us how many loops should be reduced, gradually moving to the ankle. If it is less than one, then you should reduce the loops not in each row, but, for example, through one.
- Based on these calculations, we proceed to the penultimate stage of crocheting simple and beautiful socks.
- When we knit the required number of rows and reduce the correct number of loops, we, accordingly, reach the ankle. You can now proceed to complete the product. We will describe how to do this in the next paragraph. In the meantime, we offer the reader a look at how the sock should look after we have performed the manipulations described in this paragraph.
How to knit pagolenok
The strange and many unfamiliar word that we indicated in the title of the current paragraph denotes nothing but the bootleg. In other words, the part that hugs part of the leg from the ankle and up. Earlier we mentioned it as the height of the sock. Its length can be determined independently.
So, a further detailed description of crochet socks relates to this very part:
- Having knitted a product from the toe to the ankle, you can try it on just in case. To make sure that the sock fits right.
- If the result of painstaking work is completely satisfied, we proceed to knitting a pagolenka. To do this, simply raise this part to a length that will appeal to you. We move in a spiral, we do not add new loops, we do not reduce old ones.
- When the pagolenok of the desired length is ready, carefully insert the hook into the loop located two rows below.
- We knit a crochet and a cropped thread.
- And then we fix it from the inside of the sock.
- We try on the product again. If it is easily put on, it means that we knit a second sock using the technology described above.
How to knit a sock from the sole
Another way to knit is the following:
- Divide the length of the foot by ½ girth of the foot. The resulting number is the number of loops in the chain of air loops that we should dial.
- Now we bind it, moving in a circle, as shown in the diagram below.
How to make the main part of the sock
We try on the resulting insole. If it is small, we knit a few more rows, repeating the last two rows of the scheme.
Then we crochet knitting socks for children or adults, moving in a spiral. We do not reduce or add anything. We continue in this way for three to four rows.
Now in the cape (from the base of the thumb to the base of the little finger) we reduce the loop in two.
We knit the following rows, knitting at the junction of the loop from the side and the cape together.
We continue until we reach the ankles. Then just knit in a spiral to the desired length of the sock.
How to tie a pagolenok with an elastic band
Very interesting look products, the upper part of which is decorated with an elastic band. If the reader likes this idea, then a hook and knitting needles should be prepared for knitting socks. The rest of the technology is quite simple. Having tied the product to the ankles, we collect loops in a circle and transfer them to four stocking knitting needles. Then we knit with an elastic band, alternating one or two wrong loops and the same number of facial ones. When the desired length of the pagolenka is reached, close the loops without tightening them too much.