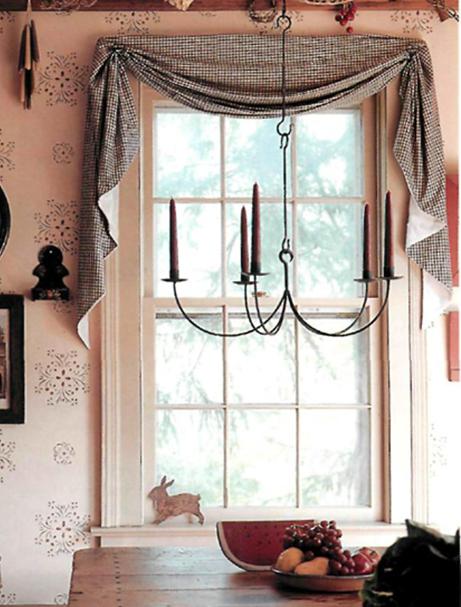
Every housewife wants her house to look decent. And one of the simplest ways to do this is the original decoration of window and doorways in all rooms. And for this, you can use not only the usual curtains and tulle, but also a lambrequin. With their own hands with patterns and instructions given in this article, even a beginner needlewoman will be able to make unique products using fabrics of different textures and colors. It is also worth noting that, in addition to the proposed schemes, each woman can also use her own creativity, so that her house will acquire a unique look.
The easiest way to sew lambrequins
With the fact that the more complicated the pelmet is, the more chic it looks, it is impossible to argue. However, if you don’t want to spend money on a luxury product, and the skill of the needlewoman still does not allow you to sew a complex lambrequin with your own hands, you can wait with patterns and choose an easier way to make this little thing.
To make the simplest pelmet from the fabric, you will need to cut a strip of the desired width, the length of which will be two and a half times the length of the cornice. After that, bend the workpiece from all sides, and sew the so-called curtain tape to the upper edge and pull the product by the threads on it. This method allows you to quickly make lambrequins with your own hands. With patterns of such products you definitely will not have any difficulties. And when you already master this art a little, you can use one of the schemes below to cut the strip. To get a more interesting lambrequin, its lower edge can be trimmed with a fringe or ribbon of a contrasting color.
Lambrequin with “ponytails”: preparation of materials and pattern
This option is no less easy to manufacture and also quite often attracts the attention of needlewomen who do not yet know how to sew a lambrequin with their own hands, but are only looking for suitable patterns. For this product, you will need the main fabric, if necessary, a lining and a lining in the form of a non-woven fabric or other sealant, a decorative cord 1 m long, as well as a soft pencil, curtain rod or plank to which the finished lambrequin will be attached. With your own hands you will not have to fiddle with the product patterns for a long time, since they are made quite easily and do not require preliminary manufacturing of a template from paper. It should be noted that the length of the cornice should be approximately 30 cm greater than the width of the window opening.
Now we begin to cut lambrequins. Do-it-yourself photo of this product can be done a little later. And now it is necessary to cut off a piece of the main fabric, the length of which will exceed the length of the cornice by 20-30 cm, and the width is 74 cm. The same size must be cut out the lining and gasket. You can do without them, but it is these materials that make lambrequins more voluminous. With their own hands, for beginner needlewomen to sew them is a very real task. There are dense fabrics, so they do not have to fiddle with other additional materials for a long time.
The procedure for the manufacture of lambrequin with "tails"
Having prepared all of the above, you can proceed to the connection of parts. If you use all three layers, you should spread the cushioning fabric, on top of it face up - the main, and then the lining, but face down. All layers must be neatly fastened with pins and sewn, leaving 30 cm unstitched on one side. This is done so that you can turn out the stitched pelmet with your own hands on the front side. With patterns, the work is completed. It remains only to unscrew the product, iron it, carefully sew the remaining hole manually, and you can hang it. This should be done as follows: the product should be attached to the center of the cornice or plank at the center point, then fix the remaining fabric, leaving the hanging edges. Next, the decorative cord should be cut in two and each of them should nicely and neatly tie the side parts of the fabric - these will be the “tails”. So the elegant lambrequin is ready, despite the fact that it is manufactured quite simply. It is worth noting that this product looks good in the kitchen. If you plan on sewing curtains, lambrequins with your own hands, then it is better to pay attention to more complex options.
One Swag Lambrequin
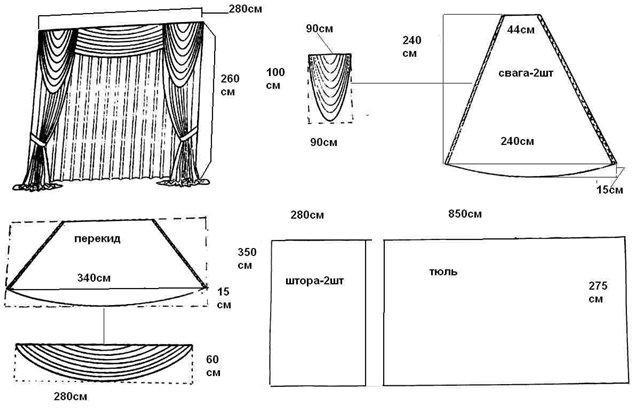
Lambrequins with swagas look the most original, but they also do much more time for manufacturing. However, having shown patience, each needlewoman will be able to receive a uniquely decorated window. So, in order to make lambrequins with your own hands, you will have to work hard with the patterns - they must be made according to the scheme below. However, first you need to prepare everything you need for work. So, you will need scissors, a wooden plank with marked centimeters, the length of which will correspond to the length of the future product, paper or cardboard for making patterns and the main fabric. Experienced needlewomen often use lining, but this adds too much trouble to those who first decided to sew lambrequins with their own hands. A workshop for the manufacture of this product also requires the availability of a sufficient number of pins.
Lambrequin with swag: pattern
If this is your first experience, then it is better to make a template from paper of the required size according to the above scheme. In this case, you can do not the whole part, but only its half, focusing on the center line of the figure. Next, the finished template should be put on the main fabric, previously folded diagonally. Of course, with this method of cutting, more material will be needed than if the pattern was laid evenly, but in this case the finished product would look more spectacular. It should be noted that the width of the upper part of the finished pattern should correspond to the length of the cornice, and the height should be two and a half times the desired size of the finished product. The fabric blank for the future lambrequin should be attached with the center point to the middle of the work bar. Next, gradually it is necessary to fix the fabric of the entire upper part on it.
Creasing and sewing lambrequin with swag
Now you can proceed to the formation of folds. The first of them is formed from the extreme point of the right shoulder to the left by lowering the so-called roller 10-15 cm down from the bar line. Both extreme points should be secured with pins. All subsequent rollers are made in the same way until the extreme points are reached. In this case, the distance between them should be the same on both sides.
After the shape of the product is ready, you will need to cut off the excess fabric on top of the plank and, laying the blank on a horizontal surface, bend all the edges, and secure the top with a seam at the points previously marked. It is advisable to process the upper part of the pelmet with mounting tape. So the sewing of lambrequins is completed. With your own hands you can do everything as you see fit. And if for the first time it doesn’t work out - do not be discouraged, try to correct the mistakes and achieve the desired goal.
Lambrequin with several swags: cut and tailoring
The rooms look richer, the window openings in which are decorated with lambrequins consisting of several swags - even various colors can be used. They should be cut according to the scheme described above, except that the desired width of the future product must be divided into as many parts as you want to receive after sewing the lambrequins with your own hands is completed. At the same time, it is advisable to take into account that in order to give the finished product a more interesting appearance, its parts should be slightly superimposed on each other, and this is a few more centimeters of the total width. As for the texture of the main fabric, it is better to take the same fabric for all swags, since all kinds of experiments in this regard are often unsuccessful.
Lambrequin with "ties": photo
If you need to decorate a window opening in the kitchen, where there are no curtains or curtains, then this option is the best solution, especially since it’s not difficult to sew a lambrequin with your own hands, the photo of which is presented below, even for a beginner needlewoman. For the manufacture of this product you will need the main fabric, scissors, 2-3 meters of curtain tape and, of course, a sewing machine. At the initial stage, it is necessary to cut a strip of fabric from the main material, which will be 1 m longer than the cornice - this is the part of the fabric that will be needed for “ties”. The workpiece from all sides must be processed with a seam, after which you can proceed to the next step.
Tailoring of a lambrequin with "ties"
Having retreated 50 cm from the edge of the future lambrequin, it is necessary to vertically place a curtain tape on it and sew it on. A similar operation should be done with the opposite side. Next, the product from both edges must be pulled to the desired state and the threads are fastened. Then the lambrequin can be hung on the ledge. The remaining "ties" should be beautifully built already in a hanging state, if this is not possible, then you can trim them and attach them separately, after folding them with an accordion and stitching along the upper edge.
Lambrequin with puffs: preparatory phase
Another interesting option for the manufacture of lambrequin is a product with puffs. True, they have one drawback - they cannot be ironed. Therefore, after learning how to sew a lambrequin with your own hands, try to choose a fabric for its manufacture that would not lose its appearance after washing, namely it was not wrinkled. The easiest way to make this product is to connect the fabric using a needle at horizontal points. To do this, cut a strip of fabric, which will be two to three times longer than the future finished product, bend it and sew the curtain tape to the upper edge.
The process of making lambrequin with puffs
Then, every 4-5 cm, it is necessary to draw points on the workpiece using an erasable marker. I started to make marks on one line, and then, having descended to the desired distance down, on the next. And so on, until all the tissue has been unfolded. Next, using a needle and thread, it is necessary to connect two points horizontally between each other, that is, you need to sew together 1 and 2 tags, then 3 and 4, and so on. These actions must be done with all brands. It is important that the fasteners are made as reliable as possible, otherwise the appearance of the product can deteriorate very quickly.
Curtains with lambrequins
In order for all the elements for decorating the window opening to fit together well, do-it-yourself curtains with lambrequins should be sewn at the same time. To do this, you need an opaque fabric, from which it will be necessary to cut two curtains of the required length and width, as well as a lambrequin of the required size. Pattern of the last element can be made according to one of the schemes described above.
As for the curtains, their size depends on the area of the window or doorway - they must completely cover it. It should be noted that it is not worth sewing together all the elements, since the curtains should be movable, and the lambrequin should remain in place. For a better combination and more original appearance, making curtains with lambrequins, you can sew them with braid or fringe of the same color with your own hands. Also, all these details can be decorated, for example, with the same bows or other decorative elements, which can either be made independently or purchased in a hardware store.