People who love good music probably know about the Hi-End tube amp. You can do it yourself if you know how to use a soldering iron and have any knowledge on working with radio equipment.
Unique device
Hi-End tube amplifiers are a special class of household appliances. What is the reason for this? Firstly, they have a rather interesting design and architecture. In this model, a person can see everything that he needs. This makes the device truly unique. Secondly, the characteristics of the Hi-End tube amplifier differ from alternative models that use transistor integrated circuits. The difference between Hi-End and the fact that during the installation uses a minimum number of parts. Also, evaluating the sound of this unit, people trust their ears more than non-linear distortion measurements and the oscilloscope.
The choice of schemes for assembly
The preamplifier is pretty easy to assemble. For him, you can choose any suitable scheme and start the assembly. Another case is the output stage, that is, a power amplifier. With him, as a rule, many different questions arise. The output stage has several types of assembly and operating modes.
The first type is a single-cycle model, which is considered a standard cascade. When operating in the "A" mode, it has small non-linear distortions, but, unfortunately, has a rather poor efficiency. It should also be noted the average power output. If you need to fully sound a fairly large room, you will need to use a push-pull power amplifier. This model can work in the "AV" mode.
In a single-cycle circuit, for the device to work well, only two parts are enough: a power amplifier and a pre-amplifier. The push-pull model already uses a phase-inverted amplifier or driver.
Of course, for two types of output stage, in order to work comfortably with the speaker system , it is necessary to coordinate a high interelectrode resistance and a low resistance of the device itself. This can be done using a transformer.
If you are a connoisseur of "tube" sound, you should understand that it is necessary to use a rectifier, which is produced on the kenotron, to achieve such a sound. In this case, you can not use semiconductor parts.
When developing a Hi-End tube amplifier, you can not use complex circuits. If you need to sound a fairly small room, then you can apply a simple one-stroke design, which is easier to make and configure.
DIY Hi-End Tube Amplifier
Before starting the installation, it is necessary to understand some rules for the assembly of such devices. We will need to apply the basic principle of installing lamp devices - minimizing fixtures. What does it mean? You will need to abandon the installation wires. Of course, this is not always possible to do, but their number must be minimized.
A good Hi-End tube amplifier uses mounting tabs and strips. They are used as additional points. This assembly is called mounted. You will also need to solder the resistors and capacitors that are on the lamp panels. It is highly discouraged to use printed circuit boards and assemble the conductors so that parallel lines are obtained. Thus, the assembly will look chaotic.
Interference elimination
Later, it is necessary to eliminate the low-frequency background, if, of course, it is present. Another important point is the choice of grounding point. In this case, you can apply one of the options:
- Connection type - star, in which all the "earth" conductors are connected at one point.
- The second way - laying a thick copper bus. It is necessary to solder the corresponding elements to it.
In general, it is better to find the grounding point yourself. This can be done by determining the level of low-frequency background by ear. To do this, you need to gradually close all the grids of the lamps that are located on the ground. If, when the subsequent contact closes, the low-frequency background level decreases, then you have found a suitable lamp. To achieve the desired result, it is necessary to experimentally eliminate unwanted frequencies. You also need to apply the following measures to improve the quality of your assembly:
- To make the glow tubes of the radio tubes, you need to use a twisted wire.
- The lamps used in the preamplifier must be covered with grounded caps.
- It is also necessary to ground the enclosures with variable resistors.
If you want to power the glow of the pre-amp tubes, you can apply direct current. Unfortunately, this requires the connection of an additional unit. The rectifier will violate the Hi-End tube amplifier standards, as it is a semiconductor device that we will not use.
Transformers
Another important point is the use of various transformers. As a rule, power and output are used, which must be connected perpendicularly. This way you can reduce the low-frequency background. Transformers should be located in grounded enclosures. It must be remembered that the cores of each of the transformers should also be grounded. You do not need to use a shielded wire when you install the devices so that additional problems do not appear. Of course, these are not all the features associated with installation. There are quite a few of them, and everything will not work out. When installing Hi-End (tube amplifier), you cannot use new element bases. They are now used to connect transistors and integrated circuits. But in our case, they do not fit.
Resistors
A high-quality tube amplifier Hi-End is a retro device. Of course, the details for its assembly must be appropriate. Instead of a resistor, a carbon and wire element may be suitable. If you do not spare money on the development of this device, you should use precision resistors, which are quite expensive. Otherwise, MLT models are applicable. This is a pretty good item, as evidenced by the reviews.
Hi-End tube amplifiers are also applicable with BC resistors. They were made about 65 years ago. Finding such an element is quite simple, just go for a walk on the radio market. If you use a resistor with a power of more than 4 watts, you need to choose enameled wire elements.
Capacitors
In installing a tube amplifier, different types of capacitors should be used for the system itself and the power supply. They are usually used to adjust the tone. If you want to get high-quality and natural sound, you should use a separation capacitor. In this case, a small leakage current appears, which allows you to change the operating point of the lamp.
This type of capacitor is connected to the anode circuit, through which a large voltage flows. In this case, it is necessary to connect a capacitor that supports a voltage of more than 350 volts. If you want to use quality elements, you need to use parts from Jensen. They differ from their analogues in that their price exceeds 3,000 rubles, and the price of the highest quality radioelements reaches 10,000 rubles. If you apply domestic elements, it is better to choose between the K73-16 and K40U-9 models.
Single-ended amplifier
If you want to apply a single-cycle model, you must first consider its scheme. It includes several components:
- Power Supply;
- terminal cascade;
- pre-amplifier in which you can adjust the tone.
Assembly
Let's start the assembly with a pre-amplifier. Its installation takes place according to a rather simple scheme. It is also necessary to provide for power control and a divider for tone control. It must be tuned to low and high frequencies. To increase the shelf life, you need to use a multi-band equalizer.
In the laughs of the preamplifier, one can see similarities with the common 6H3P double triode. The element necessary for us can be assembled in a similar way, but use the terminal cascade. This is also repeated in stereo. Remember that the design must be assembled on the circuit board. First you need to debug it, and then you can install it on the chassis. If you installed everything correctly, then the device should turn on immediately. Next, go to the setup. The magnitude of the anode voltage for different types of lamps will differ, so you will need to select it yourself.
Components
If you do not want to use a high-quality capacitor, then you can use K73-16. It is suitable if the operating voltage is more than 350 volts. But the sound quality will be noticeably worse. Electrolytic capacitors are also suitable for this voltage. You need to connect the C1-65 oscilloscope to the amplifier and apply a signal that will pass from the sound frequency generator. At the initial connection, you need to set the input signal to about 10 mV. If you need to know the gain, you will need to use the output voltage. To choose the average ratio between low and high frequencies, it is necessary to choose the capacitor capacitance.
You can see the photo of the Hi-End tube amplifier below. For this model, 2 lamps with an octal base were used. A double triode is connected to the input, which is connected in parallel. The terminal cascade for this model is assembled on a 6P13S beam tetrode. A triode is mounted in this element, which allows you to get a good sound.
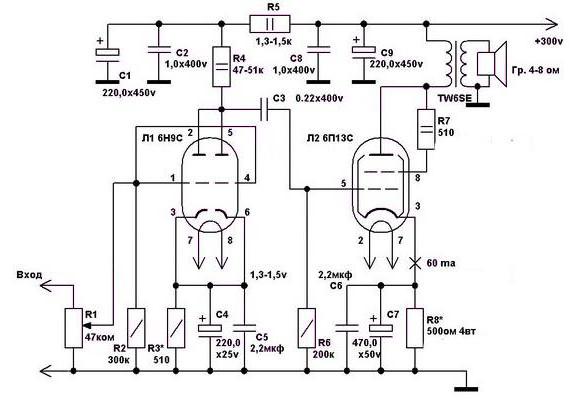
To configure and verify the operation of the assembled device, you must use a multimeter. If you want to get more accurate values, you should use a sound generator with an oscilloscope. When you have taken the appropriate devices, you can proceed to the settings. At the cathode L1 we indicate a voltage of about 1.4 volts, it will turn out to be done if you use the resistor R3. The output lamp current must indicate 60 mA. To make the resistor R8, it is necessary to install a pair of resistors MLT-2 in parallel. Other resistors can be used in different types. It should be noted a rather important component - the separation capacitor C3. It was not in vain mentioned, since this capacitor has a strong influence on the sound of the device. Therefore, it is better to use a proprietary radio element. Other elements C5 and C6 are film capacitors. They allow you to increase the transmission quality of various frequencies.
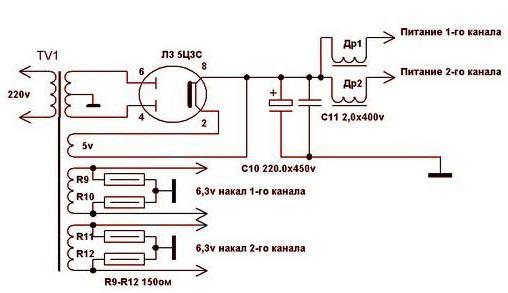
The power supply built on the 5Ts3S kenotron is worth finding. It complies with all the rules for constructing a device. A home-made tube amplifier of the Hi-End class will have high-quality sound if you find this element. Of course, otherwise, it’s worth looking for an alternative. In this case, you can use 2 diodes.
For the Hi-End tube amplifier, you can use the appropriate transformer that was used in the old tube technology.
Conclusion
To make a Hi-End tube amplifier with your own hands, you need to perform all the steps in sequence and accurately. First, connect the power supply with an amplifier. If you correctly configure these devices, then you can mount a pre-amplifier. Also, using the appropriate technique, all elements can be checked to prevent damage to the speaker system. After assembling all the elements together, you can proceed to design the device. Plywood can be a good fit for the case. To create a standard model, it is necessary to place radio tubes and transformers on top, and regulators can already be mounted on the front wall. With them, you can enhance the tone and see the power indicator.