It's no secret that children love to make various crafts. And adults should not only provide children with the necessary materials, but also at first help in the implementation of various ideas. Here are just limitless imagination and the ability to come up with interesting things literally from nothing that distinguishes not everyone. Therefore, we propose to study the technology of performing original and simple paper crafts. Which, if desired, can be done with your child. Also, the material will be useful to teachers and educators.
What is needed for creativity
In fact, it is rather difficult to answer the question presented in the title of the current paragraph. And all because the necessary set of materials and tools will depend not only on the product that you want to repeat, but also on the creativity of the young master. However, in any case, you will have to prepare:
- scissors;
- a simple pencil;
- colored paper or cardboard;
- any stationery glue.
Additionally, literally everything that your heart desires is required. As decorative elements, you can use sequins, beads and bugles, fur pompons, satin ribbons and much more. Since each child is very individual, his creativity, imagination, creativity are significantly different. Someone can even issue an ordinary and uncomplicated craft in such a way that they will not take their eyes off. Therefore, it is important to independently determine what is needed for creativity.
Easter bunny
Having prepared all the necessary materials and tools, we proceed to an interesting and fascinating process. To realize the crafts presented in the photo, cardboard is required as the main material. It is acceptable to use both color and white. And the last child will be happy to paint with pencils, felt-tip pens, colored pens or paints. You can also chop finely finely different shades of colored paper. And then glue the base of the bunny with it. The result is an interesting mosaic.
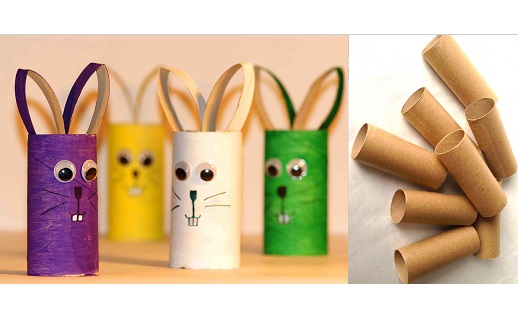
Ready photos are used on the proposed photo. They can be purchased at any needlework store. Although, if desired, these details can be drawn or glued from colored paper. In addition, it is important to note that a toilet paper sleeve can be used as the basis for a simple paper craft. Recently, many lovers of arts and crafts prefer to work with what we usually throw away. Psychologists say that decorating a plain and simple-looking thing helps a child understand that with the right approach, you can transform anything. Such thoughts contribute to increased self-esteem.
So, making an easter bunny is very simple. It is necessary to cut a rectangle of the desired size from color cardboard, roll it up and glue it. If a sleeve is used, this step can be skipped. Then cut a long strip and bend in three places, forming ears. We glue it. After which we decorate the finished craft at our discretion.
Origami tiger
Recently, ancient art, the essence of which is folding paper figures, has gained immense popularity. Skillful craftsmen perform such beautiful and original crafts that people who are far from creativity, also want to repeat. Of course, beginners and children should not immediately take on complex products. It’s better to start training on simple options. The technology for performing a very interesting and, most importantly, simple craft, we illustrated further.
If you like an origami tiger, do it with your child. And then share the finished result with us and other readers. To do this, leave a comment and attach a photo of your craft to it. We will be very happy!
Palm bunny
Psychologists are convinced that children need to start tinkering with their own hands as soon as possible. Indeed, thanks to such creativity, fine motor skills of the hands develop. And this, in turn, has a beneficial effect on the mental abilities of the baby. In addition, it is extremely useful for parents and children to create interesting and uncomplicated crafts together. After all, any joint activity brings together.
In the current paragraph, we propose to make a bunny from the palm. To do this, take a sheet of colored cardboard and draw a palm on it. Then cut along the contour and bend the middle finger in one direction, and the thumb and little finger in the other. Then draw a muzzle.
Paper kitty
Lovers of interesting, beautiful and uncomplicated crafts offer the following option.
To make it, you need to take a sheet of color or white cardboard and draw on it a strip of arbitrary length and width. On the one hand add triangles-ears, on the other - rectangles-paws. Then we cut out the resulting figure and bend in three places. Moreover, it is important to note that the head should be bent in the opposite direction. Having completed all these manipulations, we cut out a long strip of cardboard or colored paper of a suitable color. It will be a tail. We glue it to our design. And after we finish the muzzle and paws. So that the cat does not unfold, it can also be slightly glued.
Charming paper dolls
The following craft can be used as decoration on a Christmas tree. If desired and due diligence, it will be possible to make a New Year's garland, which will certainly transform any room. But it will be especially interesting to look in the children's room. So, to make a simple craft presented in the photo, you should prepare paper in different colors. And it is better to use the one that is designed for printing. It is much denser, and therefore holds its shape better. But in extreme cases, cheaper materials can be dispensed with. Or, together with a child, with the help of paints, felt-tip pens or colored pencils, paint white album sheets. The technology for making paper dolls is very simple and consists of the following actions:
- We take the first sheet of paper and fold it with an accordion. Anyway - in length or width.
- Then we fix with a satin ribbon or ordinary threads.
- We attach handles. They can also be cut out of paper.
- After we draw a circle on a sheet of a different color, cut it out.
- We draw eyes on it, a nose a mouth.
- And finally, glue the face of our chrysalis.
If the reader wants to make a garland, he will have to prepare several of these beauties, and then gather them together using a thick needle.
Spring butterflies
To make the next interesting craft, you need to prepare colored paper of related colors. The first sheet is folded in length, the second - in width. We round the edges with scissors, forming the wings of butterflies. Then we take a thick needle and a strong thread. We string several pearls - a tail, then the lower wings of a butterfly, the upper, another pearl - a head, two smaller ones - eyes and 5-7 beads - antennae. Performing such a simple craft for children will bring a lot of joy. It will be especially nice to decorate your room with a finished product. For example, you can stick a butterfly on a satin ribbon of a suitable color, and then use it as an unusual pick-up for curtains.
Interesting postcard
Valentine's Day is considered a holiday for all lovers. However, many children often give valentines to their friends, parents and sometimes even teachers. Therefore, at this point, we explore the technology for performing the original crafts. To do it, you don’t have to spend much effort and time, but the result will certainly please both the master himself and the person to whom the card will be presented. So let's get started!
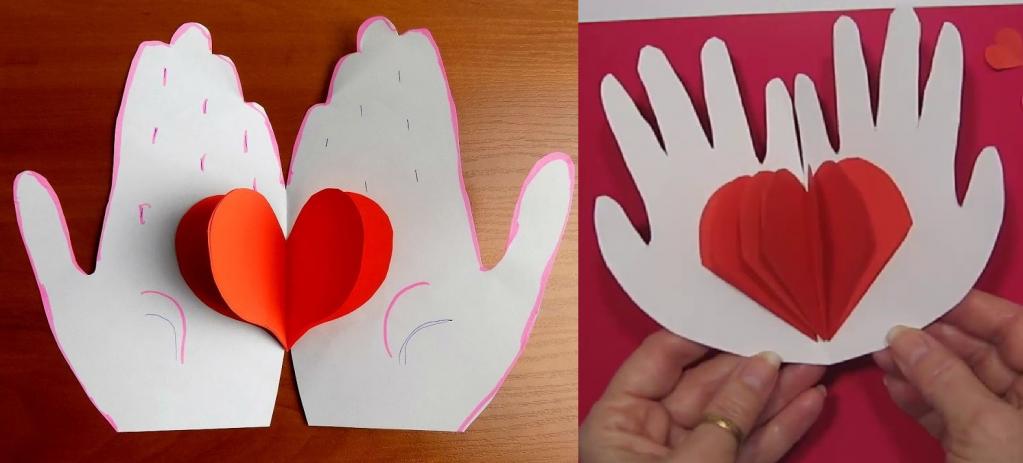
First of all, prepare a sheet of color or white cardboard. Fold in half. We take a simple pencil and outline the palm. The main thing is to put your hand so that it slightly protrudes beyond the bend line. Otherwise, a card with a spread will not work. Having drawn the silhouette, put the pencil back and take the scissors. Cut out the base of the postcard. After we draw a heart of arbitrary shape and size on red or pink paper. We cut out the part and prepare two more of the same. We bend three hearts in half and glue together, leaving one side free. It should be placed on the fold of the palms. We are finishing work on a simple children's craft after we decorate the card.
Santa Claus from balls
If you want to make an original decoration for a Christmas tree, you should use the instructions described in the current paragraph. However, it requires the preparation of colored paper in pale pink, green and black, as well as blue or red. When all that’s necessary is a friend, we begin creativity. From pink paper, cut out a large circle. We outline it on a blue or red sheet. Cut out the cap of Santa Claus. Next, we prepare several small circles, from which we will make a pompom and the beard of our New Year's character, and jewelry for the hat - a snowflake, spruce twig or other winter attribute. After we collect all the details together, finish the eyes and nose, attach a white strip - the fur trim of the hat. At the end, glue on the back of a handmade DIY thread made from a simple thread or satin ribbon. So that the finished product can be hung on the Christmas tree.
Santa Claus origami
Our article has come to an end and in the end we would like to offer the reader another interesting idea for Christmas decoration. It is performed very simply, you just need to carefully read the step-by-step instructions. Which can be studied in the photo below.
And it is worth noting that such a Santa Claus does not have to be folded out of paper, you can also use banknotes of various denominations. Such an original and valuable gift will be appreciated even by adults!
So we figured out the topic stated in the title of the article. We hope that the presented ideas of simple and simple crafts will not only help the reader to have an interesting time with their child, but will also push the family to creativity, motivate them to perform even more spectacular and unusual products.