Today, with our readers, we make bows of ribbons with our own hands. There are many ways to make these cute items, and they are all quite simple even for beginners in needlework. No special tools or materials for the work will be required, but, despite this, the results will be excellent. Below readers will find eight elementary workshops, each of which they will be able to bring to life with their own hands. Ribbon bows made by yourself will be a wonderful decoration for hairpins, headbands, gift boxes and clothes. Here we go?
Three in one
Let's start work with delicate crafts in blue and beige colors. Making bows from ribbons with your own hands is all the better because the material for the product can always be selected depending on your own needs.
So, for the bow you need to prepare three types of ribbons:
- two cuts of satin braid 2.5-3 cm wide by 10 cm wide;
- two cuts of organza tape (1.5-2 cm wide), 8 cm each;
- a piece of narrow satin ribbon - 0.5-0.8 cm - about 15 cm.
Then you need to make blanks: from a wide braid and organza, one double bow, from a narrow ribbon - a single one, and also cut a piece of ribbon to form the middle. For reliability, all elements are strengthened with threads, then stitched together as shown in the photo. So simple and quick you can make three-layer three-dimensional bows of ribbons with your own hands!
Satin bow hairpin
The next product will be a solid hairpin, which any woman will be happy to decorate her hair style. No matter how many girls have such accessories, they will definitely want to make the same DIY hair jewelry for themselves. Ribbon bows for her are formed from braid 1.5 cm wide. The length of the material depends on the size of the base - the bow should overlap the invisibility or the crab to which the workpiece is attached.
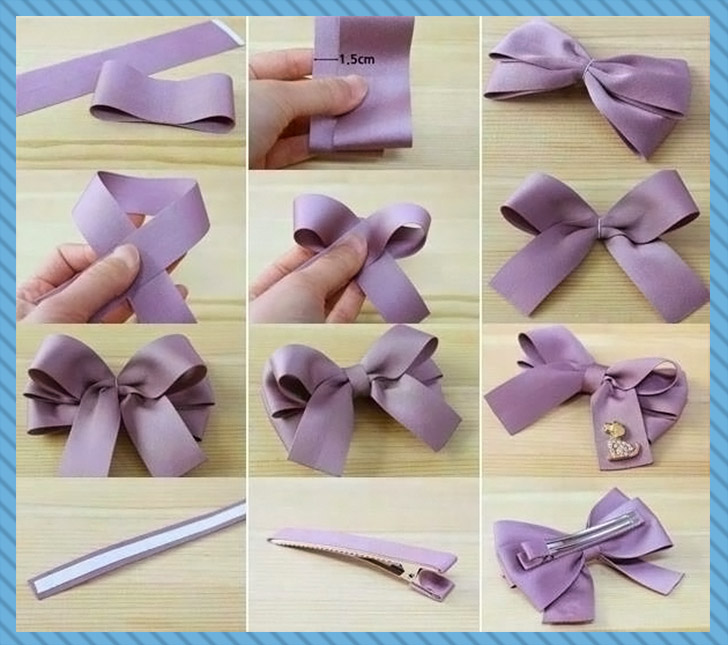
First you need to cut off two pieces of tape and fasten their tips together, getting a couple of ovals. Then, laying them on top of each other with a slight offset, sew in the middle, forming a double bow. The third step will be the manufacture of the upper tier of the decoration. A piece of the satin ribbon needs to be folded, forming a loop, as in the photo, trim the tips, collect a bow, and, fixing it with your fingers, sew into threads in tone. The lower and upper blanks are assembled together, the middle, stitched and decorated with a strap from a piece of narrow ribbon. Then the bow should be glued to the hairpin, decorated with rhinestones, a pendant or a beautiful button if desired.
For all occasions
The third option to make a bow is even easier than the previous one. Such crafts can decorate clothes, a handbag or a postcard. We suggest using not a simple ribbon, but a slanting inlay. If the materials for needlework were not ready, you can always do it yourself. Bows from ribbons of ribbons turn out to be more rigid and keep their shape better than satin ones.
We take two cuts of the stripe and, by analogy with the previous version, form ovals. We sew each of them exactly in the middle and connect together (one under the other). The final step is to attach the tips, which make a short piece of the same tape. For greater elegance of the craft, the free ends of the bow need to be cut off at an acute angle, and its middle should be decorated with a strap, button or rhinestone.
Simple beauty
Then we try to work not with satin braid, but with rep. For crafts, you will need a tape of centimeter width, from which you need to cut two pieces of 12-13 cm and one - 9-10 cm. Long segments are glued into ovals, then cross-wise are joined together. A short oval is also formed from the short one, it must be fixed in the middle of the bow, placed horizontally. Everything is sewn together with threads to securely fix the “tails” of the bow.
From the piece of tape you need to make another element - the tips, the edges of which are trimmed with a "flag". Its length is 7-8 cm. The tips are fixed on the back of the bow with glue, and the middle is covered with a strap. If there is no gun with hot glue at hand, then you can sew everything yourself. Ribbon bows made in this way come out small, but very pretty.
Miniature miracle on a fork
Using a conventional cutlery, which is in every kitchen, you can make a miniature craft, presented in the following photo. But, despite the simplicity of the method, not all needleworkers know how to make a bow out of a ribbon on a fork with their own hands.
The whole process is described in the illustrated master class above. According to the instructions, you will need a fork with long teeth and two cuts from a narrow ribbon of 3-5 mm: a long one from organza (about 25-30 cm) and a short one from satin (10-15 cm). To tie a bow, you need to take a long piece of tape and, having fixed one of its edges with your fingers, stretch the other (long) through the teeth of the device. The braid is interlaced from bottom to top, alternately "bypassing" each column. So five rows of braid are formed, after which the tape must be tied with a short piece of tape between the central teeth and remove the craft from the fork. To complete the work, you should straighten the bow and cut its loose ends.
Strictly and to the point
Looking at the following instructions, readers will learn how to make do-it-yourself bows from satin ribbons to decorate men's gifts. Of course, they are quite good for other purposes, but when you see these strict and concise bows against your will, you imagine a present for a strong and courageous guy. The craft consists of two types of ribbons of different widths - 5 cm and 2.5 cm, but the same length - about 20 cm. You also need to prepare a small piece of narrow braid (no more than 10-15 cm) in order to tie a bow on top.
Ribbons for the bow are stacked one on top of the other, their edges overlap. To prevent material from slipping off, it is better to glue the ends or sew them with threads. Having folded the blank, it is necessary to pick it up in the center, tie it with a strap and trim the excess.
Decorate a gift
Finally, we will tell and show how to make magnificent bows from ribbons with your own hands. The first option is an article made of kapron tape.
The algorithm of work is simple: twist the tape into a free roll and flatten. Then fold in half at the connection point (shown in the figure by arrows) and cut small corners on both sides at the bend point. Further, this place needs to be tied up with a previously prepared piece of the same tape and straighten all the ends of the bow from the bundles.
You can also decorate a present with a satin ribbon.
To do this, prepare three pieces of tape of the same width. The main (and longest) should be wrapped in a box with a gift and tie it with a knot, making the edges symmetrical. Then, from the other two pieces of ribbon, individual bows are formed - one larger, but without tails, and one smaller and with additional tips. The blanks are stacked on top of the tape, and then it is fixed on the box with a knot and bow.