Each craftswoman, fond of needlework, tried to create toys. There are many techniques for making such products. Among them, felting dry toys gained wide popularity. This technique is also called felting or felting.
Felting technique
In ancient times, carpets, flooring, clothes, hats were made of wool. Now needlewomen are fond of creating decorative things, toys, jewelry and souvenirs from felt. In the process of felting, the wool fibers become tangled and form a dense lump, which in the hands of the felters takes the desired shape. The main thing is to take into account that initially the amount of wool taken when felting will sit 2-3 times. Therefore, creating toys using the technique of dry felting, you need to stock up on the necessary amount of material.
If irregularities have formed in the product, they can be repaired by adding additional pieces of wool. Often toys are made by dry felting from several parts, which are made separately, and then joined by tacking one element to another with the help of small pieces of wool.
Felting tools
This type of needlework, such as dry felting of toys, does not require special equipment. In the initial set, it is enough to have needles of different diameters and cross sections. You will also need a synthetic winterizer, from which the work on felting begins. It is inexpensive, therefore, for the manufacture of large toys it is taken as the basis for the future product. Still need wool for the top layer, which wraps the prepared part from sintepon and rests on the base.
Many people use a tool like a needle holder. It is a plastic or wooden handle with holes that holds several needles at once. The needle holder accelerates the work process, helping to capture most of the area.
Dry felting of toys cannot be performed on a hard surface. The needle piercing the product through may hit the table due to impact. To avoid this, you need a special mat for felting, brush or foam sponge.
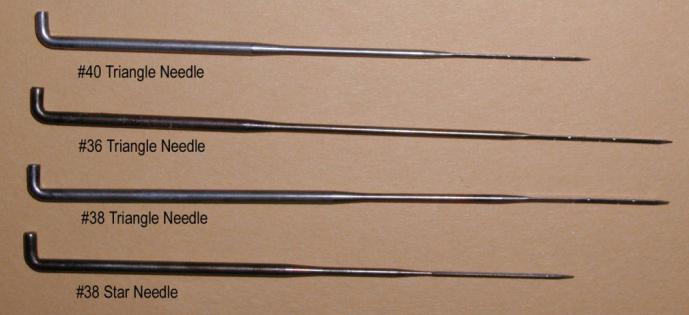
Read more about felting needles
The entire process of felting is performed with needles of different sizes. The needle for felting does not have an eye, its shape resembles a poker and can be up to 13 cm long. The needles are classified by number and section shape. The thickest ones are marked No. 32-No. 36 and are used at the beginning of work, but they leave behind large punctures in the product. Therefore, having compacted the parts, the needle is changed to the middle one with number 38. With its help, depressions are formed, the main work and decoration of the toy are performed. Needle number 40 polishes the product and finalizes the decor. The needle should be changed when it is poorly included in the part of the craft. If you engage in needlework such as felting dry toys, for beginners, three needles of different diameters having a triangular section will suffice. This form is the most common and can be used at all stages of work, only the needle number changes. There are those that have a star section. They are used to polish the product. A crown needle helps to roll decorative elements without distorting them. There is also a needle of the cross section, which rips out the inner layers of the base. It is used by professional craftsmen to give the toy a natural color from different shades.
Needle process
In the process of felting, the needle is continuously stuck in a ball of wool, penetrating deep into and capturing the fibers. In this case, the villi become tangled and crumpled until the workpiece acquires a sufficient density.
Needles for felting are very sharp, so you need to work with extreme caution. During felting, do not be distracted, otherwise you risk seriously injuring yourself. When working with a needle, the wallowed product cannot be kept on weight; it must be put on a special device that is not amenable to stalling. When working, the needles cannot be tilted and moved, but you need to keep them perpendicular to the craft, as they are very brittle.
A kind of wool
Toys using the technique of dry felting are made of sheep's wool. The wool of Australian and New Zealand merinos is especially appreciated, which has its own differences.
From coarse sheep’s wool boots and toys are created, which are obtained with shaggy wool.
Bleached, which can be easily dyed at home, is called bleaching. It is used as a basis or to create a light background.
Tow is called sheep hair from small hairs remaining after scratching. It can be used when stuffing toys.
Sliver is the cheapest unpainted wool. It is used as a filler, on which the main layer of the desired color rests.
Semi-thin wool of a merino sheep. It is used for finishing products.
Also, toys with dry felting are made of camel and goat hair.
How to connect the parts
If you haven’t worked with wool and you are interested in dry felting of a toy, for beginners it is important to know how to connect separate parts with each other. After you dump the toy parts separately, the main thing is to correctly attach them to the body. The tipping position should not be as tight as the whole product. When working with a needle, you need to go around these places, leaving them loose. The wool of the part to be joined must fall through deeply and be firmly fixed inside. We pin the element to the body with pins and find the correct position. After that, we fill the part's wool with a thick needle inside the body, achieving a strong connection. After making sure that the part sits firmly enough, level the surface and close the seam with separate tufts of wool with a medium-sized needle. Having completed the joints, they can be sanded with a thin needle.
How to fluff a product
A toy piled from wool can be fluffed in two ways:
- using a needle of the cross section;
- by rolling over individual tufts of wool.
Craftswomen basically fluff up an already finished polished toy with all the attached parts. Sticking the return needle in the body, we pull the wool fibers out. Try to make punctures close to each other so that the toy has thick fur without bald spots. Depending on the size of the product, it can take several hours to fluff. After completing the work, the hair can be trimmed with a model, giving the toy a finished look.
The second method of fluffing involves the external lay on the crafts of thin strands of wool. Starting from the bottom of the toy, we apply the middle of the lock to the body and attach it with a No. 38 needle. Thus, we increase the wool around the product. Then we lower all locks down. We roll the following bunches, stepping up from the bottom row 1 cm. The work will be finished when you fluff the entire surface intended for wool.
Mix colors
If you want to make toys with your own hands, dry felting makes it possible to make the animal as natural and lively as possible. To give the toy a natural color will help mixing six different shades. This can be done both at the beginning of the work, creating details of the future product, and by rolling wool of different colors.
If you choose the first method, a lump of wool of the same color is taken as the basis and is slightly tacked, then wrapped in the color of the future animal skin and also rolled. The color will mix at the stage of operation with the needle of the cross section. The needle will release the wool inside and partially fluff the outer layer. During the process, the toy will acquire an interesting, close to lively shade. The main thing is to select colors close to the coat of the animal.
To create strips, a fluffing method by tumbling is suitable. Only in this case, you need to increase the hair, alternately changing the color of the strands at a distance you define. This method is suitable for toys with long hair. To create short-haired animals, the strand must be firmly rolled along its entire length, creating a schematic arrangement of stripes on the body. Then fluff back the needle.
Dry felting toys: a workshop on felting toys on the frame
The process of felting is a very exciting activity. It calms and provides an opportunity to reflect and dream.
Consider for beginners a small MK. Dry felting of toys can be carried out using a skeleton. Create a doll of wool. To work, you need a chenille wire, from which cut pieces 8 and 14 cm long, wool for felting of different colors - it depends on the image you have invented. Needles of triangular section No. 38 for the initial stage, No. 40 for complete compaction, and star No. 40 for grinding, a sponge for felting.
To create the frame, fold in half a piece of wire 14 cm long, it will serve as your legs. Slip the second arm section into the loop. Twist the wire several times, forming a trunk. Next, leave 5 cm of wire free for the legs. Bend the frame depending on what position the pupa will take. It can be the bends of the knees, feet, elbows and hands. Wrap strands of wool over the entire frame of the product, gradually securing it with a felting needle. In the area of the trunk and hands, wrap a little more wool, increasing the volume.
To make a head, you need to form a woolen ball and lay it with a needle, achieving a diameter of not more than 2 cm. Then tear off a long and wide strand, wrap the doll’s head with it, tearing it down if necessary, and fix it in a small piece, creating a neck. Distribute the hanging hair in front and behind the body, attach the head and lay the strands on the frame.
Next, you need to put on a doll dress. To do this, take the wool of the desired color and begin to lay the strands vertically to the waist line, creating a skirt. Having rolled the strands around the entire body of the pupa, trim the ends so that the lower edge of the skirt is even. To form a top, wrap the doll's body in strands, securing them with a No. 40 needle.
In the same way, you can make a doll a ballet flats or sleeves. The handles can be bent and placed in the palms of a flower. Finish the look by creating the appropriate hairstyle.
When choosing dry felting of toys as needlework, one should know that this work is very painstaking and requires perseverance and patience.