Quilling is a wonderful art of paper rolling that makes many people admire. Thanks to this art, you can learn to make different panels, animals, plants and much more. 2014 is the year of the Horse, so it will be interesting to try twisting your little horse out of paper. Quilling is a simple job, so if you have the desire and patience, then you should definitely try your hand. Do not forget to properly and carefully prepare for it. A quilling horse is a fairly easy task that even children can handle. The most important thing is practice. The more you practice, the better and more beautiful it will turn out.
Preparation for work
For work, we should prepare:
- Paper stripes with a width of 3 mm, a length of 27 cm. Colors: blue, navy blue, gray and blue-gray.
- One paper strip three cm wide, blue or dark blue.
- Background paper (the color can be chosen independently, but it is necessary that it must be in harmony with the future horse).
- Prepare from tools: a thin awl, small scissors, PVA glue, miniature tweezers with elongated ends, as well as a thermal gun.
- A frame measuring twenty by twenty cm. The base should be cardboard and have a size of 17 by 17. In addition, the mat must be rounded and have a diameter of 13-14 cm.
Getting started
The first stage is that you need to make twigs, leaves, and also - most importantly - poinsettia flowers. To create a blue flower, take sixteen whole stripes and twist them in the shape of an “eye”. Next, try to give the resulting shape the shape of the English letter S. Using a heat gun, glue together eight petals in one tier. Repeat with the next petal. After that, connect 2 tiers with a slight offset of the petals and glue them. Glue to the middle a thick roll of one third strip of blue.
To make a small flower of gray-blue color, it is necessary to wind 15-16 elements from one second strip carefully. The form remains the same - the "eye", a figure similar to the letter S. To collect such a flower you need exactly the same as the first. Only there is a nuance - the middle will consist of a
gray roll of one second strip.
Now you need to take on the leaves. We will cut them out of strips with a width of three cm. To get it symmetrically, first fold the paper in half and draw on it a neat outline, “by eye”. After which, carefully cut out half a leaf. Using tweezers, we create small veins from the edge to the fold line of the leaf. And now you can open the blank - a beautiful leaflet is ready! Ten beautiful leaves will be enough. Do not forget to add variety to them - each leaf should be of a different size.
We make twigs
To make twigs, you need to twist from eight whole strips of leaflets. They should be blue or dark blue and resemble a droplet shape. Then gently squeeze them along the edge of the contour to make the shape of a “goose foot”. Next, glue them in two layers, wrapping in blue or gray.
Remember that five leaves should go to one branch, and only three to the second. You can change this option to complement your great idea.
The art of quilling: a horse - a master class
To make a cute horse, you can apply your imagination. The affinity forums also present some ideas for paneling. In fact, there is no limit to fantasy. Quilling technique is very popular today, horse patterns can be found in many sources. You will be presented with a variety of panel options and much more.
To get started, take 50-80 pieces of light gray stripes and wrap a variety of elements used in quilling - these are “eyes”, “drop”, “triangles”, “crescents”. To create a beautiful picture, you need to make these elements of different sizes. Now we begin to fill the “inside” - carefully glue the elements together with each other “backs” or “sides” using PVA glue. If you follow the picture, then make the figures more flexible and voluminous. This will help create the effect of 3D volumetric image.
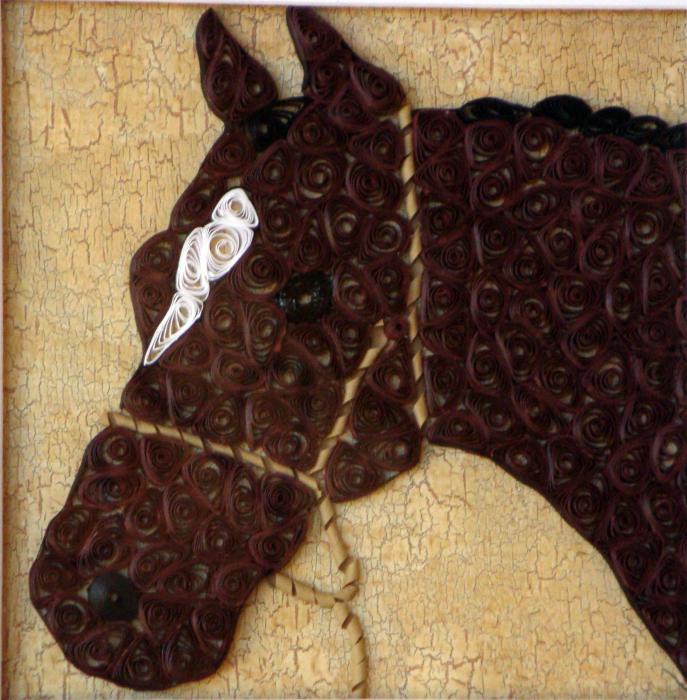
What face will the horse have? Quilling translates ideas
Now we are making a face for a horse. We make eyes - for this, cut a small circle out of dark paper or tightly twist one strip of paper. It remains only to stick it in the right place. For a change, it is even permitted to add eyelashes by cutting paper in three or five mm into small strips. If you add two ears, you get a real horse. Quilling provides a ton of creative opportunities. When creating the ears, select the color of the horse's color and wrap them with a dark strip in two or three layers. The front of the muzzle is made by twisting two strips with a bend of four to five mm and punching. Thus, it will turn out not just a roll, but an ellipsoid. On it should stick lips and nostrils cut from paper in the same way as eyes.
With a tail prepared in advance, our horse will look brighter and more original. Quilling will help organize this difficult matter. At first it is recommended to cut a wide strip with a fringe, about three cm. Leave one end uncut - this will need to be carefully twisted into a roll. Do not forget to fluff the hanging tips and stick them in the right place.
The moment has come to create a colorful mane. Be patient and wind about 80-90 pieces of strips of gray-blue or just blue. The shape should match the “eye” and be as strong as possible. Do not forget to shape the letter S. The finished mane must be glued from the top of the head to the back.
Horse assembly
First choose a background that matches the color of the horse. Then we "try on" the parts of the horse that you made, as well as additional flowers (we do not glue, but apply). If everything suits you, then you can start gluing. There will be a lot of options - try to experiment and do not be afraid of your own ideas.
If some moments seemed complicated to you, then try to familiarize yourself with them in more detail on special paper-spinning sites, and then start creating a horse. Quilling for beginners involves creating not too complex shapes. So we have sorted out a wonderful topic for beginner quillingists.