The invention of silicone has become a real find for housewives. After all, excellent kitchen tools, tacks, brushes and a lot of other useful devices, such as oven mats, which perfectly replace parchment baking paper, are made of this material. However, silicone needle molds were most appreciated by modern needlewomen, with the help of which it is easy to create figures for cake decorating, bizarre soap, candles. What is the feature of molds? What species are there? Can I make them with my own hands?
Silicone molds: what is it
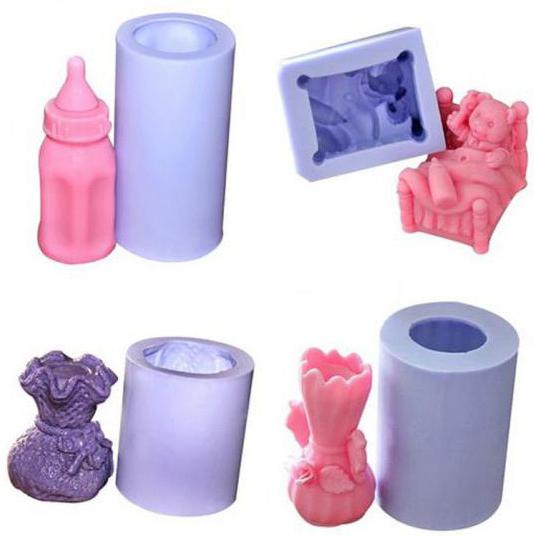
Silicone molds are special forms for obtaining the necessary prints from various materials. Outwardly, they resemble molds from children's sets. Due to the strength and ductility of silicone, with their help not only flat bas-reliefs, but also three-dimensional volumetric figures are obtained.
In cooking, silicone molds for mastic, marzipan, jelly, caramel and chocolate are most often used. In addition, molds are used for the manufacture of candles, figured soap, gypsum figures, products made of epoxy resin and polymer clay.
Types of Silicone Molds
Due to its versatility and ease of production, silicone molds of almost any shape are available for purchase today. Moreover, they differ in just a few ways.
First of all, molds differ in the material from which they are made. Their production uses both food grade silicone and non- food grade silicone . Forms of food material are always more expensive. The scope of their application is almost unlimited: they can be used not only for the manufacture of chocolate figures, but also curly soap. But cheaper molds (from industrial silicone) are intended only for working with non-food materials.
Molds are used in the manufacture of both one-sided figures and three-dimensional products.
Silicone forms are also divided into solid and collapsible (consisting of several elements connected to each other).
There is also a special type of molds - weiner. These forms are made of harder silicone, similar to rubber. Their purpose is to create textures. As a rule, viners consist of two parts, between which a sheet of mastic or foamiran is clamped to give it the desired texture.
Advantages of silicone molds over other forms
In addition to silicone molds, there are many other interesting devices on the confectionery market. Namely: plastic plungers, metal molds for cookies or dough, confectionery syringes with specialized nozzles, plastic or wooden rolling pins to give texture to mastic and so on.
Despite the convenience of all these tools, silicone molds for mastic surpass them in most parameters.
The fact is that, unlike other tools, silicone is not afraid of the cold, heat, does not break, does not rust, is easy to clean, is well transported and takes up little space in the kitchen. Due to its softness it is easy to get finished products out of it.
How to use silicone molds
Despite the variety of forms for silicone prints, the way they are used is unchanged:
- Before use, you need to make sure that the mold is clean and dry, because if there is moisture in it, voids can form in its place and then the resulting print will be defective.
- Before use, the inner surface of the mold must be lubricated so that it is easier to get the finished print. If mold is used for the manufacture of food products, edible fat is suitable as a lubricant. For inedible materials, petroleum jelly is used. If the weiner is used when working with foamiran, there is no need to lubricate it.
- The residence time of a substance in the form depends on its type. If this is mastic, then the mold with it must be placed in the freezer for 5-15 minutes to allow the impression to freeze. Over time, carefully remove the finished product and continue to work with it. If with the help of molds chocolate figures, candles, products made of epoxy resin or gypsum are made, the print needs several hours to harden. The pour time of each material is separately indicated on the accompanying instructions to it.
Do-it-yourself silicone molds: what can they be made of
Since creative people usually do needlework in their free time, at some point they will definitely want to not just use ready-made molds, but create an original form for the print.
For such cases, there is a special silicone paste on sale that can be used to make molds. For the manufacture of food molds, dental silicone pastes for casts are also used. Unfortunately, all these materials are quite expensive, so many needlewomen try to make forms from improvised means.
The main component that craftsmen make molds from is technical silicone sealant sold in hardware stores. In some cases, one of the types of polymer clay is taken instead.
Molds obtained from such materials are, of course, worse than factory ones, but they are great for making molds. At the same time, everyone should remember that you can’t do silicone molds for mastics from technical silicone or polymer clay: these materials are toxic.
The only non-specialized material that you can try to use for culinary molds is gelatin. It is mixed in equal parts with glycerin and this mass is boiled in a water bath, after which it pour the desired object. The resulting gelatin mold is very plastic and can be used for food. However, unlike silicone and clay forms, gelatin is afraid of temperature increase and begins to melt.
DIY silicone molds: a workshop from improvised tools
After it became clear from what materials molds are often made with your own hands, it is worth seeing how this is done.
In order to make a mold at home, you will need a package of technical silicone, starch (potato or corn) and items that will serve as a pattern for the future mold.
- The first step is preparing a place of work. It should be a clean, even, dry surface. For example, a table covered with film or parchment paper.
- The required amount of starch is poured onto the table. Next, the same amount of silicone is added to it.
- Of these two components, you need to knead the silicone "dough." It will take 10-15 minutes. The kneading process should not be delayed, since the silicone hardens quickly when it comes into contact with air, especially warm.
- The finished "dough" needs to be rolled out, but not very thinly. Imprinted objects are pressed into rolled circles and left in this form for several hours. And better for the whole night.
- After this period, the necessary items are carefully removed from the blanks and the mold is ready. A workpiece is molded from silicone right in the same water. She is taken out of the water and pressed into the subject of silicone imprint. Then leave for several hours - and then according to the above scenario. American manufacturers, making silicone molds, process the material in a different way. Instead of mixing the “dough” with starch, the silicone is squeezed into water with a glycerin-containing detergent abundantly dissolved in it.
Having considered the various ways of creating molds, you can now use the knowledge gained in practice, choosing for yourself the method at your discretion.