More and more often in modern life we use a variety of portable gadgets. But more often than others, gadgets related to playing music are used. It is very convenient, while relaxing in nature or in the country, riding a bicycle or doing gymnastics, to include your favorite work and enjoy high-quality sound. In this regard, portable speakers and boomboxes are very popular with many. Their cost varies from a few dollars to several hundred.
But some do not want to spread the N-th sum for such a simple device and are wondering how to make a portable speaker with their own hands.
In this article we will talk about several options for its manufacture.
How to assemble a portable speaker with your own hands
Before starting work, prepare the necessary materials, tools and equipment.
To make a portable speaker with your own hands you will need:
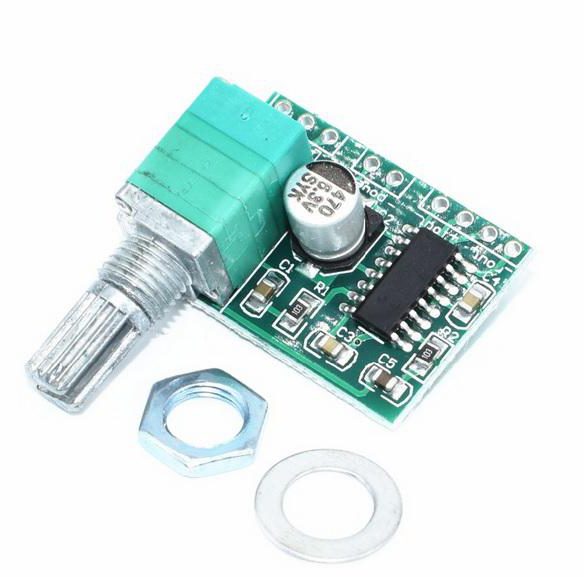
- Amplifier board with volume control.
- 2 speakers with a power of 2 to 3 watts and a resistance of 4 to 8 ohms.
- Board charge controller Li-ion batteries.
- Li-ion battery, can be from the phone.
- A wire with an audio output of 3.5 mm, it is better to take from the headphones.
- On-off switch.
- Wires.
- Bolts M3.
- Plywood 4 mm.
- Paint, better in the spray.
- Tools - screwdrivers, soldering iron, jigsaw.
When working with these tools, be sure to follow the safety instructions.
DIY portable speaker enclosure
Let's start with the manufacture of the case. The sound quality of the speakers largely depends on the material of the case. Plywood is the best suited for these purposes, because it resonates well and, due to this, the sound is juicy, rich and with good bass. Just by stuffing the speakers into a cardboard box, you can never get such a high-quality sound as from a plywood case. Case dimensions 180 x 70 x 60 mm. These are the optimum proportions for the best sound from the speakers. We mark the plywood and cut everything out with a jigsaw. We drill holes for the speakers. We clean the edges with sandpaper. We glue with PVA glue all the details except the front part with holes for the columns. We drill holes for a volume control and a switch on it. We make holes for the micro-USB connector and the audio output wire. We cut small squares (1 x 1 cm) from plywood and paste them in the corners of the case for further fastening of the cover.
Assembly
Solder the wires to the battery and isolate it with electrical tape. Solder the wires to the speakers. Please note that one contact is “+” and the other is “-”. Keep this in mind when connecting again. We attach the cover, fix it with tape and drill at the corners of the hole with a diameter of 2.5 mm. Cut the thread with an M3 tap.
We grind the entire body with sandpaper. Carefully remove dust and paint. After the paint has dried, glue the speakers onto hot glue. We screw the amplifier into the hole made earlier. We glue the switch. We solder the battery wires to the charge controller board in the places indicated by B + and B-. Be careful not to reverse polarity. At this stage, you can check the operation of the circuit by connecting the charger cable . The red LED indicates that the charge is on. The blue diode will light when the battery is fully charged. We solder the plus from the right speaker to the “ROUT +” contact, and the minus to “ROUT-”. Similarly, solder the left speaker to the “LOUT” pins. We solder the wires to the charge controller board with the contact “OUT +” and “OUT-32,”. We glue the module on hot glue. We fix the battery. We pass the wire with the audio output into the hole made earlier. To protect against a cliff, we tie a knot on it from the inside. Solder the wires coming out of the wire. Solder the remaining contacts to the switch and amplifier. We fasten the front panel with M3 bolts.
We connect the audio jack to the phone and check. A portable speaker for a do-it-yourself phone is ready. It’s not too difficult, especially if you understand the technique.
Do-it-yourself portable speaker with flash drive
We go further. The next model of a portable speaker with our own hands will be assembled from improvised means. As a basis, we will use a case with a speaker from a broken computer speaker and some materials purchased on AliExpress.
In addition, we will need:
- A decoder board (with its help, music will be played not only from a USB stick, but also from SD cards and from a phone).
- Power controller for Li-ion batteries.
- Amplifier pam8403.
- Battery.
- 2 LEDs
- 2 resistors at 220 kOhm.
- 2 switches.
- Wires, including wire with audio output.
- 1 variable 5 kΩ resistor.
- Soldering Supplies.
Circuit assembly
First, we solder the entire circuit, except for the mini-jack input and the button, so that later it would be more convenient to insert it into the case. Battery use Philips 1050 mA. The consumption of the board used is about 100 mA, so the battery lasts about 10 hours.
Solder the power controller to the battery. After that, solder the wires from the power controller to the decoder board through the switch. Repeat the connection with the amplifier. We solder the LED to the decoder board, and the LED to the amplifier board, passing 10 kΩ through the resistor. Do not forget about the polarity. Now solder the resistors. They are needed so that when playing back there are fewer rattles and extraneous sounds. We connect the board to the amplifier and start them in turn. If the LEDs light up and it turns out to reproduce the sound, then the circuit is assembled correctly.
Now you can solder a variable resistor to adjust the volume. We check. We turn on the power board and amplifier and turn the volume control.
Putting the case together
At the next stage, we will assemble the circuit and case of the portable speaker with our own hands. We disassemble the column. We solder the groove of the wire holder. We drill a hole in the body under the minijack with a diameter of 3.5 mm. We make holes for the LEDs, volume control, buttons and a USB connector. We glue the decoder board inside the case. Before attaching the buttons, we solder the native buttons of the decoder board with a soldering iron or a building hairdryer. We check the operation of the column and assemble the case. A self-made portable speaker is ready.
If you are the owner of golden hands and a bright head, then this article will definitely come in handy for you. You can make your own portable speaker with your own hands three times cheaper than it costs in the store. And get pleasure at the same time.