Well, when your favorite doll has a carriage! With your own hands you can make an open-top Lando from cardboard or an elegant chaise. And you can even swipe at a luxurious stagecoach or a comfortable crew. Tells about how to make a carriage with your own hands, a master class published here. The article will also consider options for making paper crews.
Cardboard carriage for Barbie
This toy will not only serve to create an external surroundings in the corner where Barbie "lives". On the landau with an open top, the doll will be able to make real trips. And even invite your friends to ride. And the girlfriends of the hostess Barbie will be envious when they see what carriage she now has!
With your own hands you can make it from an old cardboard box. Cope with this work can not only an adult, but also a teenager familiar with the design. And since the carriage is made of cardboard, you will have to cut out the parts yourself using a shoe or clerical knife, a scalpel, or other sharp tool. Well, design talents while working on the appearance of the crew, of course, are required.
Building a drawing for the landau hull
The cardboard carriage described here is made DIY for Barbie dolls. But you can make in a similar way a landau or a trick for other residents of the toy town. When constructing doll carriages with their own hands, drawings should be developed in accordance with the dimensions of the “users”.
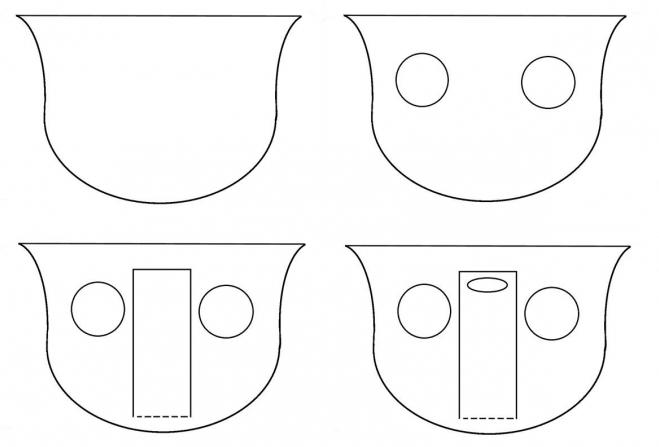
- First of all, a contour pattern of the side wall of the carriage is drawn. In our case, it has the shape of a bowl with a rounded bottom or a tulip with a straight top.
- At the top of the wall are two round windows.
- A door will be located between them. We have a ladder function assigned to it, so the side that will not be cut is at the bottom.
- You can make a hole in the upper part of the door, such as a window, or on the side - like a handle.
- A sharp blade cuts the contour of the wall, window, hole in the door and its three sides.
- The second wall is cut out the same way, just do not make the door. Although the carriage, made of cardboard with its own hands, may well have two entrances.
- Preparing the bottom for the carriage. It has the appearance of a long strip of cardboard. This part should be as wide as the width of the crew itself will subsequently be. The length is calculated in this way: the distance from the upper corner points of the side wall is measured. A centimeter tape should be skipped along the lower contour of the sidewall. To this size should be added an allowance for circular bends - decorations on top of the carriage.
Carriage Housing Assembly for Barbie
- So that the carriage with your own hands does not turn out to be curved, first calculate the middle of the bottom part and the center point of the lower wall curve. They are connected.
- Using adhesive tape, the edges of the bottom part and the curved line of the sidewall are glued at right angles.
- Attach the second side wall similarly.
- The remaining free ends of the bottom spin.
- Fix the "curl" with double tape or a piece of cardboard.
- A carriage is made of cardboard with one’s hands on conscience, so that the dolls would be comfortable using it. Therefore, a piece of cardboard, folded so that it imitates the seats and the even floor itself, is inserted inside the case. After all, the bottom of this carriage turned round, concave.
- If desired, you can make soft fabric upholstery, hang curtains on the windows.
This is how dolls gathered for a walk are conveniently placed inside the carriage.
Providing carriage motor function
Since you want to make a carriage with your own hands with wheels, thanks to which it will move, you should take care of this. In principle, preparing such a device is not difficult at all.
- For the wheels themselves, they take something round: a coil of thin tape, wire, a cover of the right size. You can even cut a circle out of cardboard. In future wheels, make a hole in the center, if it is not foreseen in the used objects.
- A cocktail tube is attached to the bottom of the carriage with tape.
- A wooden skewer is inserted into it.
- The edges of the skewers strengthen in the center of the wheels.
Work on the appearance of the crew
- Everyone decides for himself how to decorate the carriage from the outside. You can cover it with paint and varnish, and glue on top an ornament that is cut out of foil or paper of the desired color.
- You can draw an ornament using a template with silver or golden paint.
- And if the drawing is done with varnish or glue, on which beads or millet is immediately poured, then it will become voluminous. By the way, grain can also be painted silver or gold before use .
Designer carriage trick
The needlewomen adore decorating their home with little things, creative and cute. Some, for example, believe that a paper carriage made with their own hands can serve as a box for storing tea. They even arrange the side wall so that it has the shape of a teapot.
Between the sides, place a box with a lid, in which tea will be poured. You can put some little things inside this designer little thing - its use depends on the imagination of the owner.
Using the same algorithm, you can make a carriage for small pupae. True, if you do not make the wheels movable, but cut them together with the side walls of the hull, the crew will not be able to ride like a real one. However, a child will be happy with such a toy, if it is done together with him. And girls from 9 years old can already cope with such an article by decorating the carriage with ribbons, lace, braid, sequins, rhinestones, beads and beads.
Carriage desktop souvenir
Often, crafts are used as decorations. This master class will tell you how to make a carriage with your own hands out of paper.
- First, a side wall template is developed. You can draw only half of the template, and cut out the entire part at once, folding the paper in half - both sides are asymmetric. For crafts, you need two walls.
- The openings of the windows on the inside are tightened with small tulle. The human contour is attached to a piece of thick cardboard, which is glued on the inside with a second side directly on the wall detail.
- You can decorate the outer side of the body wall with beads, rhinestones, sequins, stick a handle on the door.
- A matchbox glued with white paper is glued between both parts of the case.
- The figures of the servants and the coachman are attached to it from behind and in front.
- The carriage is mounted on wheels. It can be metal buttons or circles cut out of cardboard, glued with foil.
- Figures of horses are cut out of cardboard and set in front. Thick wire fasten them to the craft. You can cut narrow strips from cardboard that will imitate a horse harness.