Budenovka was introduced into the outfit of the Red Army soldiers to distinguish it from the White Guards. The fact is that immediately after the overthrow of the monarchy, the revolutionaries had only a form of imperial troops. Insignia mated from it, and a red star was fastened to a cuff or other prominent place. It was difficult to distinguish the Red Guard from the White Guard from afar.
When did the budenovka appear
In 1918, a competition was announced to create a headdress for soldiers of the Red Army, in which the sketch of the "heroes" won. The woolen cap-hero resembled a medieval "little little girl" or with shelm with a barmitza.
Subsequently, this headdress was modified for winter uniforms and was nicknamed "Budenovka" in honor of the division of Semyon Mikhailovich Budenny. The photo on the right shows Budyonny himself in a Budenovka. This is a very rare shot.
What does a real budenovka look like
Budenovka pattern is very simple. Initially, the hat was sewn in the form of a helmet made of cloth with a cotton lining. The cap consisted of 6 spherical triangles, a metal plate of about 2 cm was sewn into the top. An oval-shaped visor and a natalnik with long edges were sewn to the cap so that they could be fastened under the chin. A mandatory element of any budenovka was the cloth star. Its color depended on the type of troops. In the winter version of the cap, the star size was 10.5 cm, in the lighter - 8.8 cm. The star was the place of attachment of the badge - cockade.
As can be seen in the photo, the winter budenovka was sewn from felt and had a quilted insulated inner layer. With minor changes, the Budenovka served the Red Army wars until the introduction of new uniforms with epaulettes. The last photo of a fighter in Budenovka dates back to 1943.
We make a full-size budenovka pattern
First you need to decide on the material for the job. The details of the heading made of cloth will require wider allowances for the edges, while the felt practically does not dissolve. To make a pattern and sew a budenovka, it is necessary to measure the volume of the head of the model. The height of the headgear has always remained unchanged, but for the peace of mind of the master, you can make a measurement from the line of the eyebrows to the crown and add 5 cm for the top.
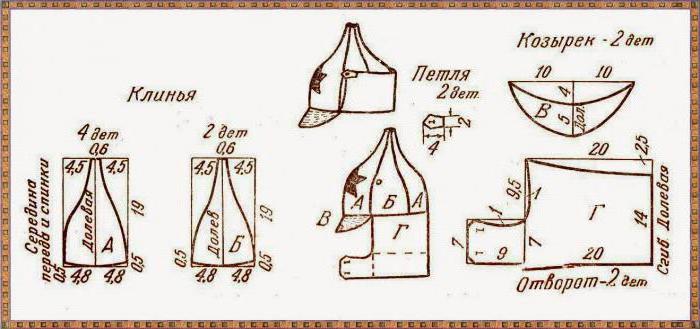
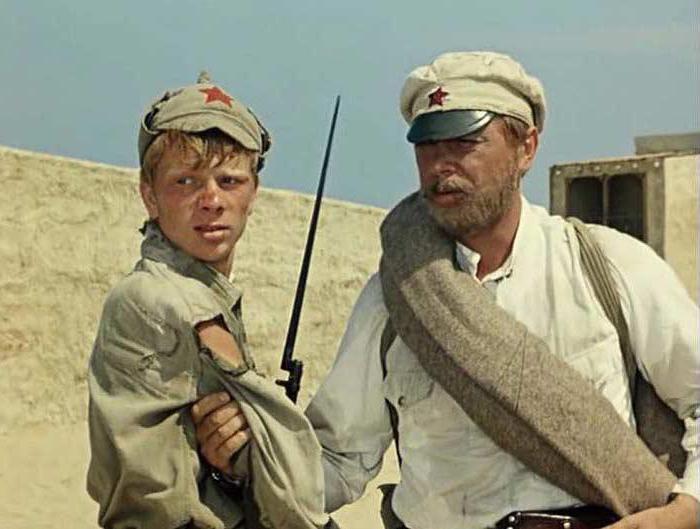
The figure shows a pattern of size 56 budenovka, in the final form the volume of the headgear will be 57.5 cm. When changing the size of the pattern, its layout is saved. For the winter version, you need to make a warm lining. Her pattern is the same as that of the wedges of the budenovka cap. The overlapping lapels need not be made so large. For example, in the famous film “The White Sun of the Desert” Petruha’s budenovka is light, designed to protect the head in a hot climate, so there is no need for large lapels.
It is not difficult to make a pattern of a budenovka with your own hands. It is necessary to fold the fabric four times and fasten with sewing nails, attach the paper part of the middle of the front and back, carefully circle around the contour and add allowances of 1.5-2 cm. Then fold the fabric in two layers and open the side wedges. Other cap details are similarly cut. The edges of all parts must be processed on an overlock or in another way. For example, you can use threadbinding tape or an adhesive web. Things processed in this way will last longer due to additional rigidity and look tidier.
We sew and detail the budenovka
After the pattern of the budenovka and the processing of the edges of the parts, the cap can be sewn. It’s best to start with a cap. The front and back parts are sewn first, then the side wedges are sewn. You can insert a plastic tip into the tops, as was done in the original. In this budenovka, the visor was rag, so it was convenient to wash the hat. For a better appearance of the final product, you can make an insert of a more dense material. The visor and natalnik are inserted between the cloth and lining parts of the budenovka, then the lower part of the cap should be sewn on a typewriter.
Detailing will make a beautiful budenovka. Take a close look at the photograph of a real headgear. Pay attention to how the visor and buttonholes are neatly stitched. It is better to find metal buttons in bronze color. The star should be made of cloth of the same quality as the dress itself. At the first budenovki star fit into a black circle.
What else can be done from the pattern of budenovki?
Taking the pattern of the cap of the Red Army, you can sew a real heroic helmet. It will only be necessary to cut parts from artificial or genuine leather, brown or gray under the metal. All that remains is to come up with details, such as button rivets or additional decorative stitching.