Many joyful moments are brought by admiring fresh flowers in nature. You can extend the pleasure of homemade products, using completely different material to create crafts. They make flowers from paper and newspaper tubes, plastic bottles and satin or nylon ribbons, fabric and plasticine. Foil flowers made with your own hands look spectacular.
The noble shine of metal attracts the eye and has long attracted the attention of lovers of needlework. The foil is malleable at work, folds well and is compressed, takes the desired shape and is ductile. Products for a long time maintain a decent appearance, are not subject to humidity and temperature changes, do not fade under the influence of sunlight. Therefore, many craftsmen are happy to use this material in the manufacture of do-it-yourself foil flowers.
Beginners and in working with children can use the usual food foil, which is easy to get at any supermarket. For professional work, they buy foil in rolls of different colors. Red and golden flowers with green stems look wonderful. The work is bright, colorful, it is especially nice to enjoy crafts in the light of electric lamps or natural sunlight. It seems that the flowers emit light, as they let out solar glare on all the walls of the room.
In the article, we will consider how to create different flowers from foil with your own hands, and an instruction with a step-by-step description of the task will help you quickly learn how to work with new material. Photos of the described samples will give a more complete picture of the finished appearance of crafts.
Using patterns
To get started, consider how to make a foil flower with your own hands according to several patterns of different sizes. So, in our sample we need to draw flowers with five petals of different diameters on cardboard in order of increasing size. Then the contours are transferred to the food foil by simple indentation with a pencil or ballpoint pen. Carefully cut out all the details of the flower with scissors. If you want to give the petals a corrugated shape, you can apply small strokes on the entire surface, as in the sample below in the photo, but the flower will look beautiful with even petals.
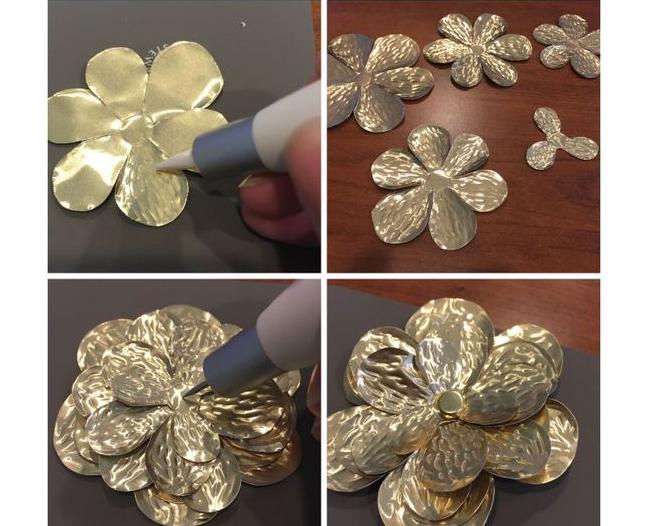
It remains only to attach to the base first the largest element, and then all the rest in decreasing order of size. Moreover, they are located with a slight shift to the side so that all the petals are clearly visible. The middle of the flower can be decorated with a circle of foil of a different color or a ball made of a crumpled piece of material can be attached. It will hold the layers between them hot glue. In the end, carefully spread and slightly lift up each petal, then the flower will look voluminous. Such a sample can be taken for children. Do-it-yourself foil flowers can be glued onto a piece of cardboard or attached to a wire and put in a vase.
Rose foil
A magnificent rose is often used by craftsmen in crafts. This magnificent flower can also be made from food foil. Each petal is cut according to the pattern separately. Details of at least three sizes will be needed, because the petals increase with distance from the middle. The bud is folded from a strip in a spiral shape and is pressed firmly down below, literally flattening the material with your fingers.
The photo below clearly shows how to make such flowers from foil with your own hands. As in the previous version, the petals can be left even and smooth or give them relief with crushing or pressing with a wooden stick.
How to collect a flower
When many petals of different sizes are cut, they begin to assemble the parts together. The first step is to make a bud, small petals are attached to it in a circle. From below, the ends of the foil are tightly twisted together. Further work is carried out with medium sized petals. Place them with a slight shift to the side so that they do not overlap the previous row. At the end, attach the largest parts. It remains to carefully spread the petals and give the flower the desired shape.
After the flower is assembled with your own hands from foil, it is attached to the wire. It can be left in its original form or wrapped in a thin strip of foil, tightly twisting it along the entire length of the stem. Supplement the crafts leaflets. How to do them yourself, we will consider further in the article.
Foil Leaves
Each plant leaf has its own unique shape. To make crafts, consider a living flower more carefully to correctly draw the outline of a sheet on cardboard. Then the template cut with scissors is transferred to a sheet of foil, tracing the cardboard around the perimeter with a toothpick point or a simple pencil. Be careful not to tear the material. Only depressed lines should remain, along which subsequently the leaflets from the foil are cut.
The veins and the central rod are also drawn with a pointed object. The foil bends well, so the leaves can be given absolutely any shape. To attach a sheet of this material to the wire stem, no glue is needed, it is enough to leave a small rectangular segment at the base and simply wind the blank to the rod. In addition, strengthen it with transparent tape for reliable connection and you can put the bouquet in a vase or give it to the hero of the day.
Hyacinths
If you want to make colorful flowers from foil with your own hands (photo below in the article), purchase material in rolls of different colors. To form the stem and leaves, you need green foil, and for the actual flowers, select more diverse shades. The double-sided foil looks beautiful, in which the back is also painted with a silver or golden hue.
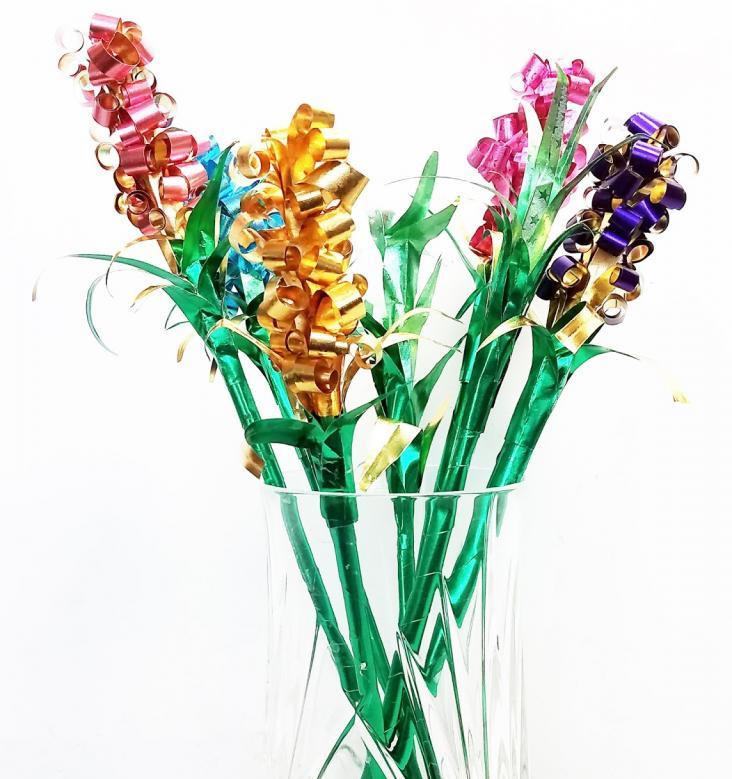
Hyacinth is made by analogy with a paper craft. A long strip of 4-5 cm wide is cut out of the foil of the selected color and one side is cut into thin “noodles”, the opposite side remains intact, since it will be wound onto the stalk. Start work from top to bottom. The end of the foil is attached to the rod with either a glue gun or transparent tape. Then the workpiece is tightly screwed in a spiral, and at the end the lower edge is again fixed in the selected way. Then twist each incised piece of foil inward. It is convenient to use a round pencil or ballpoint pen for this purpose. It is enough to once draw a rounded object over the foil, and the segment will curl.
How to make a stalk
The hyacinth flower is wound on the wire rod to the middle, the rest of the surface of the stick is filled with green foil. The work is carried out already from the bottom up, twisting a thin strip of material in a spiral. The edges are still fixed with tape or hot melt adhesive. Closer to the flowers, attach the elongated thin leaves characteristic of this spring flower. This craft can be done with children of primary school age for a gift to mom on March 8.
Origami flower
If you know how to make flowers using the origami technique, then these can be folded out of dense foil, following the pattern. The folds are performed carefully, without such strong ironing, as in the version with paper crafts.
Try it yourself and make flowers from food foil with your own hands. This is a fascinating and creative process that will captivate you from the first crafts. Have a good start!