DIY handmade bead topiary for the New Year is a beautiful and unique gift for loved ones and friends. It is practical, as it does not fade and does not crumble, remaining a bright and elegant interior decoration. Unlike a living Christmas tree, a bead tree will remain for many years and take up little space, creating a sense of celebration. Such a gift will retain fond memories and will be associated with the person who gave it.
How to choose beads for New Year's topiary
When choosing material for wood, it is not necessary to focus on expensive brands. Any material will do. It may well be uneven and slightly different in shades, because real living Christmas trees do not look monotonous, and their branches are the same. For topiary from beads, the remains of other crafts are also suitable as a material. By mixing them with each other, you can get smooth transitions, which will allow the branches to look more natural.
How to choose a topiary shape
At the first stage of work, you need to decide exactly what the New Year tree will be. Typically, the topiary is made in the form of a Christmas tree or ball. Twigs are made using the coral technique of needles or loops. You can combine different options or come up with your own. New Year's topiary is also an ordinary tree of white beads. If you decorate it with large beads resembling balls or berries, you get an unusual winter composition.
Gift Ideas
Bead wood can be complemented with various decorative elements. Before making a bead topiary, you should consider the composition of the future crafts. You can choose the form, focusing on your taste or the wishes of the person to whom the gift is intended. Round topiaries are usually quite large and take up a lot of space, much more than miniature trees. To assemble them, you will need a large number of branches to make the crown look quite lush and dense. The basis can be a ball of foam or papier-mâché. For weaving, you will need a wire 0.3 mm thick, and for the trunk - 1.5 mm. You can decorate the finished tree with a floral ribbon in green or brown. Such a topiary is often placed on the site, surrounded by additional accessories, for example, miniature wire benches or snow-covered lanterns.
Materials needed to create a topiary
Round-shaped trees are most often placed in ordinary flower pots or cups. To fix them, you will need the container itself and a gypsum solution. The trunk of such a topiary can be made from ordinary barbecue sticks or sushi. Then it will turn out direct and equal. For a more natural form, a real dry branch is suitable. A thick wire will help to make a curved trunk. But its thickness must be sufficient to withstand a heavy crown. To work with the wire, you will need wire cutters and pliers. The crown can be additionally decorated with beads, rhinestones or other decorative elements.
For the New Year's topiary in the form of a tree, you will need a platform, which can also be done using gypsum mixture. But sometimes a small stand is enough. The main thing is that the tree is stable. To create a bead topiary with a height of about 13 cm, the mixture will need about 60 grams, and about 30 meters of wire. It is not necessary to use green color for Christmas trees, blue or white is suitable. The diameter of the wire is also not very important. The main thing is that it can be passed through the bead twice. In order to make fir branches elastic, you also need a steel wire about three meters long, but you can do without it.
How to make a blank for a round topiary yourself
Foam balls and blanks that are used to create trees come in different sizes. But their cost may seem too high and limit the diversity of the composition. There is a way to replace an expensive element and create a topiary of beads of the desired diameter. To do this, you will need soft napkins or paper towels, PVA glue diluted with water in a ratio of 1: 1. You also need a balloon and a regular dishwashing sponge. We will create the basis for the topiary using the papier-mâché technique:
- Inflate the ball to the diameter of the workpiece and cover the surface with glue.
- Glue the first layer of napkins, giving the workpiece a round shape.
- Without waiting for it to dry completely, re-apply glue and attach paper. The more layers, the stronger the workpiece will be.
- Dry, burst the ball with a needle and remove it by pulling on the peeking part.
- Use the result of work. The remaining hole can be used to insert the bead tree trunk.
Another way is to make a workpiece from polyurethane foam. To do this, squeeze it into a plastic bag and quickly give a spherical shape. When the mass has hardened, remove the bag and cut off the excess with a sharp knife. In this way, you can create blanks of various shapes.
Creating a bead topiary: master class
After you have decided on the form, proceed to create twigs. Spherical bead topiary and wood product are assembled from the same blanks. But in the case of a Christmas tree, their size will be different, since the lower branches in nature are longer than the upper ones. Therefore, first, short blanks are attached to the trunk of a winter topiary from beads, and then their size gradually increases. For a round topiary, you need to make many identical branches to get an even shape.
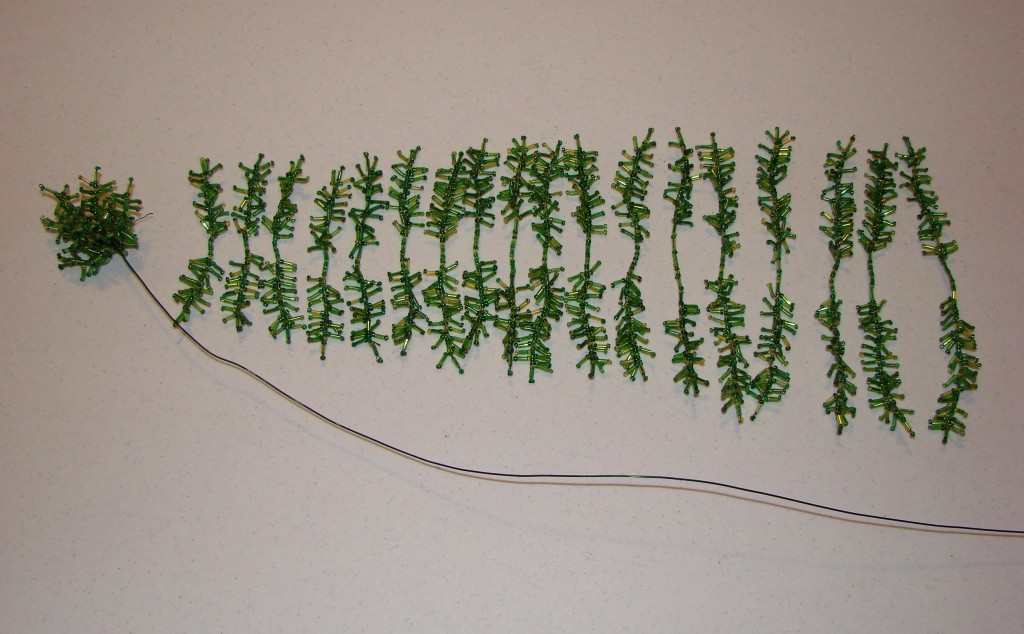
Let's start the master class with the basics of weaving a winter tree. We prepare all the necessary materials, and then we take the wire and cut it into pieces from 40 to 70 cm long. We will create spruce branches with needle weaving. A 40 cm long wire blank will produce approximately 17 needles 6 beads high. For a Christmas tree 13 cm high, you will need 5 pieces of 40 cm, 9 pieces of 50 and 60 cm and 11 pieces of 70 cm.
All branches will weave in the same way:
- On the wire, dial 6 beads.
- Pass one and pass the wire in the opposite direction through the remaining 5 balls. Do not leave a long edge, it is not needed. Tighten the resulting needle.
- Keep weaving. Again, collect 6 beads and repeat all the steps, skipping the last one.
- Connect the resulting needle with the adjacent one, pressing them to each other.
- In the same way weave all the branches.
Wood assembly
When the workpieces are braided, grab the elastic wire. It should hold its shape well, but do not use too thick. A diameter of 0.5 mm is enough. The wire with the right properties is sold in beekeeper shops and in veterinary pharmacies. Cut it into 30 pieces about 10 cm long. At the end of each piece, use a pair of pliers to make a loop. It must remain open, do not bend the wire to the end. The bead tree consists of four tiers. On the first is the top and four branches. At the second and third level - 8 branches, and at the last - 9 pcs.
Now we will figure out how to assemble a fir branch. To do this, take the base of thick wire and wind the blanks around it one after another, starting to fix the free part from below. Then, reaching the top, we collect the needles, moving in a spiral down. Then the resulting branch needs to be pulled up to form the top of the tree, and the tip should be fixed. Pull the wire base down so that the loop catches on to the workpiece. After that, the branch will be tightly fixed, will not move anywhere and will not spin. We finally shape the needles by straightening or pulling them to create a denser tree. After all the branches are ready, we begin to collect them on a thick base with a thin wire. We mount the finished bead tree on a gypsum base or place it in a prepared pot.
Round Topiary Decoration
A spherical crown is likewise created. Only all branches will be the same size. Between them, you can add Christmas tree decorations or other bead products, such as flowers. The wire usually pierces the base well and fastens inside the workpiece. Sometimes the composition is additionally fixed with glue from a hot gun. But he can leave marks, therefore it is necessary to work accurately. The trunk of a spherical New Year's topiary is decorated with a floral ribbon, and in the pot is also fixed with a plaster mixture. On top you can put some kind of decoration or cotton wool imitating snow. So the composition will look complete.