Adobe Photoshop has all kinds of functions for comfortable working with images. In this graphical environment, you can create objects, edit images, and retouch photos. And this is a very small part of the functionality that this application offers. Many users spend their time in the program, as well as completely new participants trying to achieve such heights that were conquered by professionals with experience.
An important component of this program is the active work with layers. Some are aware of the duplication method, but not everyone knows how to apply it. Therefore, novice users think about how to duplicate a layer in Photoshop CS6. This action will definitely be needed for those who create a large-scale project and use a large number of documents. Also, sometimes there is a natural need to transfer layers from one image to another.
Work with layers
Before duplicating a layer in Photoshop, we’ll deal with the concept of a layer. Layers are an indispensable part in any image editing process. It should be noted that without the possibility of creating them, users experienced tremendous inconvenience, since working on one canvas seems difficult and uncomfortable. Fortunately, this editor has everything you need for users. A layer is such a local space in which you can apply individual settings, edit independently of other layers.
The vast majority of users split their image into many layers, so that it is easier to work and correct defects if they suddenly appear. On each layer, you can impose a special mask, many filters and other blending options.
How to duplicate a layer in Photoshop
Now we can go directly to the duplication of layers. They are located in a special window, which is located in the lower right corner of the program. There are also tabs “Channels” and “Contours”, in addition to the main tab “Layers”. In this section, you can observe all the layers that are included in the image. The program has the ability to duplicate a layer in Photoshop with hot keys.
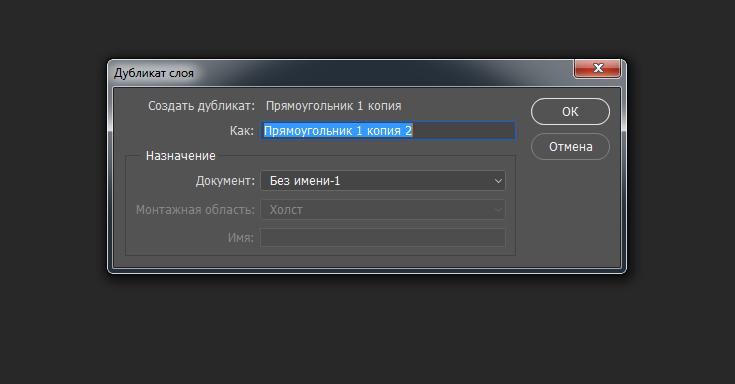
- First of all, of course, you need to run the program Adobe Photoshop and open the desired document with the image.
- Go to the layers section and select the one you want for duplication.
- Right-click on the name of the layer and select "Create a duplicate layer" from the dialog box that opens.
- A window will appear in which you need to select the name of the future layer, as well as with a document for duplication. By default, the original name is placed with the signature "copy". If you have an artboard connected, you can change the Canvas value to another and also specify a name. The operation can be carried out an infinite number of times.
Duplicate Layer Features
You can simplify various types of tasks if you duplicate layers in Photoshop several times. For example, using duplicate images, you can create a glitch effect, while leaving on each layer one value of the color channel. Various operations can be performed on the created copy to change the visualization - usually after that the layers are compared and the editorial tools are evaluated. You can also apply a mask to the duplicated layer.
To simplify the process, there is a special combination of buttons that help duplicate the layer in Photoshop with a key.
- Using the combination Ctrl + LMB, the user must first select the "Move" tool and select the desired layer.
- After pressing the hotkey, you can immediately move the layer to a new location.
Layer transfer
We have already touched on this topic in the process of creating duplicates. Recall, in order to transfer a layer using the duplication function, you just need to select another document in the last window. After that, the layer is transferred to the same place where it was located in the previous image. This is often used by those who design the program or application, where you want to create many different tab screens.
Adobe Photoshop supports the transfer of selected layers and through the usual drag and drop from one document to another. To do this, just select the layers and hold down the left mouse button to transfer another image to the tab.
Reorder layers
The order of the layers is determined automatically, that is, each new layer is created on top of the previous one. This is not always convenient, so there is a certain need for manual rearrangement of elements.
This is as simple as possible - select the desired layer and drag it to the desired position between other elements with the left mouse button.
Other layer operations
Most of the work is associated with layers, so it makes sense to briefly describe their functions and settings.
- Overlay options. A large customization in which you can edit parameters such as transparency, shadows, paths, color channels and much more. Allows you to impose various effects and controls the graphic component of the layer. This feature is really useful, as it provides additional flexibility to the layers.
- Convert to smart object. Use this setting in order to seamlessly change the scale of the image without a strong loss of quality.
- Rasterize the layer. Turns a smart object and shape layer into a regular one. For rasterized elements, settings are available that could not be applied to layers of a different format.
- Combine Visible. Allows you to quickly merge all layers that were not marked as invisible.