This article will describe in detail the configuration of Contact Form 7 - a plugin for such a popular platform for creating and promoting sites on the Global Web as WordPress. This software tool allows you to create and configure feedback forms.
A bit about WordPress
One of the most popular and most common tools for developing and filling information resources is WordPress. Initially, this software product was aimed at creating simple blogs. But then, specialized specialists supplemented its functionality, which made it possible to create other Internet resources using this content management system.
Strengths and weaknesses of this platform for the creation and promotion of sites
The advantages of this software platform are:
Simplicity and openness of source codes.
An impressive amount of background information.
The ability to develop any thematic resource of any complexity on the Internet in the shortest possible time.
High performance without additional software add-ons (plugins).
But the disadvantages in this case are as follows:
Sites created on the basis of WordPress will not cope with the heavy load.
There is a decrease in the speed of the Internet resource when installing additional mini-programs or, as they are also called, plug-ins.
What are plugins and why do websites based on the WordPress platform need them
The basic functionality of such a content management system as WordPress is very modest. It is only enough to develop the most simple blogs and sites. In order to somehow improve the situation with the functionality of the software platform and add flexibility to it, developers have to reinstall special mini-programs, which are called plug-ins in professional jargon. One of these is Contact Form 7. Configuring the plugin allows you to create a feedback form with an advanced level of functionality on a specific page of the content management system.
Specialization "Contact Form 7"
As noted earlier, creating feedback between a visitor and an administrator of an Internet resource based on the WordPress platform is the main task of Contact Form 7. Setting up mail, editing a template, sending various files is not a complete list of the possibilities that this provides mini program. At the same time, the load on the hardware resources of the site will be relatively small and its presence will not lead to a significant decrease in the performance of the site or blog.
Plugin installation procedure
There are three ways to install plugins on the WordPress platform:
By downloading the ZIP archive from the global web and "uploading" it to the corresponding directory of the Internet resource.
Using various kinds of FTP clients.
Download miniprograms using the administrative control panel of a site, blog or portal.
The safest of the three options for installing plugins is the last. In this case, the program code is downloaded from the official site and it certainly does not contain any kind of malicious, dangerous fragments. The very procedure for installing the plugin in this case is as follows:
We go to the administrative panel of WordPress.
Then you need to move to the "Plugins" section.
In the window that opens, select the "Add New" item.
In the search bar we enter the name of the plugin - Contact Form 7 - and after that we hover over the "Search" button and make a single click. After that, the search operation for the necessary software will begin.
At the end of the list of plugins found. In this list we find the one that we need and click on the button with the inscription "Install", which is located opposite it.
After that, the content management system will automatically download and install this plugin.
The next step is to activate the installed software. To do this, go to the "Plugins" tab and find Contact Form7 in the list. Next to it is the inscription: “Activate”, and click on it once with the mouse.
We update the administrative panel of the content management system and find Contact Form7 among its items. This is the condition for the successful installation of this popular and functional plugin.

Algorithm for setting up “Contact Form 7”
Contact Form 7 setup consists of the following items:
Creating a new form or editing the old one that was created when installing the plugin. As experience shows, in most cases it is better to use the option to create a new form.
At the next stage, select the language of the form and set its name.
Then, if necessary, reconfigure its template.
We save the changes.
Create a new page with the code you received earlier.
Then you need to publish a new page.
At the final stage, you need to go to the site and check the correct operation of the created interface element of the Internet resource.
Create a new form
Immediately after activation, this plugin creates a default form for asking questions from visitors to the site or blog. It, of course, can be edited and configured properly. But it will be much easier to remove this and create a new one with a full set of all the necessary functionality. To do this, perform the following actions:
We go to the menu of this plugin and select the “Forms” item.
In the window that opens after that, you need to check the box next to the item "Contact form1".
Then, above it, in the "Actions" drop-down list, select the "Delete" item.
In response, a question appears to confirm the actions performed. It is necessary to confirm the removal of the form and click on the "Yes" button.
On the next, select the menu item: "Create New" in the administrative panel "WordPress" "Contact Form7".
In the window that opens, in the drop-down list, select the interface language of the future form - “Russian”. After we press the "Create" button.
After that, the initial code of the new feedback form for WordPress will be generated by default. After that, you will need to perform operations such as setting up Contact Form 7.
Set the name of the form
After completing all the above steps, a window for entering the name of the new form in Contact Form 7 Style will appear. Customization of this interface element exactly begins with this simple operation on the one hand. But the name of the form is best given based on search engine optimization. Therefore, the most optimal in this case will be, for example, “Feedback Form” or “Ask a question to the site administrator”. Once we have decided on the name of this interface element, we type it in the corresponding field of the request window.
Editing the template “Contact Form 7”
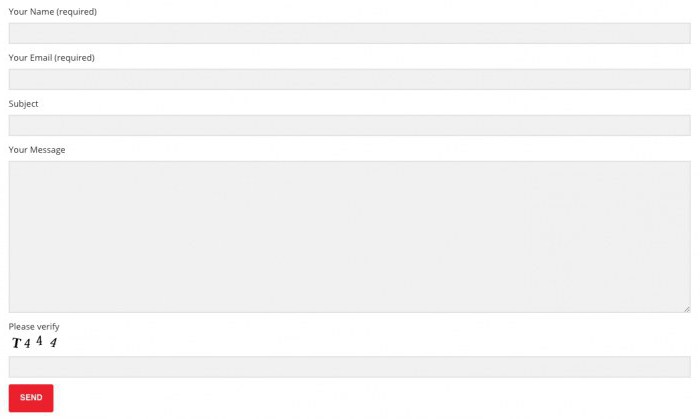
In the same window with the name of the created form there are 4 tabs. The first of them is the “Template”. By default, only 5 elements are formed here:
The place to dial the name of the visitor to the Internet resource.
The field for dialing the email address of the visitor who asked the question.
Another field allows you to type the subject of the question.
Next, a large text field is intended to directly type the message itself.
The last form element by default is a button labeled Submit.
If necessary, the text in this field can be edited and other interface elements added. To do this, just select the code of any text element (for example, the part of the code where the subject of the message is indicated and copy it using the context menu to the same field in another place. On the right there is a drop-down list of parameters (it will be described in detail in the next paragraph), in which we select the element of interest to us. After that, the necessary code appears next to the drop-down list. Next, copy this code and paste in place of the message subject code. We choose the element name as we like.
Setting the length of fields and not only
In the same place, you can change the length of the input field in Contact Form 7. The width of any text field can be adjusted as follows:
For example, you need to increase to 55 the number of characters in the name of a visitor to an Internet resource. There are 40 by default.
To do this, add the numbers 60/55 in the [text * your-name] code at the end. The result will be the code [text * your-name 60/55]. After saving the changes, the length of this field will be 60, and the maximum number of characters that can be typed in it is 55.
Similarly, you can resize the message text box. Only in this case is it necessary to change the code of this element as follows [textarea your-message 40 x 30]. In this case, 40 is the number of letters in one line, and 30 is the total number of terms in this interface element in Contact Form 7. The appearance of the form itself is adjusted precisely by selecting the parameter values for each individual element. Therefore, it is recommended that the code of each element indicate the specific values of each parameter given in this section.
Other form tabs
As noted, the first tab is called “Form Template”. The next one in this window is “Letter”. It sets the parameters of the place where mail will be sent from this Internet resource. On the “Notification” tab, the text of the message is generated, which will be displayed if the letter is sent successfully. There is also the opportunity to prepare a message in case you can’t contact the site administrator using the means. The last tab in Contact Form 7 is Advanced Settings. It contains those parameters that are used in practice very, very rarely. For example, you can use it to set up tracking of user-entered text using Yandex metrics.
Fields that can be added using this plugin to this form
Setting up Contact Form 7 for Wordpress allows you to add such interface elements to the feedback form:
The test field is a universal interface element into which you can enter any set of characters.
E-Mail - the place to enter the name of the electronic mailbox.
URL - a field for typing the address of an Internet page.
Phone Number - allows you to enter a phone number in international format.
The "Number (spinbox)" element allows you to create an input field of any integer value (for example, the age of the visitor).
The “Number (Slider)” element adds a slider to the form, with which you can select a numerical value from a given range.
The “Date” item creates a special input field where you can specify the required date. When this interface element is activated, a calendar appears at the bottom, in which you can immediately select the required date.
In turn, the “Text box” drop-down menu item is intended for typing the text part of the email.
The next item - “Drop-down menu” - allows you to select the required parameter from a fixed list.
But “CheckBoxes” is designed to select one or more values from a given list.
The Radio Buttons interface element is almost identical to the previous one. The only difference is that in this case you can choose only one correct option, while “CheckBoxes” can have several correct values.
The “Acceptance” item allows you to add just one flag to the form you are creating. As a rule, it is used to familiarize yourself with any conditions and without accepting them in the future it will not be possible to send an email.
The menu item allows you to create a special section in the interface that will protect your mailbox from spam. In this case, before sending it will be necessary to give the correct answer to the question.
The second protection option is CAPTCHA. When you select it on the form, a separate section will be added in which a picture with symbols and an additional field for entering them will be displayed.
The next item is “File Submission”. Allows you to add a file with various explanations and comments to the resource text for the resource administrator.
The last item - “Submit Button” - allows you to add the corresponding interface element.
Save changes
After the necessary values are set, and the form must be properly configured, you need to save all this. To do this, in the edit window of the plugin we rise to its upper part. There should be a Save button. We point the manipulator pointer at it and make a single click on it. In response, the form code appears, which we select using the same mouse pointer and copy it. Next, we move to the “Pages” item in the administrative panel of the content management system. Then we create a new page with the necessary name (for example, “feedback”, “Contacts” or “Ask a question to the resource administrator”). Then we translate the dial cursor into the input field of its code. In this case, it is necessary to switch the code dialing mode to “Text” on the parameter bar. After that, insert the previously received form code. Next, on the right side of the interface, we find the “Publish” button and move the mouse over it. At the next stage, we make a single left-click on this element of the interface of the content management system.
Check the result
After performing the previously specified manipulations, a new page should be added to the interface of the Internet resource, on which the elements specified in Contact Form 7 will be displayed. Setting up the interface, in principle, is done. It is only necessary to verify the correct software settings. To do this, go to the main page of a site, blog or portal. Then in the list of pages we find the one on which the feedback form was posted. We go to it, enter the correct parameters into all the fields at once and send a test letter to our mail. In response, an informational message should appear on the successful completion of this operation. Then, with empty fields, we try to send another letter. After that, a message should appear stating that you must set all the marked form parameters. If in both cases the results indicated above were obtained, then the created feedback form functions correctly.
Pros and cons of the plugin. Alternatives
An excellent solution for a novice developer to create a feedback form is the Contact Form 7 mini-program. Setting up sending mail, creating interface elements and other important interface elements in this case is mostly automated and requires minimal user knowledge. Therefore, for a simple entry-level Internet resource and with a novice administrator, this is a great solution. But after all, any plug-in is an additional load on the resources of the web page, which reduces performance. As a result, more advanced users recommend avoiding such an easy way to create a feedback form. It can also be independently created using HTML, CSS and JS, albeit with a lower level of functionality. At the same time, the need for computing resources of the site will decrease and the level of performance will increase significantly.
Summary
This article describes the configuration of Contact Form 7. This plugin really has a high level of functionality, with which you can create any feedback form. On the other hand, the use of an additional plugin as part of a content management system increases the level of load on the site’s hardware. Therefore, it is recommended that novice site administrators based on this content management system use this plugin for such purposes. Well, more advanced users can do without Contact Form 7. Configuring the plug-in in this case is definitely not needed.