People who have just installed a brand new operating system on their computer or laptop often encounter a message on the Internet like “Java needs to be installed for proper operation”. Inexperienced users this message can terrify and cause confusion. But do not panic, you have come to the right place. This article will examine in detail the question of why the presented software is necessary, and what to do if Java is not installed. Detailed installation instructions for both Windows users and Linux “users” of Ubuntu will also be posted.
What is Java?
The message about the need to install software is most often encountered by people who have recently installed a new operating system. It appears on the Internet when trying to open a page or launch an application. From this we can conclude that it is necessary to run programs written in this language. Yes! Java is a programming language, and it is everywhere. Nowadays, almost all sites use this language in their code, and by the way, it was created back in 1995 and there are still no analogues of its level. All because it is constantly updated and improved. Because of which, in turn, it is the best in terms of information processing speed, it has incredibly reliable protection and is very reliable.
This language is used not only on personal computers, it is ubiquitous. They found application for it in game consoles and in supercomputers. Therefore, its need becomes clear.
So, with the concept we figured out, now we need to move on to the main question - what to do if Java is not installed?
Java is not installed on Windows
If you do not have Java software on Windows, then you urgently need to install it. You can do this by visiting the official website of the application. But it happens that you downloaded the program, and for some reason it refuses to be installed on your PC. Now we will analyze the reasons and tell you what to do if Java is not installed on Windows 7.
So, consider a common problem. The fact is that Java is downloaded from the official site as a web installer. That is, after this download and opening the downloaded file, the launcher through the connection to the Internet will load the necessary files and place them in the library , after which Java will work. But this is optimistic, it happens that the download and installation of the program is blocked by antiviruses, believing that the executed action threatens the system. There are two ways out of this situation. The first involves disabling all antiviruses. The second is more trivial, you can simply download the offline installer on the site. Its size is about 50 MB.
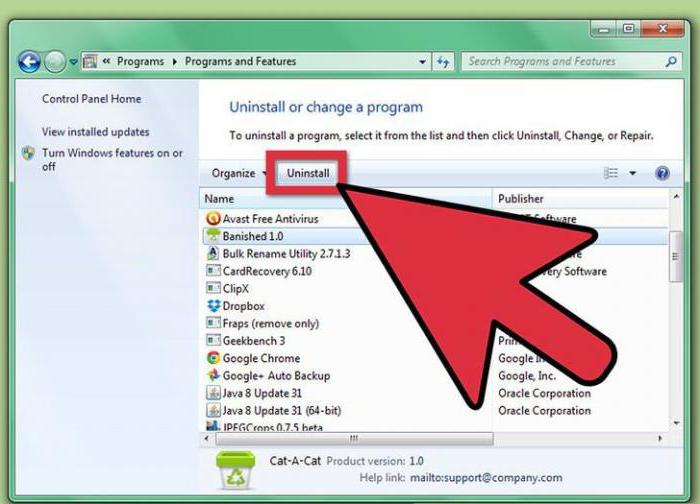
It may also be that the previous version interferes with the installation of a new version of Java. To solve this problem, go to “Programs and Features” through the control panel and find Java in the list and delete it, and then repeat the installation.
In rare cases, viruses can do much harm, so download an antivirus if you don’t have one and check for their presence.
Errors in the registry can also block the installation of Java, so download Cclaner or any similar program and clean the registry.
If no method has helped, visit the Java folder, which is located along the path of the C - ProgrammFiles - Java drive, and delete all the files cleanly.
And in case of emergency, go to Windows Update and update your operating system. It helps.
Now you know what to do on Windows if Java is not installed. As you can see, there are a lot of options.
How to install Java on Ubuntu?
Now we’ll talk about how Java is installed on the Ubuntu operating system. Various methods will be considered. Linux users are well aware that almost all distributions can install various programs in several ways. So that everyone finds his own, we will light them all.
Manual Java Installation
The first method presented is suitable for users of GNU-based distributions.
Visit the Java site and click Download there. You will be taken to the program download page.
In the list, select the version you need, in this case it is a file with the extension “.gz”.
Click on the appropriate link to start the download.
After it ends, go to the folder where the downloaded file is.
Unzip the contents of the package to a convenient place for you. The best option is to install in the / usr / java folder. After the manipulations on the specified path, a folder of the type “jdk.1.8.0_111” will appear - this is Java.
The program is installed, it remains to run it. To do this, go to the folder above and browse to “bin”, where the executable file lies.
If Java is not installed in this way, then the second will be presented.
Installation using the terminal and package manager
As mentioned above, installing Java on Ubuntu can be done in several ways. We present to your attention the second installation method, through the terminal.
Our main task is to install Java. Ubuntu is friendly to this application and places it in its repositories, so you can easily use the terminal.
Open the terminal by clicking on the corresponding icon or using the keyboard shortcut Ctrl + Alt + T.
We enter the first line: sudo apt-get install openjdk-7-jdk openjdk-7-jre icedtea-7-plugin.
A wall of text will appear in front of you, do not pay attention, most importantly, when a question appears, answer yes by entering “Y” or “D” depending on the system.
The program is installed.
As you can see, everything is done faster through the terminal, and those who do not like to use it can use the Synaptic package manager.
Open the package manager.
In the search bar, enter “openjdk-7-jdk”.
Check the box next to the required file.
Click the button in the top panel to start the installation.
In the process, they may ask you for permission; always answer them positively.