What UltraISO is all about, no need to say, every user is well acquainted with this software. She received such popularity for a reason. This program contains a bunch of tools for working with removable media, virtual drives and image files. However, its interface is not very clear for a beginner and it’s rather difficult to understand the full range of possibilities. Unfortunately, it will not work to tell about everything at once in one article, since there is a lot of information, however, this article will tell you how to burn an image to disk via UltraISO.
Burning an image to a CD / DVD
So, for starters, let's figure out how to burn an image to disk via UltraISO. To do this, you will need:
Insert the disk into the computer’s drive and open the program.
Add image. To do this, click "File" and select "Open" from the menu. In the explorer that appears, pave the way for the image.
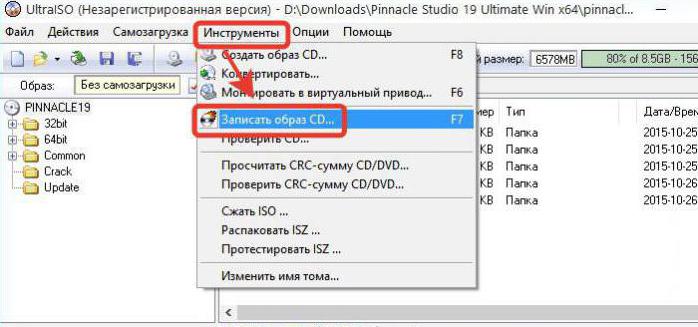
Click the "Tools" button located above the toolbar.
In the menu, click on "Burn CD Image".
Set recording options. Specify the drive where the disc is inserted. If you have only one, then this item does not need to be performed. Set the recording speed. It is recommended that you select the maximum to speed up the recording process. Do not change the recording method. In the line "Image File" should be laid the path to the previously selected file, if it does not match, then change.
If the disc is RW, that is, rewritable, then click the "Erase" button.
Click the "Record" button.
After all the actions, recording starts, you can understand this by the sound of the drive. So you learned how to burn an image to disk through UltraISO. However, as mentioned above, this program has many functions, and the one presented above is just one of them. Next, we will tell you how to write an image to a USB flash drive and how to create a bootable USB flash drive or disk, so we advise you to read the article to the end to find out as many functions of the program as possible.
Flash Recording
Now let's figure out how to write an image to disk via UltraISO on a USB flash drive. This is done as follows:
Open the program with administrator rights.
Click the "File" button and select "Open."
In the explorer window, pave the path to the image file and click on "Open."
Now, above the toolbar, click "Boot" and select "Burn Hard Disk Image" from the menu.
In the window that appears, you need to configure in accordance with the image, which will be attached below this list.
Then you can click the "Record" button. If the flash drive is not formatted, it must be formatted by clicking on the "Yes" button in the appropriate window.
Then the recording starts. The process may be delayed, but at this time you can use the rest of the system components. As a result of the recording, the system will emit a characteristic sound.
Creating a bootable flash drive
Above, we described how to write an image to disk via UltraISO and an image to a USB flash drive, but most often the program is used to write a boot image of operating systems. The program does an excellent job of this. Now we will analyze in detail the instructions on how to burn a Windows 7 image to disk via UltraISO. By the way, the instruction will be common for other versions of Windows, and not just for the seventh.
So, before you burn an image to disk via UltraISO with autorun, you need to:
Run the program by first inserting a USB flash drive or disk into the computer.
Click the "File" button and select "Open" in the menu.
In the explorer window that appears, you need to open the folder in which the OS image is located, what you prepared, select it and click "Open".
Above the toolbar, click the "Self-loading" button.
In the menu, click on the line "Burn Hard Disk Image".
Now format the USB flash drive or erase the disk and click on the "Burn" button, which is next to the "Format".
As a result, you must wait until the recording ends. This will be indicated by the line in the process log "Recording is completed." After that, you can already get the drive out of the computer and use it for your own purposes.
Conclusion
As you can see, to record an image to a disk or flash drive using UltraISO, you do not need much experience. Following the instructions attached above, this process can be completed in just a few minutes. It is significant that for each method the instruction is almost the same, so the likelihood of getting confused is minimized.